bd43's 07 Headlight Mod Part 2

Chaosratt

Senior Member
Joined
Jul 23, 2007
Messages
292
Reaction score
4
Points
0
Location
Tampa, FL
www.computing.zone
Heres a video of the light when done properly:
My mod wasnt as clean as the OP, but it does the same job in the end (I taped into the green wire just below the handlebar, which is the more common and quicker option, but is not as clean/stock looking).


[nomedia]http://www.youtube.com/watch?v=_CiN29m8pu0[/nomedia]
 

doc_simple

Meat Popsickle
Joined
Jun 19, 2007
Messages
368
Reaction score
2
Points
0
Location
PDX, OR
Visit site
Holy Crap nice right up! I have to admit I took the easy way out and used a clip on wire jumper from radio shack. Took 15 minutes and cost about 2 dollars :)
 

bd43

Moderator
Staff member
Elite Member
Joined
Aug 24, 2007
Messages
889
Reaction score
79
Points
28
Location
Alberta, Canada (GMT-7)
Visit site
Hey everyone. I have some people interested in the harness I made in part one of this mod recently. Since I sold off all the ones I made in the first batch, I spent the weekend and then some making a few more. If you're interested in one, PM me and I can get you a price depending on your mailing location. ;) I think by the time these ones are gone, it'll be riding season and that'll be it for then. I may or may not continue making these this fall/winter as it's a lot of work and was fun for a while but not so much now. :(
 

poorwboy

New Member
Joined
Jun 25, 2007
Messages
712
Reaction score
10
Points
0
Location
Redlands ca
Visit site
Nice write up and mod bd43. I might have to comb through the r1's manual and see if I can find a empty slot.:thumbup:
 

nimzotech

1st Photo Contest Winner
Elite Member
Joined
Jan 1, 2008
Messages
1,431
Reaction score
23
Points
0
Location
Los Angeles
Visit site
package arrived from Canada!

I just received the bikerdude's harness in the mail today. Nice workmanship! I plan on installing it this Friday when I have more time. Being kind of a simpleton when it comes to mechanical tools, would you guys please list ALL the necessary tools needed to install the harness. I remember someone mentioning not having a 10mm wrench. If you guys can list all the proper tools and their sizes, I would greatly appreciate it. I also noticed the bungee used to hold the tank cover up, where can i get a bungee like that?
 
Last edited:

Fred

M em b er e d
Joined
Nov 6, 2007
Messages
1,790
Reaction score
63
Points
0
Location
Austin, TX
www.robietech.com
Towel to cover the paint on the tank.
5mm and 4mm allen sockets.
10mm socket
Extension for same.
Rachet wrench
bungie cords, rope or tie down to hold the tank up.
Flashlight
#2 phillips head screwdriver.
needlenose pliars

*shrug* that's about it.
 
Last edited:

jeff in ohio

Junior Member
Joined
May 21, 2007
Messages
76
Reaction score
2
Points
0
Visit site
Harley switched it's connectors in 1997 to AMP style connectors that look damn near the same if my memory serves me correct. The good part is, Harley dealers sell the pins and bodies. I'll drop over to a dealer soon to check out the crimp on pins to see if they look the same. I know 1997 Sportsters were 1/2 Deusch 1/2 AMP conenctors beasue teh AMP ones were a royal hassle to take apart where as teh Deusch ones were easy to make up new. 1998 Sportster models I think are all AMP....
 

nimzotech

1st Photo Contest Winner
Elite Member
Joined
Jan 1, 2008
Messages
1,431
Reaction score
23
Points
0
Location
Los Angeles
Visit site
Towel to cover the paint on the tank.
5mm and 4mm allen sockets.
10mm socket
Extension for same.
Rachet wrench
bungie cords, rope or tie down to hold the tank up.
Flashlight
#2 phillips head screwdriver.
needlenose pliars

*shrug* that's about it.

Thank You ;-):thumbup:
 

nimzotech

1st Photo Contest Winner
Elite Member
Joined
Jan 1, 2008
Messages
1,431
Reaction score
23
Points
0
Location
Los Angeles
Visit site
I was stuck at the same spot as you/
Take a look at the service manual for air box removal. Besides all the screws you will have to disconnect the 4 hoses (3 on the back and 1 on the right which is a little hard to get to). You will also have to disconnect a green regulator on the back (right next to the hoses). Then I just lifted the box out - it will pop. In my case I couln't get to the hose on the right so I lifted the box out carefully without jerking it too much and then disconnected the hose on the side. When mounting it back, I connected that hose first and then wriggled the box in place. Just make sure it sits in nice and tight on the air pipes below.
There are screws on the bottom which are hard to get to taht tighten a ring around the 4 pipes underneath. I didnt see them until I poped the box out. The service manual didnt say anything about it, May be if you can get to them and loosen them a turn or so, it will be easier to pop the air box out - that's just a guess. Doesn't seem that it is required as service manual doesnt say anything about them.

What is the best way to remove the hoses? I do not want to make them too loose so that when i plug them back in they will slip out. My mechanic skills are not up to par.
 

Fred

M em b er e d
Joined
Nov 6, 2007
Messages
1,790
Reaction score
63
Points
0
Location
Austin, TX
www.robietech.com
What is the best way to remove the hoses? I do not want to make them too loose so that when i plug them back in they will slip out. My mechanic skills are not up to par.

Use the needle nose pliers to grab the tabs on the hose clamps and squeeze them together. This will loosen the hose clamp and you can then slide it down the hose a bit. Then the rubber hose will slide right off of the nipple

Do the same thing backwards to reassemble. I found that it worked best to work the hoses partway on, then work the airbox down over the throttle bodies, then move the hoses more, then the airbox again, etc until it all settled into place.

Fred
 

codeblue

winter soldier
Elite Member
Joined
Oct 16, 2007
Messages
1,209
Reaction score
19
Points
38
Location
Edison, NJ
Visit site
What is the best way to remove the hoses? I do not want to make them too loose so that when i plug them back in they will slip out. My mechanic skills are not up to par.

I did not have any problems removing and reconnecting those hoses under the airbox. I used a standard pliers (long or short nose is okay) to release and reconnect those flat metal clips. What surprise me is the hose coming from the right side under and along the airbox. That hose comes out easily by pulling on it, it reattaches by simply pushing the hose back in. Other than that biker_dude's mod is excellent. I wouldn't even call it a mod since you're not really moding/changing anything that really should have been there in the first place. "Thanks alot Mr. Yamaha" :p
 

nimzotech

1st Photo Contest Winner
Elite Member
Joined
Jan 1, 2008
Messages
1,431
Reaction score
23
Points
0
Location
Los Angeles
Visit site
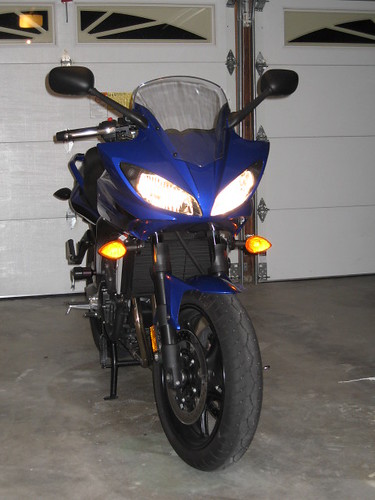
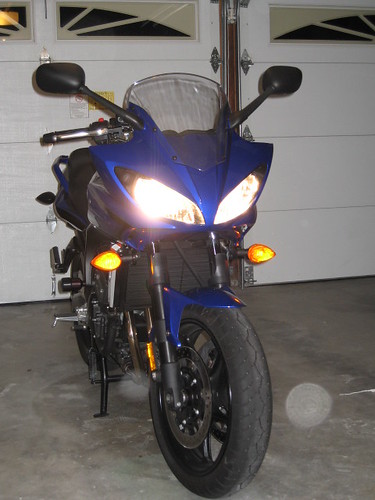
Done at last!
2268659464_5666ee18fd.jpg
2268660502_8885d04025.jpg


It took me several hours to get this right. I needed the right tools and had to figure out all the necessary bolts, screws, and valves to remove from the air filter box/battery. Then it was the wire assemblies to connect; I made the mistake of connecting the harness to the wrong light - Duh, but I quickly corrected the mistake.

I am proud of this project ;-)

Thank you BD!
 
Last edited:

bd43

Moderator
Staff member
Elite Member
Joined
Aug 24, 2007
Messages
889
Reaction score
79
Points
28
Location
Alberta, Canada (GMT-7)
Visit site
hey nimzotech;

I'm glad it worked out for you and everyone else that's tried it. I think it's great because you have to get up close and personal with your bike. What needs to happen in getting this install teaches you to do what you will eventually need to do anyway. That is, get access to the area under the tank, locate the air box because eventually you need to clean or replace the air cleaner, and remove the battery because it won't last forever either.

I personally enjoyed doing this mod to my bike because it did just that. I was so excited with the outcome that I had to share it with everyone. As blueMONday said, Yamaha should have done it anyway.

:rockon:
 

Numpty

Senior Member
Joined
Dec 7, 2007
Messages
797
Reaction score
19
Points
0
Location
Eastbourne UK
Visit site
I did this mod to my bike a few weeks ago in just over an hour thanks to the very clear post and info sent with the wire assembly from biker_dude. It was my first mod and if every mod is detailed in the same way im sure there will be more to come. :wav:

Well done Daryl and many thanks.:thumbup:
 

Nelly

International Liaison
Elite Member
Joined
Jul 8, 2007
Messages
8,945
Reaction score
125
Points
63
Location
Co Offaly, ROI
Visit site
I did this mod to my bike a few weeks ago in just over an hour thanks to the very clear post and info sent with the wire assembly from biker_dude. It was my first mod and if every mod is detailed in the same way im sure there will be more to come. :wav:

Well done Daryl and many thanks.:thumbup:
you can defo do mine mate lol, what year is your bike again?
 
Top