VS-02 install...need a little direction

CCHOUSEKY

Kentucky Wildcat Fanatic
Joined
Feb 21, 2007
Messages
1,445
Reaction score
20
Points
0
Location
Lexington, KY
Visit site
Hey guys. I've recently converted from the Buell setup to the VS-02 setup and I'm wondering if I'm doing something wrong. BTW, I have to give high praise to Vishnu for this kit and his service! While it took forever to get the thing through US Customs (according to DHL it was because the Super Bowl was being played nearby and my kit came through Cincinnati), Vishnu's service both before and after the sale has been stellar! What a great guy!

Anyway, I've pretty much got the headlight mounted and after sourcing some of the "collars" that go behind the side covers for the top hex cap bolt (they forgot to put them in my kit), I seem to be having a little issue.

The inside of each cover is actually touching the upper triple, and this is without the bolts being completely tight. The collars I'm using are 1/2". I tried 1" collars first, but the hex cap bolts weren't long enough to reach the bolt on the inside of the side of the headlight. I'm hoping those of you that have done this install will understand what I'm saying, but here's a couple of pictures to illustrate the issue.

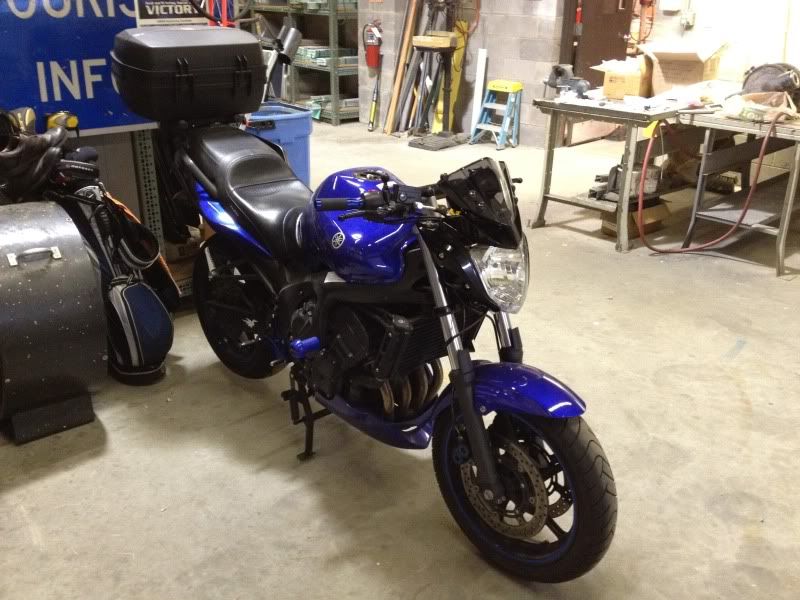
First, what it looks like overall. It looks GREAT! I haven't buttoned things down yet because I'm going to be upgrading the bulb to HID and I'm waiting for that to arrive, so if you see some things hanging out here and there, that's why.

IMG_0418.jpg


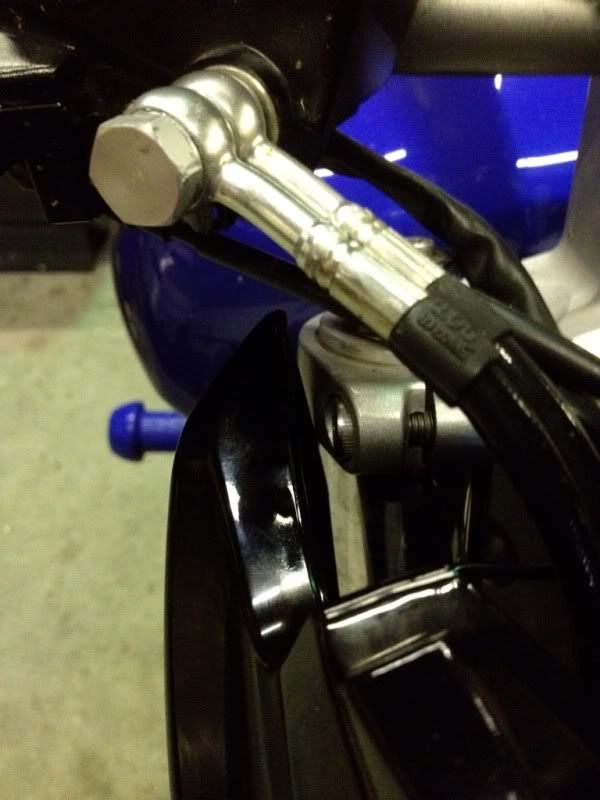
Now, the issue. This is the brake side, looking at it from the front. As you can see, the bottom of the side cover is touching the upper triple. If you've done this conversion, is this what yours looks like?

8e894299.jpg


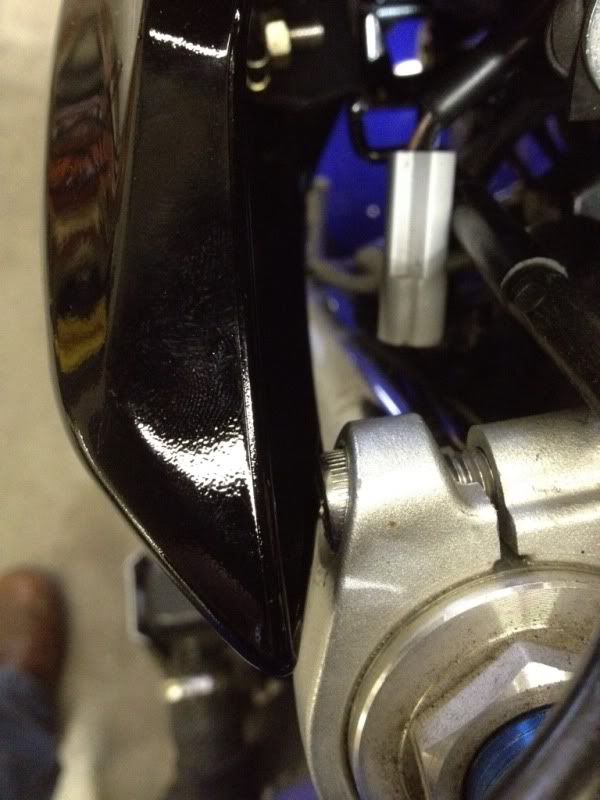
And the clutch side, looking at it from the back (or if you were sitting on the bike). Same thing.

0c072d10.jpg


If it's possible, could someone post pictures like this of your bike so I can see if there's clearance there where there is none on mine?

The only two fixes I can see at this point are this: Either leave it as-is, which makes me uncomfortable, as I'm worried that vibrations from the forks would eventually crack the side covers...or, use the longer 1" collars and source some longer hex cap bolts. I don't think those bolts would be easy to find, though.

Again, any help would be greatly appreciated! :thumbup:
 

Iron Cross

Junior Member
Joined
Jun 23, 2011
Messages
92
Reaction score
1
Points
0
Location
NJ
Visit site
I should be finishing my install on my kit today (got it on wednesday), if I notice anything different when I do it I'll let you know.

Oh and don't wanna thread jack, but I'm confused on the running light wiring. Which wires are the stock ones I'm supposed to cut?
 

CCHOUSEKY

Kentucky Wildcat Fanatic
Joined
Feb 21, 2007
Messages
1,445
Reaction score
20
Points
0
Location
Lexington, KY
Visit site
Thanks! I appreciate the help.

As far as the running light, on the Buell setup I had on there before this one, I connected the running light to the running light wire on one of the turn signals. I don't remember which one it was at this point (I'll have to check that for you), but since the stock turn signals have the running light function, it made sense to do it that way. If someone else has another idea, I'm all ears (I haven't wired up the running light yet either). :thumbup:
 

galen

Junior Member
Joined
May 7, 2010
Messages
265
Reaction score
2
Points
0
Location
Ocracoke,NC USA
Visit site
I had the same problem. After removing the kit 3 times to fix an electrical problem and centering the headlight beam i was able get just enough clearance on each side. If it keeps touching it will cause a buzz at certain rpms. good luck
 

CCHOUSEKY

Kentucky Wildcat Fanatic
Joined
Feb 21, 2007
Messages
1,445
Reaction score
20
Points
0
Location
Lexington, KY
Visit site
I've figured out that I need to use a different size "collar" that goes on the inside of the side cover (that the top bolt goes through). I originally tried a 1" one and it's too long. I then tried a 1/2" one and it's too short, so I'm going to try and find some 3/4" ones and that should do the trick.

Anyone know off hand how long the ones that came with the kit are?

On a side note, the HID kit came in yesterday and this should be fun...lol. I'll be enlisting the help of a guy that's already done this kit on his R6, so I should get it figured out. But man, there are wires going everywhere on this thing! I have no clue what I'm doing, but if I can get it to work, it's gonna be great...lol.
 
Last edited:

degake

Stop flashing!! G$*%£#
Joined
Feb 7, 2011
Messages
604
Reaction score
9
Points
0
Location
Belgium
Visit site
On a side note, the HID kit came in yesterday and this should be fun...lol. I'll be enlisting the help of a guy that's already done this kit on his R6, so I should get it figured out. But man, there are wires going everywhere on this thing! I have no clue what I'm doing, but if I can get it to work, it's gonna be great...lol.

Take a look at my Morimoto Mini D2S retrofit on my naked FZ6... It will give you some ideas to route your wiring and place your ballast/relay ;)
[thread=42492]Morimoto mini D2S retrofit[/thread]

Grtz,


Degake
 

CCHOUSEKY

Kentucky Wildcat Fanatic
Joined
Feb 21, 2007
Messages
1,445
Reaction score
20
Points
0
Location
Lexington, KY
Visit site
I went with a longer collar/bolt. problem solved.

Out of curiosity, where did you find the bolts? Are they the same "button head"-type bolts that came with the kit or just regular hex head bolts? I ask because I thought about that, but I couldn't source the button heads anywhere local (Lowe's, Home Depot, that sort of place). I also haven't been able to find them online. I figured out that if I used the 1" spacers, I'd need a M6X60mm button head screw, but those are apparently hard to come by. For now I'm using a spacer that's just slightly longer than 3/4" and it seems to work ok.

I had to do a little modifying of the attachment point where the stay attaches to the lower triple, too. I noticed when I installed it with the spacers behind it, the headlight was angled off to the right. After pulling everything off, I took a good look at the stay and the bottom bracket is at an angle, not in alignment with everything else. I'm not sure if it was accidentally made this way or if it got bent during shipping, but to resolve the problem, I put a washer behind it to "push it out", so to speak. It seems to have fixed it and now the headlight is pointing straight ahead.

The kit has been a little more work than I thought it would be, as what I really liked about it going in was that it was "plug and play", but overall I still love it. Right now I'm still working on extending the wiring of the HID kit so I can hide most everything under the seat. It's a labor of love, but it's gonna be great once I get it done. :thumbup:
 

degake

Stop flashing!! G$*%£#
Joined
Feb 7, 2011
Messages
604
Reaction score
9
Points
0
Location
Belgium
Visit site
Right now I'm still working on extending the wiring of the HID kit so I can hide most everything under the seat. It's a labor of love, but it's gonna be great once I get it done. :thumbup:

Just get everything under the tank, and move the relay harness into one of the sidepods :thumbup:
It will look much cleaner and you keep the storage compartment under the seat :cheer:

Grtz,


Degake
 

CCHOUSEKY

Kentucky Wildcat Fanatic
Joined
Feb 21, 2007
Messages
1,445
Reaction score
20
Points
0
Location
Lexington, KY
Visit site
Just get everything under the tank, and move the relay harness into one of the sidepods :thumbup:
It will look much cleaner and you keep the storage compartment under the seat :cheer:

Grtz,


Degake

I was actually looking through the post you linked last night and you made a lot of sense. That's going to help immensely (even though our HIDs aren't exactly the same). Thanks for the help! :thumbup:
 

degake

Stop flashing!! G$*%£#
Joined
Feb 7, 2011
Messages
604
Reaction score
9
Points
0
Location
Belgium
Visit site
I was actually looking through the post you linked last night and you made a lot of sense. That's going to help immensely (even though our HIDs aren't exactly the same). Thanks for the help! :thumbup:

You even don't have to use a relay to wire your HID conversion :BLAA:
Cliff helped with a new wiring schematic, where the light will be 100% of the time lit (when switching Hi/Lo, there will be a really small timeframe when there will be no current throught the wiring, which could cause a possible hot restrike everytime when switching Hi/Lo....)
Here is the link to the post with the wiring option :)
Link

Grtz,


Degake
 

CCHOUSEKY

Kentucky Wildcat Fanatic
Joined
Feb 21, 2007
Messages
1,445
Reaction score
20
Points
0
Location
Lexington, KY
Visit site
You even don't have to use a relay to wire your HID conversion :BLAA:
Cliff helped with a new wiring schematic, where the light will be 100% of the time lit (when switching Hi/Lo, there will be a really small timeframe when there will be no current throught the wiring, which could cause a possible hot restrike everytime when switching Hi/Lo....)
Here is the link to the post with the wiring option :)
Link

Grtz,


Degake

I should be good to go as far as powering the HID goes. I got Cliff's relay, but in the end I'm not going to need it for the HID (I would've needed it to upgrade the stock VS-02 bulb to 55 watt). But the HID kit I've got already switches the low beam off when the high beam is turned on, so no worries about premature bulb burnout or overheating the housing. Plus, the HID I'm using is 35 watt, so it's really just plug and play. :thumbup:

What I really meant by my comment earlier was that your post about how to run the wires really helped. I only need to extend two wires and I can get everything to where I want it to go. While I haven't gotten that deep into it yet, I think you're right that I can put most of it under the tank (around or above the battery) and save my space under the seat. But the longer wiring should give me more options, such as tucking the ballast down inside the front of the frame (next to the battery).

All the wiring is overwhelming at first, but once you realize you really only have to connect two wires, your mind starts to calm. It's just a matter of routing everything so there are no kinks and making sure you've left enough wire outside the frame so you can turn the forks from lock to lock.

Whew...after that, I've gotta wire up my new Hyperlites that are replacing the old ones on the back (one of the old ones has a row of burned out LEDs). The originals lasted me 4 years through rain, dirt, and summer heat, so I've been pretty happy with them! :rockon:
 

degake

Stop flashing!! G$*%£#
Joined
Feb 7, 2011
Messages
604
Reaction score
9
Points
0
Location
Belgium
Visit site
I should be good to go as far as powering the HID goes. I got Cliff's relay, but in the end I'm not going to need it for the HID (I would've needed it to upgrade the stock VS-02 bulb to 55 watt). But the HID kit I've got already switches the low beam off when the high beam is turned on, so no worries about premature bulb burnout or overheating the housing. Plus, the HID I'm using is 35 watt, so it's really just plug and play. :thumbup:

If I'm not mistaking, you're going to use a dual hid bulb? (low beam = hid, high beam = halogen)? If not and you're running a true bixenon bulb (shifting the light chamber in the bulb/bulb itself), shouldn't the HID be always on??

What I meant with the hot restrike etc. was; when using the relay, the light could be out for a split second while the relay switches from low beam to high beam (though it wouldn't/isn't noticeable). If so, the ballast will ignite again to start the bulb (thus, giving the startup current of +-23kV, whilst the bulb doesn't need that current, as the salt mixture inside it is still vaporised.) This is what is called a hot restrike and could lead to premature HID failure. (That's why they always say not to use HIDs for high beam only (flashing lights = short/hot restrikes...)

What I really meant by my comment earlier was that your post about how to run the wires really helped. I only need to extend two wires and I can get everything to where I want it to go. While I haven't gotten that deep into it yet, I think you're right that I can put most of it under the tank (around or above the battery) and save my space under the seat. But the longer wiring should give me more options, such as tucking the ballast down inside the front of the frame (next to the battery).

The ballast fits best underneath the tank, just aside the fuel pump connector (where the main wiring harness goes from the left side to the right side in the frame...) :)

All the wiring is overwhelming at first, but once you realize you really only have to connect two wires, your mind starts to calm. It's just a matter of routing everything so there are no kinks and making sure you've left enough wire outside the frame so you can turn the forks from lock to lock.

You will have to feed the OEM light wiring throught the hole in the frame at one side, and the HID wiring through the hole at the other side.

If you're going to try the solution made by Cliff, you should be able to get all the wiring through 1 frame hole, as you won't need the stock headlight wiring... :) (Thus resulting in less cables/connectors :))

Whew...after that, I've gotta wire up my new Hyperlites that are replacing the old ones on the back (one of the old ones has a row of burned out LEDs). The originals lasted me 4 years through rain, dirt, and summer heat, so I've been pretty happy with them! :rockon:

You can't be too visable in traffic :thumbup:

Grtz,


Degake
 

Motogiro

Vrrroooooom!
Staff member
Moderator
Elite Member
Site Supporter
Joined
May 8, 2008
Messages
14,998
Reaction score
1,167
Points
113
Location
San Diego, Ca.
Visit site
I should be good to go as far as powering the HID goes. I got Cliff's relay, but in the end I'm not going to need it for the HID (I would've needed it to upgrade the stock VS-02 bulb to 55 watt). But the HID kit I've got already switches the low beam off when the high beam is turned on, so no worries about premature bulb burnout or overheating the housing. Plus, the HID I'm using is 35 watt, so it's really just plug and play. :thumbup:

What I really meant by my comment earlier was that your post about how to run the wires really helped. I only need to extend two wires and I can get everything to where I want it to go. While I haven't gotten that deep into it yet, I think you're right that I can put most of it under the tank (around or above the battery) and save my space under the seat. But the longer wiring should give me more options, such as tucking the ballast down inside the front of the frame (next to the battery).

All the wiring is overwhelming at first, but once you realize you really only have to connect two wires, your mind starts to calm. It's just a matter of routing everything so there are no kinks and making sure you've left enough wire outside the frame so you can turn the forks from lock to lock.

Whew...after that, I've gotta wire up my new Hyperlites that are replacing the old ones on the back (one of the old ones has a row of burned out LEDs). The originals lasted me 4 years through rain, dirt, and summer heat, so I've been pretty happy with them! :rockon:

What HID are you using. It seems that there are a lot of different designs coming out. I like to see all types so that I know solutions for wiring all types.

Thanks C!
 

degake

Stop flashing!! G$*%£#
Joined
Feb 7, 2011
Messages
604
Reaction score
9
Points
0
Location
Belgium
Visit site
What HID are you using. It seems that there are a lot of different designs coming out. I like to see all types so that I know solutions for wiring all types.

Thanks C!

I've posted about these different types of HID bulb designs in another thread around here :)

There are actually 4 types of H4 HID bulbs:

H4-1: Low beam only
H4-2: Low beam = Hid / High beam = Halogen
H4-3: Low and High beam; switching between Hi/Lo by moving the light chamber inside the bulb (tilting), or moving the bulb from its socket
H4-4: Same as H4-2, but using 2 separate HID chamber

Other bulb types (H1, H3, H7, H11, .... which are normally used as a single filament halogen bulb) only have 1 chamber. (So "low beam" only, depending on which reflector bowl it's placed in).
D1S, D2S, D2R, etc. are the OEM Xenon bulbs (and are also 1 chamber design)

So in fact, all the designs are all the same, where the H4 has 3 extra options (H4-2, H4-3, H4-4), as it is the only original halogen setup with dual filament (so 2 modes....)

Grtz,


Degake
 
Last edited:

CCHOUSEKY

Kentucky Wildcat Fanatic
Joined
Feb 21, 2007
Messages
1,445
Reaction score
20
Points
0
Location
Lexington, KY
Visit site
If I'm not mistaking, you're going to use a dual hid bulb? (low beam = hid, high beam = halogen)? If not and you're running a true bixenon bulb (shifting the light chamber in the bulb/bulb itself), shouldn't the HID be always on??

Lots of good question/info in this post, so I'll take it one point at a time...lol.

You're right...it is a true bixenon bulb (where it shifts in the chamber rather than having a separate hi and lo beam. I got confused until I talked to someone at dinner tonight who knows this setup. So yeah, the HID is always on. :thumbup:


What I meant with the hot restrike etc. was; when using the relay, the light could be out for a split second while the relay switches from low beam to high beam (though it wouldn't/isn't noticeable). If so, the ballast will ignite again to start the bulb (thus, giving the startup current of +-23kV, whilst the bulb doesn't need that current, as the salt mixture inside it is still vaporised.) This is what is called a hot restrike and could lead to premature HID failure. (That's why they always say not to use HIDs for high beam only (flashing lights = short/hot restrikes...)

Hmm...so if I'm reading this correctly, you're saying I should use the relay I got from Cliff and not connect the HID directly to the stock harness?


The ballast fits best underneath the tank, just aside the fuel pump connector (where the main wiring harness goes from the left side to the right side in the frame...) :)

Fantastic piece of info there, friend! That's exactly the type of thing that will make this easier!


You will have to feed the OEM light wiring throught the hole in the frame at one side, and the HID wiring through the hole at the other side.

If you're going to try the solution made by Cliff, you should be able to get all the wiring through 1 frame hole, as you won't need the stock headlight wiring... :) (Thus resulting in less cables/connectors :))

Again, so you're saying if I use the relay from Cliff and wire all of it directly together, I shouldn't need the stock harness (for the headlight...I realize I'll still need the wiring for the turn signals and speedo, obviously.)


You can't be too visable in traffic :thumbup:

I couldn't agree with this more! :D

Grtz,


Degake

See my responses in blue above. Apparently you can't respond inside a quote or it tells you you don't have 10 characters. :confused:
 

CCHOUSEKY

Kentucky Wildcat Fanatic
Joined
Feb 21, 2007
Messages
1,445
Reaction score
20
Points
0
Location
Lexington, KY
Visit site
What HID are you using. It seems that there are a lot of different designs coming out. I like to see all types so that I know solutions for wiring all types.

Thanks C!

I've posted about these different types of HID bulb designs in another thread around here :)

There are actually 4 types of H4 HID bulbs:

H4-1: Low beam only
H4-2: Low beam = Hid / High beam = Halogen
H4-3: Low and High beam; switching between Hi/Lo by moving the light chamber inside the bulb (tilting), or moving the bulb from its socket
H4-4: Same as H4-2, but using 2 separate HID chamber

Other bulb types (H1, H3, H7, H11, .... which are normally used as a single filament halogen bulb) only have 1 chamber. (So "low beam" only, depending on which reflector bowl it's placed in).
D1S, D2S, D2R, etc. are the OEM Xenon bulbs (and are also 1 chamber design)

So in fact, all the designs are all the same, where the H4 has 3 extra options (H4-2, H4-3, H4-4), as it is the only original halogen setup with dual filament (so 2 modes....)

Grtz,


Degake

Pretty sure mine is the H4-4, but I'll take a few pictures and post them up tomorrow so you guys can tell me for sure. Cliff, I'll get some shots of the entire HID setup (wiring and all) so you can see what I'm dealing with. FYI, this kit came from a guy over on R6 Forum that sells them and they come highly recommended. I have a riding buddy that's dealt with electrical stuff for a long time and he's been so impressed with them in his R6 that he bought more and put them in his truck and car.

Pics to come tomorrow so we can clear things up! :thumbup:
 

degake

Stop flashing!! G$*%£#
Joined
Feb 7, 2011
Messages
604
Reaction score
9
Points
0
Location
Belgium
Visit site
Lots of good question/info in this post, so I'll take it one point at a time...lol.

You're right...it is a true bixenon bulb (where it shifts in the chamber rather than having a separate hi and lo beam. I got confused until I talked to someone at dinner tonight who knows this setup. So yeah, the HID is always on. :thumbup:

Hmm...so if I'm reading this correctly, you're saying I should use the relay I got from Cliff and not connect the HID directly to the stock harness?

The relay provided by Cliff is to get proper switching from low beam to high beam (so, to turn of the low beam filament when using high beam with a single H4 (dual filament) bulb).
If you do this, you will have a fully working H4 connection, at which you should then connect the H4-coupler leading to your HID harness.

However, If you wire it directly, you shouldn’t have the need for both relays, as you will get the proper switching directly from the OEM wiring at that point.
Maybe Cliff can confirm that this is the same for the naked and faired version??

Fantastic piece of info there, friend! That's exactly the type of thing that will make this easier!
You’re welcome ;)

Again, so you're saying if I use the relay from Cliff and wire all of it directly together, I shouldn't need the stock harness (for the headlight...I realize I'll still need the wiring for the turn signals and speedo, obviously.)

As said above: when using that direct tap of the dimmer relay #60, you have no need for relays to get the correct switching :)


Pretty sure mine is the H4-4, but I'll take a few pictures and post them up tomorrow so you guys can tell me for sure. Cliff, I'll get some shots of the entire HID setup (wiring and all) so you can see what I'm dealing with. FYI, this kit came from a guy over on R6 Forum that sells them and they come highly recommended. I have a riding buddy that's dealt with electrical stuff for a long time and he's been so impressed with them in his R6 that he bought more and put them in his truck and car.

Pics to come tomorrow so we can clear things up! :thumbup:

You say your bulb changes its location to go between HI/LO, and now you say you have a H4-4 bulb with 2 different chambers?? :confused: :D
If you can give us those pictures and/or a link to the R6 forum post about them, we will surely help you :rockon:

Grtz,


Degake
 

CCHOUSEKY

Kentucky Wildcat Fanatic
Joined
Feb 21, 2007
Messages
1,445
Reaction score
20
Points
0
Location
Lexington, KY
Visit site
The relay provided by Cliff is to get proper switching from low beam to high beam (so, to turn of the low beam filament when using high beam with a single H4 (dual filament) bulb).
If you do this, you will have a fully working H4 connection, at which you should then connect the H4-coupler leading to your HID harness.

However, If you wire it directly, you shouldn’t have the need for both relays, as you will get the proper switching directly from the OEM wiring at that point.
Maybe Cliff can confirm that this is the same for the naked and faired version??


You’re welcome ;)


As said above: when using that direct tap of the dimmer relay #60, you have no need for relays to get the correct switching :)


You say your bulb changes its location to go between HI/LO, and now you say you have a H4-4 bulb with 2 different chambers?? :confused: :D
If you can give us those pictures and/or a link to the R6 forum post about them, we will surely help you :rockon:

Grtz,


Degake

Ok, so if I'm understanding you correctly, I won't need the relay that I got from Cliff. As far as the H4-4, I'm sure I'm just confusing it...lol. Here's what I can tell you for sure...when I switch from LO to HI beam, the bulb slides forward and back (and I can actually feel the click if I'm holding the headlight).

I'm going to go take a few pics right now so it will give you a better idea of what I've got...lol.

Here's the link to the original thread on R6 Forum. My bulb doesn't look like the ones pictured at the top of this thread, though. You'll see from the pictures.

http://www.r6-forum.com/forums/showthread.php?t=148278
 
Last edited:
Top