
SANGER_A2
Super Member
I've wanted one of these for ages, but wasn't willing to pay the high prices of ClearAlternatives etc. When I saw a brand new on Ebay for £27 I jumped at the chance and ordered a smoked on straight away. There were no instructions however and I had to make it up as I went along and bodge it a bit. You get what you pay for really!
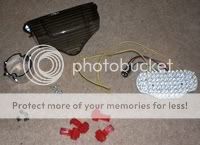
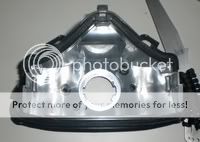
Here is what you get in the kit, a smoked tail-light cover, the light itself, a ring of plastic for their awful fitting system and some crimps to wire in the indicators:-
The first step is to get the original tail-light unit out and take off the stock red cover. You reuse the stock reflector housing with this kit. You can buy some replacements where you get the whole unit, these are much much easier to fit and I would probably recommend one unless you are pretty handy. A lot of people have trouble getting the unit on and off the bike. The easiest way to get it off is to remove the seat and side pods, unscrew the four large bolts and two smaller ones underneath that hold the rear part of the bike on. Then you slide the tail-light out from underneath. There are a couple of pictures showing how to do this later on when I put the unit back onto the bike.
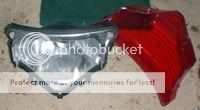
There are just two screws to undo to the the tail-light off the bike. Then you just carefully pry off the red cover from the reflector. Here you can see I have removed the stock cover from the stock reflector unit:-
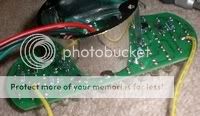
Here is how the ring from the fitting system screws onto the back of the circuit board:-
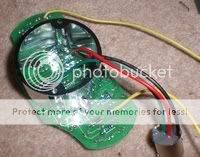
The screws go through the circuit board and screw into the ring to hold it in place:-
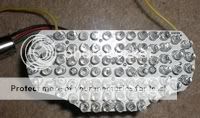
I found that the ring put pressure onto the wires and filed some of it off to leave them space. I drew on with a sharpie first where I wanted to remove the plastic:-
And here you can see where I filed the two gaps for the wires:-
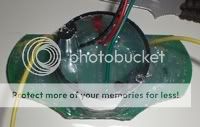
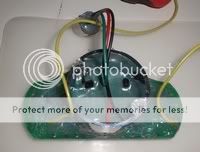
I covered the back of the whole thing using my glue gun for three reasons: 1. to keep the ring in place solidly instead of just with two screws. 2. to ensure that none of the circuit tracks or LEDs vibrated loose over time and 3. to make it more waterproof:-
Here is roughly where you have to drill holes in the reflector. There are two holes needed for the screws and two for the wires going to the indicators:-
I didn't put the holes in exactly the right place, so they messed up the ring. It was a stupid system anyway and it would probably have fallen to bits after a couple hundred miles:-
Here is what you get in the kit, a smoked tail-light cover, the light itself, a ring of plastic for their awful fitting system and some crimps to wire in the indicators:-
The first step is to get the original tail-light unit out and take off the stock red cover. You reuse the stock reflector housing with this kit. You can buy some replacements where you get the whole unit, these are much much easier to fit and I would probably recommend one unless you are pretty handy. A lot of people have trouble getting the unit on and off the bike. The easiest way to get it off is to remove the seat and side pods, unscrew the four large bolts and two smaller ones underneath that hold the rear part of the bike on. Then you slide the tail-light out from underneath. There are a couple of pictures showing how to do this later on when I put the unit back onto the bike.
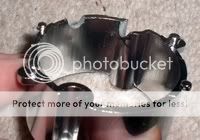
There are just two screws to undo to the the tail-light off the bike. Then you just carefully pry off the red cover from the reflector. Here you can see I have removed the stock cover from the stock reflector unit:-
Here is how the ring from the fitting system screws onto the back of the circuit board:-
The screws go through the circuit board and screw into the ring to hold it in place:-
I found that the ring put pressure onto the wires and filed some of it off to leave them space. I drew on with a sharpie first where I wanted to remove the plastic:-
And here you can see where I filed the two gaps for the wires:-
I covered the back of the whole thing using my glue gun for three reasons: 1. to keep the ring in place solidly instead of just with two screws. 2. to ensure that none of the circuit tracks or LEDs vibrated loose over time and 3. to make it more waterproof:-
Here is roughly where you have to drill holes in the reflector. There are two holes needed for the screws and two for the wires going to the indicators:-
I didn't put the holes in exactly the right place, so they messed up the ring. It was a stupid system anyway and it would probably have fallen to bits after a couple hundred miles:-
")