Need a way to connect. Ideas?

FinalImpact

2 Da Street, Knobs R Gone
Site Supporter
Joined
Mar 16, 2011
Messages
11,137
Reaction score
184
Points
63
Location
USA, OR
Visit site
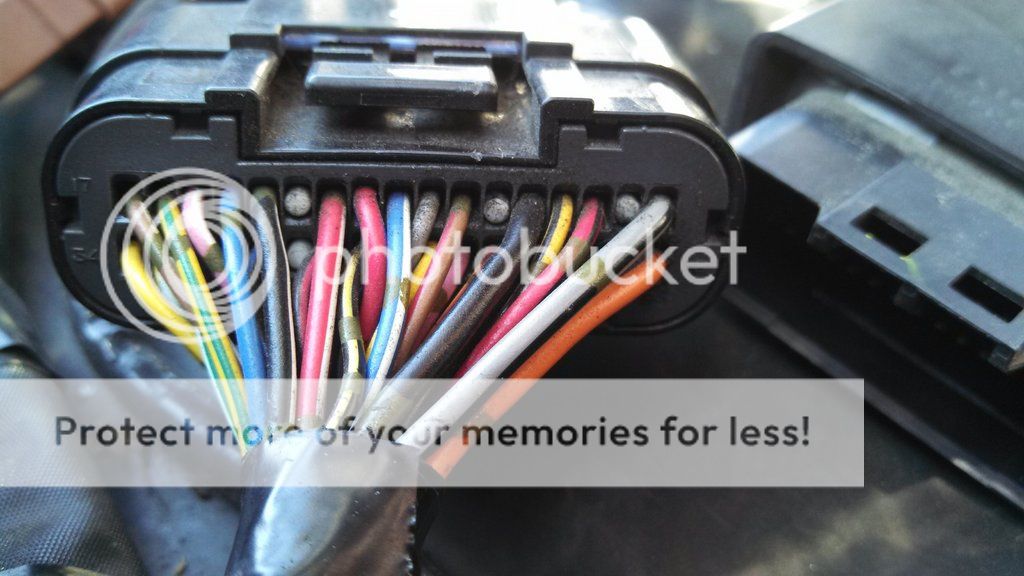
I grabbed this from another thread but the key being I want to be able to connect to several of the ECM leads and look at the signals with an oscilloscope. Anyone have any ideas on how to do this temporarily and NOT damage the wires, connector, or kill anything?

If I had both male and female connectors I could make a break out box, but that's not practical at this time. In the past I've seperated the connectors and inserted small 0.032" mod wire in and shoved it back together. This one seems to tight for that and I really don't wish to poke holes in the jacket.

Interesting;
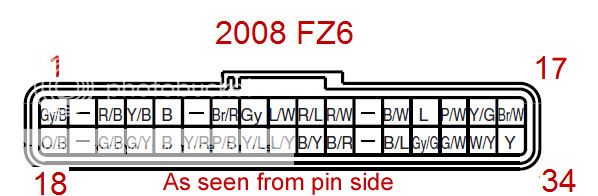
As best I can tell the CPU pin out (looking into the the CPU connector), is left to right bottom row is 1 -> 17

The US FSM shows no connection to Pin 2 and pin 6 goes to a wire designated as "D" (Pin #6 wire colors Y/R) which connects to nothing on our bikes.
attachment.php


Of course there are other ways to "count" the pin out, but that way has a whopping 2 points that line up with actual Pin outs called out in the FSM. I'm open if someone can show some proof as to which way is correct.

I was curious where 2 and 6 would go and what function they would have. I found nothing. Can someone from Europe post the PN of your ECM?

2013-08-12 Added Label drawing:

Reference the 2007 FSM for item descriptions to MATCH the ITEM numbers although most are self explanatory. ** Not responsible for errors ** :D
attachment.php

JJD952
 

TownsendsFJR1300

2007 FZ6
Site Supporter
Joined
Feb 7, 2009
Messages
12,531
Reaction score
1,176
Points
113
Location
Cape Coral, Florida, USA
Visit site
A "Posi tap" pokes one VERY small hole thru the insulation as you tighten it down, very, very verstile (the actually come with "Hyperlights" rear flashing lights:

Order Online- Discounts

Once your done, some dilectric grease, wrap with electrical tape(heat to seal) or remove the connector from the harness and heat shrink the wire.

I've had them attached to my Hyperlights flashing/running tail light for years (attached under the left pod, among other things both on the bike and boat), no issues...
 
Last edited:

FinalImpact

2 Da Street, Knobs R Gone
Site Supporter
Joined
Mar 16, 2011
Messages
11,137
Reaction score
184
Points
63
Location
USA, OR
Visit site
Thanks Scott.
That does look like it would work but to better describe the need, I just wanted to "sample" what the signals look like and leave w/out doing any lasting damage. It may come down to piercing the jacket with a probe tip. I'm gonna inspect it closer and see what options I have.
Tks!
 

TownsendsFJR1300

2007 FZ6
Site Supporter
Joined
Feb 7, 2009
Messages
12,531
Reaction score
1,176
Points
113
Location
Cape Coral, Florida, USA
Visit site
Thanks Scott.
That does look like it would work but to better describe the need, I just wanted to "sample" what the signals look like and leave w/out doing any lasting damage. It may come down to piercing the jacket with a probe tip. I'm gonna inspect it closer and see what options I have.
Tks!


No problem...

The Posi Tap will do the same thing however you'll get a much better/solid access point to get an accurate reading. You can easily remove it and use it on the next project.. I do put just a dab of di-lectric grease at the "puncture point" too, "just to make sure"...

I use them all the time on customers bikes when adding accessories.
 
Last edited:

FinalImpact

2 Da Street, Knobs R Gone
Site Supporter
Joined
Mar 16, 2011
Messages
11,137
Reaction score
184
Points
63
Location
USA, OR
Visit site
This is going to be a serious PITA as I'm not fond of poking holes in wires and then there is the OEM tape leaving about an inch of exposed wire. I did see that critical wires like TPS, IGN pickup are waterproof while things like the speed sensor, O2 sensor are exposed for easy probing before the ECU..... At the ECU the connections are water tight. Anyway, I tried getting a 0.010" wire past the rubber seal on the wire side to probe them but no luck. It just wouldn't make a connection even tho the wire went deep inside the weather seal.

50047d1378600027-need-way-connect-ideas-img_20130907_153358_585.jpg


Also please take note that this drawing is backwards in its Pinout designation...
48985d1372866394-fz6-s-fazer-78-hp-98-hp-re-set-fz6-ecu-pin-out.jpg


CORRECTED PIN OUT NUMBERS:
FZ6ECUPINOUT_zps0b10c633.jpg
 
Last edited:

FinalImpact

2 Da Street, Knobs R Gone
Site Supporter
Joined
Mar 16, 2011
Messages
11,137
Reaction score
184
Points
63
Location
USA, OR
Visit site
And I found a few other items to share too.
Check this out...

Here you are looking at the idle air control valve where the TB sync is done. The nut looking assembly pulls out against a spring. On the the other end is hot water from the engine and a bi-metalic spring to adjust idle speed according to engine temp. Depending on the water temp, it moves that whole shaft with the nut on it to adjust idle air volume, Here you can see the Nut is Locked down by a heavy sealant to fix the idle air volume at the factory.
attachment.php


attachment.php


Connector with 5 black wires/yellow trace, its the starter lockout and it appears it can call be decoupled as that aluminum insert connects all branches together. I can see that being used to disable the bike! Hint Hint...
attachment.php
 
Last edited:

TownsendsFJR1300

2007 FZ6
Site Supporter
Joined
Feb 7, 2009
Messages
12,531
Reaction score
1,176
Points
113
Location
Cape Coral, Florida, USA
Visit site
I believe (if the same as the older FJR's, likely yes), thats the nut used to adjust the COLD IDLE SPEED, when you first crank up the bike. (pretty much what you first posted).


Just as a side note, I keep my hot idle at 1,000 RPMs (below spec's). When starting cold, it idles 1250 or so. So, if your idle HOT is set for 1300, the idle COLD will likely bump up a similar difference, (approx 250-300 RPM's).


BTW, as tight as that harness is (and limited space), the correct sized Posi Tap will fit in that small area without untaping anything. I've used it very tight spots like that, just sneak the slot in of the PT, gently pushing adjacent wires away just a very little, rotate the PT where you want it, install the screw in center piece, done deal...

I suppose if you wanted to, (I haven't, a little dab of clear marine grade ((waterpooof)) silicone at the "stick point" will pretty much eliminate ANY potential of water intrusion
 
Last edited:

motojoe122

No ride is too far...
Moderator
Elite Member
Joined
Oct 12, 2010
Messages
3,579
Reaction score
44
Points
0
Location
Somers Point, NJ
Visit site
I believe (if the same as the older FJR's, likely yes), thats the nut used to adjust the COLD IDLE SPEED, when you first crank up the bike. (pretty much what you first posted).


Just as a side note, I keep my hot idle at 1,000 RPMs (below spec's). When starting cold, it idles 1250 or so. So, if your idle HOT is set for 1300, the idle COLD will likely bump up a similar difference, (approx 250-300 RPM's).


BTW, as tight as that harness is (and limited space), the correct sized Posi Tap will fit in that small area without untaping anything. I've used it very tight spots like that, just sneak the slot in of the PT, gently pushing adjacent wires away just a very little, rotate the PT where you want it, install the screw in center piece, done deal...

I suppose if you wanted to, (I haven't, a little dab of clear marine grade ((waterpooof)) silicone at the "stick point" will pretty much eliminate ANY potential of water intrusion
Spot on with the hot/cold idle, Scott. At start up, mine idles at 1500 then drops to1300ish once warmed up.
 

FinalImpact

2 Da Street, Knobs R Gone
Site Supporter
Joined
Mar 16, 2011
Messages
11,137
Reaction score
184
Points
63
Location
USA, OR
Visit site
CORRECTED PIN OUT:
However, the view is from the connector side not the wire side...
FZ6ECUPINOUT_zps0b10c633.jpg


Note: Pin #2 & #6 are N/C now. Rumor was these had some special feature and the may at the ECU level but are not used at the bike management level.

IMG_20130907_153358_585ECUWIRES_zps30d87a82.jpg
 

TownsendsFJR1300

2007 FZ6
Site Supporter
Joined
Feb 7, 2009
Messages
12,531
Reaction score
1,176
Points
113
Location
Cape Coral, Florida, USA
Visit site
On the older FJR's, the US version did NOT have access to change the CO settings thru the dash.

A member of one of the forums discovered swapping I believe, two of the wires in that loom (maybe grounding another) allowed CO settings to be changed from the dash. (called the "Barbarian jump"). The European models had access stock. This may be some of the differences, but it is two dfferent bikes. I never did the Barbarian jump, wasn't real comfy messing with the ECU..

Just an FYI
Barbarian jumper mod:
The "Barbarian Jumper Mod"
 

FinalImpact

2 Da Street, Knobs R Gone
Site Supporter
Joined
Mar 16, 2011
Messages
11,137
Reaction score
184
Points
63
Location
USA, OR
Visit site
Tried back probe pins?

Hey thanks! :thumbup: Thats what I did with the SS wire of 0.010". Just couldn't get a connection to the pin(s). Perhaps because its a weather proof connector?


Scott,
All of those wires are for the starter lockout nothing more. I suspect when fitting the alarm to it involves coupling to that plug and walla - anti - theft enabled.
 

fb40dash5

Junior Member
Joined
May 29, 2011
Messages
448
Reaction score
3
Points
0
Location
NoMD
Visit site
Hey thanks! :thumbup: Thats what I did with the SS wire of 0.010". Just couldn't get a connection to the pin(s). Perhaps because its a weather proof connector?

I don't have a set, but pretty sure there are some that will work on a weatherproof plug. I keep meaning to buy a set for work and then forgetting.

I assume it's a lot smaller than a Weatherpak connector? Those have about a 3/16" silicone plug on the back side around the wire that can be slid out with a pick for easier access. Maybe try an actual pin, like for sewing... stick it in the back between the insulation and the seal and try to either pierce the insulation past the seal or just get to the terminal, then use a gator clip lead?
 

Se7enLC

Nerd
Joined
Jun 6, 2008
Messages
164
Reaction score
2
Points
0
Location
Arlington, MA
Visit site
The easiest way I've found to tap into a wire to view the signal without ruining it is by using a very sharp multimeter lead. I'm talking extremely sharp. You can pierce right into the insulation to see it and it doesn't leave enough of a hole to make a difference. It's also usually able to fit down inside the back of a connector as an alternative.
 

FinalImpact

2 Da Street, Knobs R Gone
Site Supporter
Joined
Mar 16, 2011
Messages
11,137
Reaction score
184
Points
63
Location
USA, OR
Visit site
:thumbup:
Thanks gentlemen! I'm guessing that's what its gonna come down to.

I have a plan to modify the ignition curve but first I have to capture WHAT it is STOCK (advance/retard curve vs RPM, vacuum, gear, TPS, blaH BLAH BLAH). Without building a custom see through side cover and fastening a degree wheel and running it down the road to simulate a load at RPM, its going to be done off the bike but the bikes ECU and everything on the bike will be live. An electric motor will spin the trigger wheel, the cranks pickup coil will be live and thinking the bike is running. haha!

I just need a mount an RC motor to a spare trigger wheel, attach spare trigger pick up to ECU and walla! The bike is running but with no moving parts....

Because it needs to think its in gear 1 - 6, I need a simulator to simulate the output from the trans and all the gear ratios! There is some speculation that advance is limited in the lower gears. I want to know!!! If it cries about the O2 sensor. Not sure about that. I'd guess there are O2 sim's for this.. .. ..

It'll be my winter project.
 

chunkygoat

Member
Joined
Oct 26, 2008
Messages
792
Reaction score
11
Points
18
Location
Pennsylvania
Visit site
I know I am late on this Final, but this is what we do generally when we need to probe a circuit, yet keep it touch proof and mechanically stable. I know you said without damaging the existing wires, but, we use these:

50pcs Wago 3 Port Lever Nuts 222 413 Cage Clamp Brand New 50 Pieces Free SHIP | eBay

They're snap connectors. We will cut the wire and insert both leads into the Wago block. The third empty terminal leaves room for you to insert a probe (yes an oscope probe will snap right into the Wago block as well). When finished, unsnap and remove the probe. The Wago can be left in place for future probing.

There have been instances where I have left wagos in, and ran female banana jack leads out of two wagos and zip tied them to create a fast way to connect a DMM for quick measurements if you know you will be measuring a across two specific points repeatedly in the future. Very effective, very high quality snap terminals, they have a solid hold on the wire and can endure a great deal of stress. They come highly recommended from me - this is the route I would choose.
 

FinalImpact

2 Da Street, Knobs R Gone
Site Supporter
Joined
Mar 16, 2011
Messages
11,137
Reaction score
184
Points
63
Location
USA, OR
Visit site
^^ Thanks!
I bought some very pointy DMM probe tips but still need to find some O'scope tips that are real fine point or something like that.

Its more of a one time deal.
 

Se7enLC

Nerd
Joined
Jun 6, 2008
Messages
164
Reaction score
2
Points
0
Location
Arlington, MA
Visit site
^^ Thanks!
I bought some very pointy DMM probe tips but still need to find some O'scope tips that are real fine point or something like that.

Its more of a one time deal.

You can get a BNC to dual-banana-plug adapter that will get the job done. Of course, it'll just be a 1x probe like that, but if you're just looking for timing it probably won't matter.

images
 

FinalImpact

2 Da Street, Knobs R Gone
Site Supporter
Joined
Mar 16, 2011
Messages
11,137
Reaction score
184
Points
63
Location
USA, OR
Visit site
^^ Thanks, I have an adapter like that - BNC to banna plug. I'm concerned the output to the coils will be in excess of 300V tho.

Anyways, First run will involve taping into the Crank Sensor output and coil inputs. In addition I think I'll need at least 3 channels as it would be interesting to see timing events between spark output and fuel injection timing.

PS - The Crank Pickup Trigger outputs about 5mv dc just from waving a screw driver past it (open leads, no ECU involved).
 
Top