TofuJunky87's FZ Reincarnation

TofuJunky87

Do you Tofu?
Joined
Feb 18, 2015
Messages
36
Reaction score
0
Points
0
Location
The Matrix
Visit site
Hey Everybody!

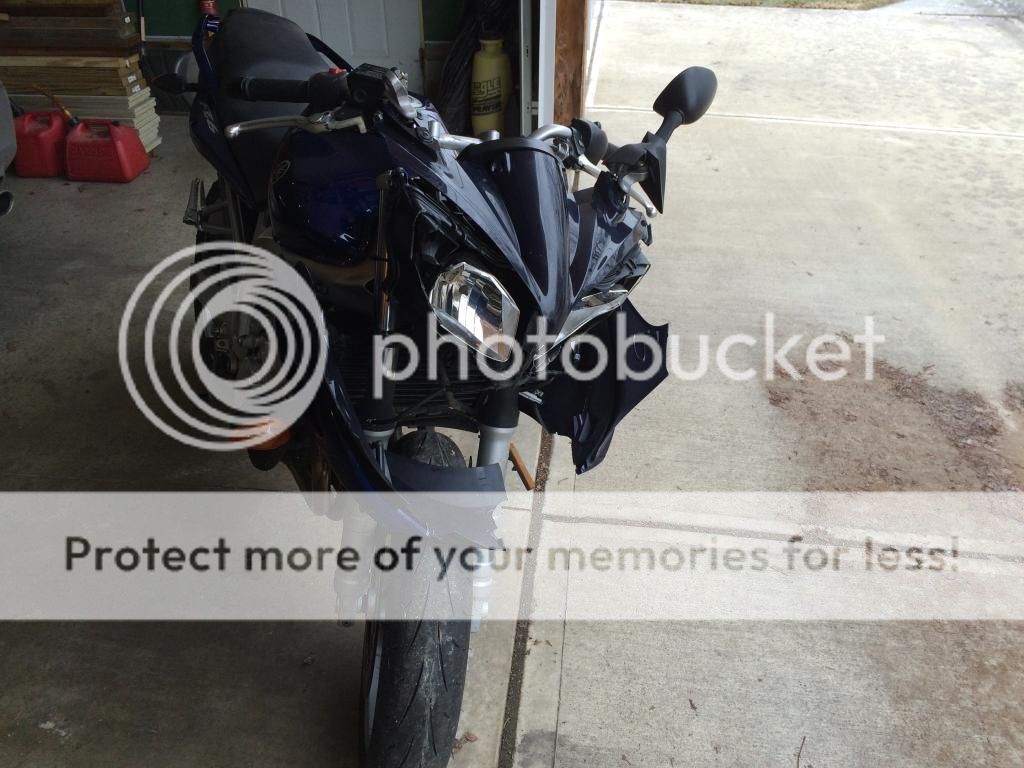
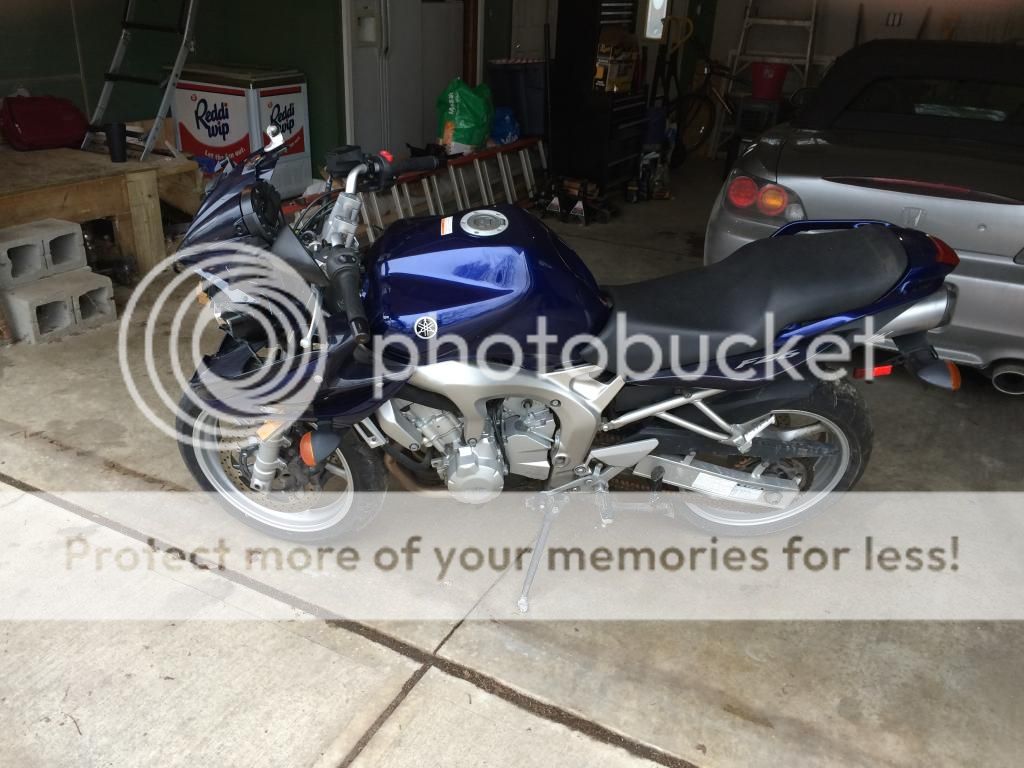
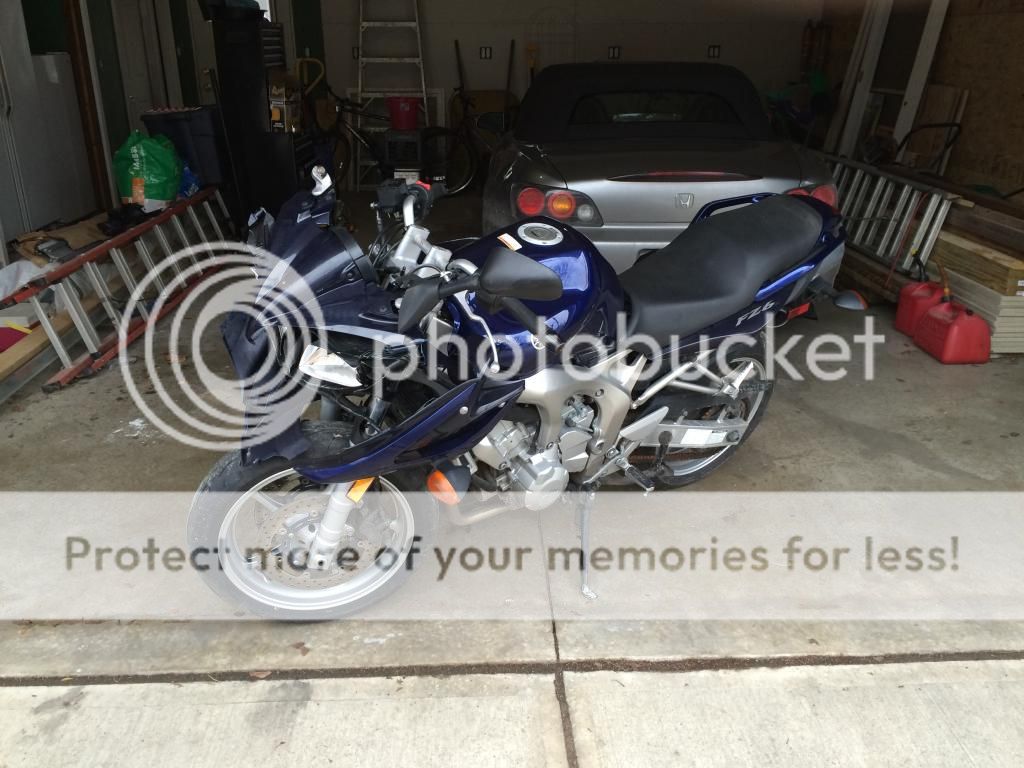
Welcome to my build thread as I attempt to reincarnate an FZ that was lost. Basically, I was given permission by the boss (Wife) to get a project bike that I could tinker with and rebuild to turn into a fun commuter. So I found this 2004 Yamaha FZ6 in Galaxy Blue. The bike was totaled in a front impact collision by the previous owner. It has massive fairing and fork damage, with some frame damage as well amongst other things. It currently has 30,007 miles and runs great.

I hope you enjoy watching me bring this beauty back from the dead as much as I will enjoy doing it.

As a side note, I love taking pictures, so if you follow this thread, plan on seeing lots of visuals.

So, on to the initial pictures I took the day after I brought her home.

8F173970-325D-451F-BDF8-0D0CD5F7E855.jpg

7DAB4835-90D3-4535-B583-35C5F4D0F2D3.jpg

55C47ED4-802B-4D90-8A0A-398A94C85146.jpg

C0AF8DE7-C646-4FEE-9919-CDCBBB023E94.jpg

C7EF93C3-F5FA-4CE6-8563-4EEDFBF87F7A.jpg

C283F683-030F-42E2-B0C6-029812CA20C7.jpg

F99F4BB4-EF78-45AB-80EF-0C484C64AEE9.jpg

9F800890-1D1D-443F-BECC-A36ABB4F9739.jpg

57B4C29E-8CB9-4919-9E93-68E734A06FA9.jpg

09F7D886-54D7-4901-835F-636421FE03AA.jpg

D97FCB58-35E1-45D9-8763-46407905E6E1.jpg

A9F295ED-593C-4B18-9A04-B30D8AE5D207.jpg

24ACD932-F31A-4E3F-9419-9314DFE10156.jpg

495820B8-ED8A-4BBA-9754-D03BA260A850.jpg

EE285B1B-65BF-4506-B5C0-A86947130DF2.jpg

3CEBB2F7-4285-45B4-B98A-982DB9F63BDC.jpg

6AEE6C87-697D-44DE-907D-C2DCC3DD1CB3.jpg

B8926957-4217-4D15-BCA5-63F2B70175B1.jpg

516D8716-EE05-46B7-B5BC-A9B309E16079.jpg

C271364C-A51D-44AA-AB69-7299E7DE8EB8.jpg

CBA1F067-5731-44C8-A85A-9B5789890412.jpg

0F8A3450-FB9A-45C8-A102-403F26DBDFA2.jpg

29B8E07E-768F-4ED3-B55F-98F2D8CB2F22.jpg

5428BD60-BA4F-4843-8FC4-CAA8AAD7B3B7.jpg

94FEF3B3-8A33-48F7-90CF-2F0DF96B97CF.jpg

D52A1E49-C18B-44D9-82F0-89F26D9AB6DF.jpg

CEB3F08A-3EEC-478F-AB94-A9614FC373F9.jpg

97975321-A561-48D6-AADF-47C83CCEEE42.jpg

8A2F6732-9D45-406D-BE36-F2E8E561776F.jpg

5AFF0344-DD3B-4B70-B68B-EBB8DAC00EC5.jpg


Phew, I think thats just about it. I've got a lot of work ahead of me...

The fun begins
 

TofuJunky87

Do you Tofu?
Joined
Feb 18, 2015
Messages
36
Reaction score
0
Points
0
Location
The Matrix
Visit site
So the first order of business was tearing her down and getting all of that broken crap off. I really needed to get to the forks because of how the front was it, it was really difficult to move the bike. It would only turn right due to the forks bent to the right, and the wheel would catch against the headers if turned straight.

Time to take it all apart! I started with the fairing, then moved to the tail, followed by the tank. I'll leave the front wheel and forks for another day.

F0224A80-A7F4-4671-AC5D-E3561EDF8F41.jpg

58FE2377-9090-4A30-911D-0C2824A6AD4E.jpg

7C6AB1BB-838F-46F2-AA35-4717A8954517.jpg

41DBE397-BFED-44DF-9135-6A306CC991D2.jpg

F4240ABC-E0BD-48B1-BBF5-D1E41D18CA18.jpg

B7AFE8EC-49FF-4B71-A78C-6F1B878E6CFE.jpg

9735FC92-11D3-4DF1-A7E1-FC0E79B58329.jpg

4AC916F6-D526-48BC-AD96-E1F67D7D4690.jpg

60DAA394-AAEE-4784-A380-B0656840CB26.jpg

59D4C44D-815B-42A0-B3CB-D368A7D923AB.jpg

8D77F990-8529-4F09-926E-46828A3A5C7C.jpg

BC625B35-6DA6-4137-ACCC-4F475E06B001.jpg

6CD29EDD-89A0-477A-A21E-1CB8D1456C2C.jpg

268C98C9-F9AC-415C-85E6-419C4733781C.jpg

487715EC-D280-4483-8C99-2C4A03AB570C.jpg

D5A7F7AB-1281-4B3A-B870-6390EE3A3FA9.jpg

920554FA-8382-49EB-B27E-5BC19A348EAF.jpg

BA38933F-6DF6-4619-B4E6-031EBE52F278.jpg

19C3D491-41BB-4784-A91B-1F59243238C7.jpg

21FAA6A5-FD36-40DC-A3EC-43B2E4E33868.jpg

ADC2DA46-5953-4876-AC0F-6DAE55700652.jpg
 

TofuJunky87

Do you Tofu?
Joined
Feb 18, 2015
Messages
36
Reaction score
0
Points
0
Location
The Matrix
Visit site
Before I did anything with the front end, I really wanted to fix that broken piece of the frame as it was really bothering me. I took the headers off so I could move the bike properly and actually push it straight and slightly to the left and took it to a friend who is a wiz with aluminum repair. After a little bit, he had welded it back. I snapped a few quick pics during the process. :thumbup:

75151832-D66F-4E13-AE49-05F2F1616F7D.jpg

05CF0CC2-0C13-4032-AAF8-583A9926A61B.jpg


Now that its done, I need to clean it up and touch up the frame to get rid of the discoloration from the welding process.
 

TofuJunky87

Do you Tofu?
Joined
Feb 18, 2015
Messages
36
Reaction score
0
Points
0
Location
The Matrix
Visit site
I finally got around to working on the front end. It was delayed because I didn't have the massive 19mm allen socket needed to unscrew the front axle. Luckily, Amazon prime has free 2 day shipping! :rockon:

Anyways, I got the axle out, pulled the wheel off, and was able to get the front forks off. The right fork which was really bent bad was especially difficult to get off because of the creasing that took place in the upper tube, it pinched the fork tube in the lower triple tree bracket. It took some effort, but I persuaded it to come out. :thumbup:

I also began trying to pound out the big dent in the fuel tank. I really feel sorry for the guy that did that to the tank. I hope he can still have kids :hug:

4DBF5F0A-B175-4168-BF0C-2AC163A09705.jpg

A172F758-DAB4-49F0-8788-1558C2B04654.jpg

8DDCA484-D50A-4280-AF79-7A79AB744E3C.jpg

BC23AA85-10CE-402E-8386-AB428653F1E1.jpg

2B5D7C19-AFA9-4B89-975B-D3FFBA58A872.jpg

9D9A8EBC-41C6-4A21-9E17-730690801457.jpg

A22C3978-98BF-4BF5-8F3D-FB6D11C91A9F.jpg

CA4C32AD-6F3B-4249-A6EF-4DD5A8FDBF13.jpg

65935D31-6E96-4CFE-A537-35939DC9C567.jpg

4C2A592D-EDD1-43CB-BD64-81BC729B831C.jpg
 

TofuJunky87

Do you Tofu?
Joined
Feb 18, 2015
Messages
36
Reaction score
0
Points
0
Location
The Matrix
Visit site
I started working on taking apart the forks. I've really been dreading this because I knew it wouldn't be simple. I was right. The left fork which only had a slight bend to it, went swimmingly. I removed the cap, took the spacer and spring out with no muss and no fuss. Then came the right fork. :disapprove:

I was having real difficulty removing the cap. Little did I know that when the bike was wrecked, the fork was compressed when it hit, causing the spring to be jammed in the bend high in the tube. This meant that there was space below the spring in the bottom, but above the bend, the spring was highly compressed. This extreme compression was manifesting itself in a very stubborn cap removal.

I finally got the cap down to the final threads and BAM, the cap shot off of the tub like it was fired out of a gun (luckily I held onto the fork and the wrench in my hands and the end of the fork was pointed away from me). The spacer and washer inside also shot out and hit the ceiling, leaving an indentation in the drywall. :eek:

Being that the spring was securely wedged in the bend, I used a pneumatic die grinder to cut the tube in half. The spring was still wedged, so I had to cut more and finally got it out. Luckily, the spring escaped without me hitting it with the grinder, and it doesn't look damaged and looks straight.

Next, I used the broomstick trick with an impact wrench and took the bottom fork bolts out. I'm letting them set so they finish draining all of the fork oil. Tomorrow, I think I'll tackle pulling the tubs apart.

1C8F57F1-789B-4A28-9A60-288D66852D18.jpg

046A3E29-C197-4752-AD4F-1D0A17861B83.jpg

5649E810-FF19-4B0F-9808-7055B1288874.jpg

B77CEE52-CF7B-4853-A670-015EE2676B93.jpg

57BA1758-85E3-473C-9BFA-9BE4BDDDD101.jpg

CB0B03C7-186F-4429-9169-5F69480941C3.jpg

F4EC3D52-80C0-43F0-B5ED-3227F93D29B8.jpg
 

Motogiro

Vrrroooooom!
Staff member
Moderator
Elite Member
Site Supporter
Joined
May 8, 2008
Messages
14,995
Reaction score
1,162
Points
113
Location
San Diego, Ca.
Visit site
Not trying to be negative but I have a thought that may be worth consideration.

The engine is a stress member of the frame. That broken ear looks as if the frame is possibly tweaked 1/4 inch from where is was originally. If you haven't thought of it you might want to loosen all of the frame bolts to allow any possible misalignment tension from impact to be released. This will hopefully relax or lessen that 1/4 inch misalignment. Also make sure there are no burs in the counter bore seat as well as the frame to engine mating surface. Do not remove any of the weld to make that repair look smoother. You want all the strength possible at that ear. Carefully inspect the front of the frame at the triple for fractures. Insurance companies total bikes just from scratches/scrapes on the frame because they don't want liability later for failed repairs.

I'm sure you'll have a great bike when it's all done and thanks for sharing these great photos! :)
 

Andz

Phantom Rider
Elite Member
Joined
Oct 18, 2008
Messages
2,601
Reaction score
104
Points
63
Location
Edenvale, South Africa (GMT +2)
Visit site
That one pic of the tank took me back to the 80s when I had a Honda CB400N and I ran into the back of a car, flying over the top of it and leaving a nice big dent in the back of the tank in the process. Painful memories!
 

Motogiro

Vrrroooooom!
Staff member
Moderator
Elite Member
Site Supporter
Joined
May 8, 2008
Messages
14,995
Reaction score
1,162
Points
113
Location
San Diego, Ca.
Visit site
That one pic of the tank took me back to the 80s when I had a Honda CB400N and I ran into the back of a car, flying over the top of it and leaving a nice big dent in the back of the tank in the process. Painful memories!

Yes! I saw that and hurt for the body that made that impression! :eek::(
 

TofuJunky87

Do you Tofu?
Joined
Feb 18, 2015
Messages
36
Reaction score
0
Points
0
Location
The Matrix
Visit site
Not trying to be negative but I have a thought that may be worth consideration.

The engine is a stress member of the frame. That broken ear looks as if the frame is possibly tweaked 1/4 inch from where is was originally. If you haven't thought of it you might want to loosen all of the frame bolts to allow any possible misalignment tension from impact to be released. This will hopefully relax or lessen that 1/4 inch misalignment. Also make sure there are no burs in the counter bore seat as well as the frame to engine mating surface. Do not remove any of the weld to make that repair look smoother. You want all the strength possible at that ear. Carefully inspect the front of the frame at the triple for fractures. Insurance companies total bikes just from scratches/scrapes on the frame because they don't want liability later for failed repairs.

I'm sure you'll have a great bike when it's all done and thanks for sharing these great photos! :)

Great advice! Yes, although I am going to try to use some paint to touch the frame up and hide the repair, the welds will definitely go untouched. I totally agree. I already checked the rest of the frame and up near the triple, everything looks A ok. And you made a very good point about the other bolt mounts. Actually, as soon as I brought it back from the welding shop, I loosened all of the other mounts and gave the engine some breathing room in the frame. I have put the bolt back in the welded mount but I only snugged it down to the frame. I haven't closed the gap yet completely between the repaired frame and the engine. Part of me wants to put a washer or something in between so that closing the gap doesn't overly stress that arm of the frame. Loosening the other bolts helped slightly, but not as much as I had hoped.

Thoughts? Should I just torque it down or maybe shim it a bit?
 

Motogiro

Vrrroooooom!
Staff member
Moderator
Elite Member
Site Supporter
Joined
May 8, 2008
Messages
14,995
Reaction score
1,162
Points
113
Location
San Diego, Ca.
Visit site
Great advice! Yes, although I am going to try to use some paint to touch the frame up and hide the repair, the welds will definitely go untouched. I totally agree. I already checked the rest of the frame and up near the triple, everything looks A ok. And you made a very good point about the other bolt mounts. Actually, as soon as I brought it back from the welding shop, I loosened all of the other mounts and gave the engine some breathing room in the frame. I have put the bolt back in the welded mount but I only snugged it down to the frame. I haven't closed the gap yet completely between the repaired frame and the engine. Part of me wants to put a washer or something in between so that closing the gap doesn't overly stress that arm of the frame. Loosening the other bolts helped slightly, but not as much as I had hoped.

Thoughts? Should I just torque it down or maybe shim it a bit?

Maybe 1/8" washers at the two front frame mounts so that if it is a little sprung you could share it between Peter and Paul and at the same time reduce the stress. Torque these bolts to factory specs.

Keep an eye on the repair and maybe recheck the torque on the bolts after riding.

It's generally a controversial repair because of liability.
 

TofuJunky87

Do you Tofu?
Joined
Feb 18, 2015
Messages
36
Reaction score
0
Points
0
Location
The Matrix
Visit site
Well, today I was able to work on the bike some more. I focused on trying to finished breaking down the forks. With relatively few expletives, I was able to yank them apart. So much for "forcefully but carefully." I had a bit of a hangup with the damper rod assembly, as it was still not wanting to come out of the rest of the fork tubes since they had very slight bends. Again, my persistence paid off without needing to use the die grinder again. :thumbup:

Thankfully, the disassembly of the forks is all done, and now I get to wait for the new seals and fork parts to come in to finish them and put it back together. In them mean time, I'm going to try to take off the handlebars, which gave me grief today. The star screws in the bar ends are rusty, and immediately rounded out as soon as I turned the ratchet. I tried for a little while to use an Easy Out but I was having difficulty drilling into screw heads. Not sure if these are hardened steel or not? :confused:

Took a few pics while working today. I also got my new front fender in!

D80516B0-2345-4EE3-975C-F53F18035CE4.jpg

FA52B22C-5145-4CBF-B6F5-223833B77C71.jpg

DFB1D746-D505-4C4E-ADE7-59909625D3CA.jpg
 

TofuJunky87

Do you Tofu?
Joined
Feb 18, 2015
Messages
36
Reaction score
0
Points
0
Location
The Matrix
Visit site
Maybe 1/8" washers at the two front frame mounts so that if it is a little sprung you could share it between Peter and Paul and at the same time reduce the stress. Torque these bolts to factory specs.

Keep an eye on the repair and maybe recheck the torque on the bolts after riding.

It's generally a controversial repair because of liability.

Sounds good. Ya, frames are always a touchy subject. I'll make sure to get some extra washers to ease that frame arm back into duty. Thanks for the tips. :thumbup:
 

TofuJunky87

Do you Tofu?
Joined
Feb 18, 2015
Messages
36
Reaction score
0
Points
0
Location
The Matrix
Visit site
Worked on the bike again today. For once, I actually put something back on it instead of taking something off! I took the old handlebars off after fighting and fighting with the stupid bar ends. Luckily, the Easy Out worked and I didn't have to cut the bars. The new bars went on with fairly little problems, although the small plastic tabs in each hand control box had to be cut and filed down so they fit properly around the 7/8" bar. I quickly laid a few of the body pieces on to get an idea of how the new bars look with the blue. Lovin' the gold Renthal Ultra Low street bars!!! Now I just need to get a new left grip and put the mirrors on.

FEDA413D-3339-4316-AE19-0A5DA669F0B4.jpg

21698B0A-F463-442D-B545-CC2458A305D3.jpg

4C68468E-34B4-4541-A601-D7C27F7BA8ED.jpg

7C83341C-F0CF-4139-A019-F4EF71A52042.jpg

90573FEB-0CCD-47EB-9211-F90B1B0890A8.jpg

50CFA192-9577-46ED-A9AE-4C1F714711C1.jpg

6883F5CF-4B21-4203-84DD-5B53A03992AC.jpg

E08F4762-66CC-4419-9992-A1C8ED8D85FD.jpg

4F8D635C-1FAD-4BEC-81C7-BEAEB96CB4F1.jpg

A29800F3-870C-4814-AFAE-4DEBEC6B609D.jpg

38D1E927-28E6-4240-9857-27A634858126.jpg

182D87E7-C683-4181-96A3-EE46EAA8B2F9.jpg

FE09F068-E52C-4E49-A1B2-B2FA9CD7D7AA.jpg


I also painted my new brake bracket because it was used and had some bad scuffs and scratches. Looks like new now!

AFBD0A91-2C66-472C-99A7-5EA25D10B330.jpg

295A19CD-0C6A-4963-A28A-76FD19EA3CE4.jpg


I started putting the forks back together. I'm still missing some seals but I got a start. I love the shiny new fork tubes, especially since they are bent!

9E0CDC04-8F1A-4B48-B265-000496F5CA14.jpg

A15B22AF-DE5D-4294-8FAC-6BB71BC05FF6.jpg

11685E2F-ED28-4574-AF8B-DDC1A68BB5BA.jpg

7D5352F6-F951-4A23-B91C-9CD609FB066C.jpg

4378595C-D1AF-42E8-A274-EB1842123CCE.jpg

1C23FEF6-C8B1-4C44-93F4-D5E070CCF1D3.jpg


Finally, I sanded down and painted the holes of the lower triple tree bracket. It was really rusty for some reason so I took all of that crap off and gave it a few coats of black. Hopefully it will hold up when I put the new forks in.

C6C5438B-5398-40BC-AECC-33AC9D609D1A.jpg

6CBA6367-A1B0-4D83-BB1A-B21795EB661F.jpg

18F79C38-79E2-483B-8580-41ADA9636231.jpg

01DA0ED3-D89D-47E8-99F0-D241E132BE34.jpg

8563FB50-DE5F-438B-BE19-D5F2154B4D29.jpg
 

2007Z6ALL-LED

Member
Joined
Oct 10, 2014
Messages
248
Reaction score
2
Points
0
Location
Southern California
Visit site
This must be required lots of work to re-born the bike...Good luck!

For safety,,the re-welded frame piece IMO doesn't look that strong as it was the area where the bolt, nut to hold engine and frame together and there's always stress going on within., please be extremely careful to ride the bike.

As for the insurance, I was told, asked by All States, Farmers and other insurance representative (not the agent or agency) if the bike was savage or any extensive repair of the bike (sort of questions is the bike being modified from its OEM build..etc). They told me if the bike has savage title or any modification different than the OEM build they will NOT sell the insurance or if they found out later in the accident that they will not honor the policy holder in case of payout.. Just be careful

My humble advice, it may be your hobby to rebuild the totaled,savage bike ..but in safety and legal matter it might not be worth it! for just $3,500 you will get 2007, 2008 FZ6 with 15-20K miles compare with effort, time and $$ for aftermarket rebuild parts to rebuil this bike...(I'm seeing you can afford Honda S2000 relatively new, why not to spend $3,500 to get an used Fz6 and modify anything you'd like?)

just my thoughts..!
 

TofuJunky87

Do you Tofu?
Joined
Feb 18, 2015
Messages
36
Reaction score
0
Points
0
Location
The Matrix
Visit site
This must be required lots of work to re-born the bike...Good luck!

For safety,,the re-welded frame piece IMO doesn't look that strong as it was the area where the bolt, nut to hold engine and frame together and there's always stress going on within., please be extremely careful to ride the bike.

As for the insurance, I was told, asked by All States, Farmers and other insurance representative (not the agent or agency) if the bike was savage or any extensive repair of the bike (sort of questions is the bike being modified from its OEM build..etc). They told me if the bike has savage title or any modification different than the OEM build they will NOT sell the insurance or if they found out later in the accident that they will not honor the policy holder in case of payout.. Just be careful

My humble advice, it may be your hobby to rebuild the totaled,savage bike ..but in safety and legal matter it might not be worth it! for just $3,500 you will get 2007, 2008 FZ6 with 15-20K miles compare with effort, time and $$ for aftermarket rebuild parts to rebuil this bike...(I'm seeing you can afford Honda S2000 relatively new, why not to spend $3,500 to get an used Fz6 and modify anything you'd like?)

just my thoughts..!

Thanks for the advice.
 

TofuJunky87

Do you Tofu?
Joined
Feb 18, 2015
Messages
36
Reaction score
0
Points
0
Location
The Matrix
Visit site
Tonight was the last time I can work on the bike in the next week because I will be way too busy and staying up late everyday. So I figured I would make the best of it and try to get a little more done.

I put the battery back in and wired in the permanent harness for the Battery Tender. This turned out really well and I was able to route the quick plug-in down to the side by the frame so it is inconspicuous. After this was done, I immediately plugged it in so it could charge and trickle. Its been in the single digits here at least a few days a week. The garage isn't heated so I know that battery is taking a hit. I also found that the Battery Tender unit will fit nicely under the seat so I'm going to use the stock Yamaha rubber bungee to keep it next to the tool set when I'm not using it.

F1FFE9FE-0C4B-439D-8C85-56FC9DA94CB0.jpg

F0C84752-42E5-472C-8CF6-0CF202DC28E5.jpg

87A6E5CE-CCD6-4205-A299-D1699926D4D6.jpg

D34C024D-2438-4E75-996F-9E65DF4C27A1.jpg


The other big thing I did tonight was work on getting the tank mostly done. Unfortunately, I don't have the money to replace the tank, so for the time being, I will have to make due with this one. No big deal if this is a commuting beater. My temporary fix isn't anything pretty but it gets the job done. I beat out the dings and dents the best I could on the outside and through the fuel pump opening (which honestly turned out much better than I anticipated considering the side of the damage in the tank). Then I sanded it down good to get rid of the surface rust that was starting to accumulate on the exposed metal. I primed and painted it black. It kind of looks like a really crappy tank protector! I'm going to try to find something like a tank bra to cover that part of the tank so you wont even know there was damage. Other than that, at least the rust is gone until I replace the tank. The fuel pump is back in and the tank is back on the bike, hooked up, and ready to go.

13C7BB93-1139-4208-B84B-690DFF705277.jpg

5001EE5E-D792-43A1-A78F-1517AD06C38C.jpg

EF0C8DA1-0AEE-4D25-A85D-4CD36F1ADFE6.jpg

537FC29D-6647-4D13-ABB8-4EE0C9B5A036.jpg

0014EB4C-7595-4765-B61E-A318B9FA9AB5.jpg

B2758906-C47F-4C5D-923E-ED5343A3985D.jpg

9EA8C3C2-2F2E-4BCE-A41E-0F07240E16DA.jpg

6D58085A-E717-4DEC-914D-520B1730BC9A.jpg

FEE78DC4-318B-42F9-AA90-8B5E240F9492.jpg

994D3F96-D4C9-4ACC-B64C-BD7F8055BF0D.jpg

FF834527-C3D7-4077-A55F-B9476080FB67.jpg

70F7AA43-8A18-402A-984E-A50A4B3ABB91.jpg

6240E185-C836-481D-BABC-3CB5D4945635.jpg

3E7254C2-656F-41E4-AC8B-D71E809E4ABA.jpg

1E2A9A44-7044-4A3B-BF8E-412337505754.jpg

087002EB-C106-4F72-A314-89CCACA49FA5.jpg

19442CFC-7DC8-40EA-A8B4-E27F4C4B11DD.jpg


Now back to reality for the rest of the week. Maybe I can get back to the bike this upcoming weekend. And thanks for showing interest in my thread and for the great questions and suggestions. I can't wait for her to come to life again and hit the streets!
 

seansi

Junior Member
Joined
Feb 16, 2015
Messages
63
Reaction score
0
Points
0
Location
USA
Visit site
Those bars look pretty nice. I recently bought a new pair as well, not renthal. Some no name brand off of ebay. Could be a hit or miss, and they're bad I might just get a Renthal as well.

How do they differ from stock and is it worth to pay $30 extra?
 

TofuJunky87

Do you Tofu?
Joined
Feb 18, 2015
Messages
36
Reaction score
0
Points
0
Location
The Matrix
Visit site
The bars I got which are the Renthal Street Ultra Lows are lower than stock. They also angle back slightly more than stock. I got them because I wanted something more aggressive than stock, but still comfortable for longer rides. Since the bike will be naked, the added wind should help to take the pressure off of my wrists but I wasn't committed to going to something extreme like clubman bars or clip ons.

As far as if they do what I think they will... I have no idea! Hahaha mainly because I haven't ridden the bike yet so hopefully in the next week or so, I can find that out. ;)

As far as quality, I will say they are top notch. I love the gold color, the knurled end, and the Renthal logo on the bar. It even comes with a nifty little measurement feature to help you center the bars down to the nth millimeter. One downside is that I tried fitting my new bar end mirrors and the inside diameter of the bar is too small. This could be the fault of the mirror (most likely, as they are cheap Chinese rubbish) but just a consideration.:thumbup:
 

FinalImpact

2 Da Street, Knobs R Gone
Site Supporter
Joined
Mar 16, 2011
Messages
11,137
Reaction score
184
Points
63
Location
USA, OR
Visit site
Like above, I don't wish to dampen the effort or enthusiasm but the frame is a stressed member and the impact clearly deformed it from its previous state. Being cast, it does move and flex but usually results in fractures. Adding to that - once stressed and IF you pull in that tweaked section, cast frames often break.

That said, its under stress and once vibrations are added back into the mix its very likely going to crack somewhere. Based upon the angle the wheel was driven back, the engine went left and took the frame with it.
To date we've only seen small stress fractures and crash damage snapping ends off. This is a whole new arena with a section actually being hit and remaining "displaced" from its location.

I'd strongly recommend you find a new frame.
 
Last edited:
Top