Help with ebay conversion kit and suspension question.

iBeef

Member
Joined
Feb 19, 2017
Messages
37
Reaction score
1
Points
8
Location
UK
Visit site
Hi all,

I went to fit my FZ6 Chinese naked conversion tonight and ran into a problem. I've not really seen this mentioned but it's bugging me and I'm not sure that I can just let it be as it is. For a little background the headlight stay with the kit I ordered was absolute rubbish so I ordered the proper Yamaha one which fits great but its fixing it to the bike which is causing me hassle. Obviously the bottom part fixes to where the horn was no problem but on the upper triple clamp two holes seem to be missing? There is a bolt hole where the throttle cables are held in place but then in the other two locations there is just a circular bump indicating a hole should be there but it hasn't been drilled; the images below explain what I mean better than I can with words:


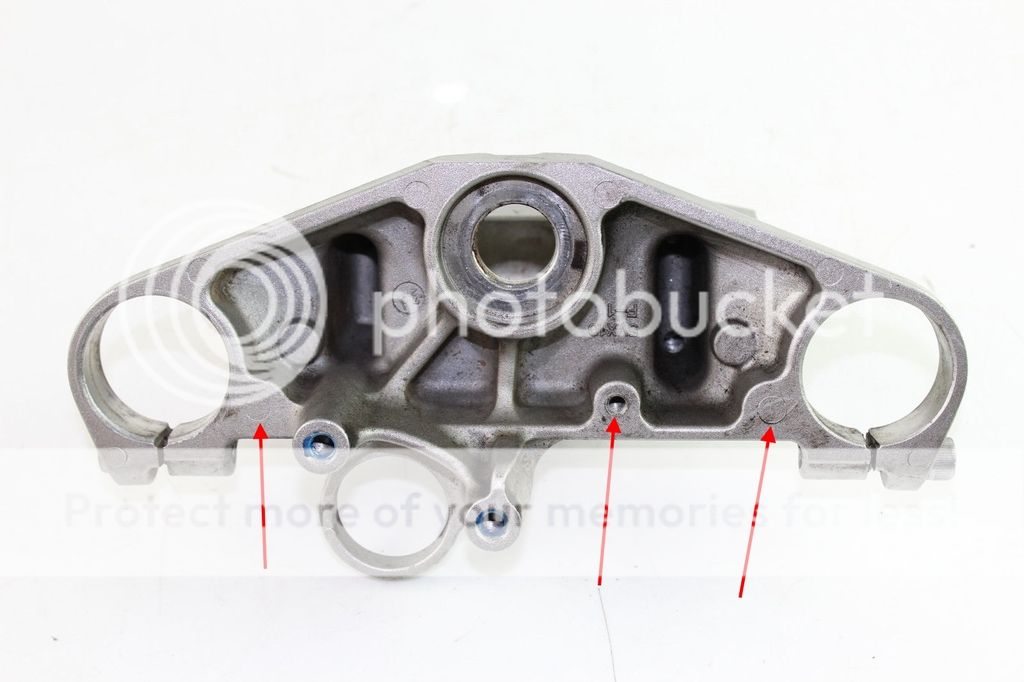
My worry is for the single hole as nothing will be holding it in place if I just use the one hole available to me. To anyone who has done this can you advise on what you did please? Did you just leave it?

This brings me to my second question, how easy is it to remove the upper triple without disturbing the fork setup? I've considered removing the top triple and drilling and tapping a hole myself for peace of mind. Any help would be appreciated and I plan to produce a step by step guide for this for anyone in he future but I just need to finish it first!

Thanks in advance.
 

FinalImpact

2 Da Street, Knobs R Gone
Site Supporter
Joined
Mar 16, 2011
Messages
11,137
Reaction score
184
Points
63
Location
USA, OR
Visit site
I've never done this conversion but I have removed the triple for powder coating.

The lower triple will support the bike fine.
Loosen: top pinch bolts and center triple nut.
Remove the bars.
Remove nut and lift triple off. It is attached by ignition switch. So, flip the triple over and secure triple to one stanchion tube.
Center Punch, Drill, and Tap holes.
Remove triple and reassemble.

If you find the ignition wires are too short to do this, reassemble triple, snug nut, pinch bolts, and bars..
Block bike up under the header. Omit previous step if you have a jack.
Now slide each stanchion tube down about an inch. Tighten lower pinch bolts and lower tire to the ground for stability.
Top triple wire should reach now. Drill and tap.

Good luck.
 

FinalImpact

2 Da Street, Knobs R Gone
Site Supporter
Joined
Mar 16, 2011
Messages
11,137
Reaction score
184
Points
63
Location
USA, OR
Visit site
If you have to move the stanchion tubes to get the triple clamp to reach, follow this to put it back together.
Minor details - right??
Flip triple install loosely. Slide each stanchion up one by one. You have to lower the frame to do this.
Once both tubes are through the top triple ( dont worry about height yet ), tighten lower triple tubes only.
Tighten top nut only.
Return stanchion tubes to flush or as found height and tighten all 4 pinch bolts. Continue assembly process.
 

upshiftoverdrive

Junior Member
Joined
Sep 2, 2011
Messages
188
Reaction score
1
Points
18
Location
Ridgeland, SC
Visit site
You are correct. It appears that the conversion kit expects you to only use the hole for the bracket that holds the throttle cables, and the horn bracket. I only had this kit on for a little while, but it seemed to hold fine when mounted to those two.

I also thought about drilling and tapping the second hole by the throttle cables. The little arm that comes up on the other side of the tree didn't reach the upper triple on mine... Probably due to the fact that mine got beat to sh*t in transit from China and was basically useless.

I am curious where you bought a factory Yamaha mounting bracket?
 

FinalImpact

2 Da Street, Knobs R Gone
Site Supporter
Joined
Mar 16, 2011
Messages
11,137
Reaction score
184
Points
63
Location
USA, OR
Visit site
You could just drill it and use a bolt and nut too! If the tap thing isn't your thing!
 

elus1ve

Member
Joined
May 29, 2012
Messages
542
Reaction score
4
Points
18
Location
Montreal
Visit site
The naked FZ6 version will come with a triple with all the required holes on the triple to bolt the stay in place. The full fairing triple only has one - the middle one.

You could leave it with one bolt, like I and many others did. It's a fat bolt, not likely to break. Holds on fine. I used some loctite on the bolt to ensure it doesn't come off.

You can tap and drill the triple as you said.

You could also get a triple from a naked version with all the required holes.Should fit the same.
 

FinalImpact

2 Da Street, Knobs R Gone
Site Supporter
Joined
Mar 16, 2011
Messages
11,137
Reaction score
184
Points
63
Location
USA, OR
Visit site
Then you have to remove ignition switch. Drilling and bolting using triple/tube as a fixture and you could be done done in 30min.

Any reason you can't make a template, transfer pattern to the top and drill down?
 

iBeef

Member
Joined
Feb 19, 2017
Messages
37
Reaction score
1
Points
8
Location
UK
Visit site
You are correct. It appears that the conversion kit expects you to only use the hole for the bracket that holds the throttle cables, and the horn bracket. I only had this kit on for a little while, but it seemed to hold fine when mounted to those two.

I also thought about drilling and tapping the second hole by the throttle cables. The little arm that comes up on the other side of the tree didn't reach the upper triple on mine... Probably due to the fact that mine got beat to sh*t in transit from China and was basically useless.

I am curious where you bought a factory Yamaha mounting bracket?

Yeah I thought that would be the case. Mine was also a bag of sh*t, tried a test assembly off the bike and nothing would line up. I found the part no. online and ordered it from yamaha along with the four grommets that sit between the headlight and the brackets that hold the indicators. I haven't got the part number on my right now but I can post ot later if you're interested.

The naked FZ6 version will come with a triple with all the required holes on the triple to bolt the stay in place. The full fairing triple only has one - the middle one.

You could leave it with one bolt, like I and many others did. It's a fat bolt, not likely to break. Holds on fine. I used some loctite on the bolt to ensure it doesn't come off.

You can tap and drill the triple as you said.

You could also get a triple from a naked version with all the required holes.Should fit the same.

I've looked around for a naked version and cannot find one anywhere. Every one I've seen is the same as mine. It also looks like the ignition is permanently attached to the yolk by some sort of rivet too so I'd rather not mess with that.

I have no doubt it holds fine but I'm worried about vibration to the parts themselves. I'm a bit of a perfectionist and I know this will bother me if I don't do it properly.

You could just drill it and use a bolt and nut too! If the tap thing isn't your thing!
I've tapped before, I reckon I can do it no problems.

I've never done this conversion but I have removed the triple for powder coating.

The lower triple will support the bike fine.
Loosen: top pinch bolts and center triple nut.
Remove the bars.
Remove nut and lift triple off. It is attached by ignition switch. So, flip the triple over and secure triple to one stanchion tube.
Center Punch, Drill, and Tap holes.
Remove triple and reassemble.

If you find the ignition wires are too short to do this, reassemble triple, snug nut, pinch bolts, and bars..
Block bike up under the header. Omit previous step if you have a jack.
Now slide each stanchion tube down about an inch. Tighten lower pinch bolts and lower tire to the ground for stability.
Top triple wire should reach now. Drill and tap.

Good luck.

Thanks for the info! I was more worried about the bottom triple dropping out but it looks as if there are lock nuts under the top triple anyway. Thanks for the explanation, I'll do it tonight as it seems easy enough; I'll just have to borrow my brothers torque wrench to do it back up :).


Sent from my SM-G935F using Tapatalk
 

iBeef

Member
Joined
Feb 19, 2017
Messages
37
Reaction score
1
Points
8
Location
UK
Visit site
Gave this a go tonight but had trouble tapping the thread due to the ignition switch in the way. This resulted in me getting impatient and a sheared bolt.

In the end I ended up drilling out the ignition switch security bolts and tapping an M8 instead due to having to drill the sheared bolt out. It seems to have gone fine, it just takes a different bolt. Lesson learnt and all that, to anyone in the future trying this, remove the ignition barrel first!

Sent from my SM-G935F using Tapatalk
 

TownsendsFJR1300

2007 FZ6
Site Supporter
Joined
Feb 7, 2009
Messages
12,531
Reaction score
1,176
Points
113
Location
Cape Coral, Florida, USA
Visit site
A bit more involved but you could have simply un-plugged the ignition harness under the tank / battery tray and avoided the ignition switch bolts altogether..

Where those casting marks are under the triple, I would have simply drilled and tapped those. Then make the Chinese bracket fit (whether it be by bending, spacers, etc..)

Lastly, those security ignition bolts... You can simply drill the heads off, slip off the switch, then use a vise grip to remove the long studs left.
 

iBeef

Member
Joined
Feb 19, 2017
Messages
37
Reaction score
1
Points
8
Location
UK
Visit site
A bit more involved but you could have simply un-plugged the ignition harness under the tank / battery tray and avoided the ignition switch bolts altogether..

Where those casting marks are under the triple, I would have simply drilled and tapped those. Then make the Chinese bracket fit (whether it be by bending, spacers, etc..)

Lastly, those security ignition bolts... You can simply drill the heads off, slip off the switch, then use a vise grip to remove the long studs left.

The ignition Barrel height was the problem, whilst in the top triple it made it hard to get any real grip on the tap. I did drill out the security bolts in the end and remove the barrel that way.

Honestly I wish I could have made the chinese bracket work but it was awful. It wouldn't line up off the bike as a mock fit never mind on the bike and I didn't feel like the threads were going to last long either. I've read quite a few stories on this forum of people struggling to get the headlight straight no matter how much they bent it. I got the Yamaha bracket to hopefully solve this. Saying that the headlight, side brackets and speedo cover that came with the kit are great so it was still worth buying the kit if you price all the OEM parts up.


Sent from my SM-G935F using Tapatalk
 

iBeef

Member
Joined
Feb 19, 2017
Messages
37
Reaction score
1
Points
8
Location
UK
Visit site
Hi all, another quick update. I managed to get my top triple back on today and my hole lined up perfectly and the bracket is fixed :).


I also test fitted the headlight and it sat nice, straight and central.


So far so good, just the electrics now! A quick question for anyone who's done this, what did you do with the throttle cables? They don't seem to really want to move much.
 
Last edited:

iBeef

Member
Joined
Feb 19, 2017
Messages
37
Reaction score
1
Points
8
Location
UK
Visit site
Hi all,

Another question, specifically to anyone with an S2 who's done the conversion. Did you have to change the throttle cables? I can't get mine in any sort of position in which they don't bind. It's starting to get really frustrating. I'm thinking about buying the fz6n throttle cables as they're different part numbers so I'm assuming they're shorter but wanted to know if anyone could shed some light on this. I did read somewhere someone twisted the throttle on the handlebars to take some of the slack but that would mean drilling a new hole for the locating dimple.

Sent from my SM-G935F using Tapatalk
 

iBeef

Member
Joined
Feb 19, 2017
Messages
37
Reaction score
1
Points
8
Location
UK
Visit site
Finished my naked conversion today, took it for a test ride and all seems to be ok. This has not been the as straightforward as I'd like but it's level, everything is working as it should and overall I'm so happy I've done it. The only thing I have left to do is get my bar end weights machined to fit my bar end mirrors which I believe is happening next week. I'm going to try and write a how to guide on this at some point to help anybody in the future who wants to give it a go but it might take a little time to write up.


Sent from my SM-G935F using Tapatalk
 
Top