I got the Y-pipe alright...Exhaust build thread..

KB2WYL

CQ CQ, DE KB2WYL
Joined
Jul 26, 2015
Messages
160
Reaction score
2
Points
0
Location
Ferndale, CA
Visit site
So, didn't want to just put this in that other thread. That was "where can I find a Y pipe, heres some ideas, etc". This is more like "One mans way to build high performance cans for 50$ and 2 full night's time".

So the project goes like this. Originally I gutted my exhaust can (stock). Great, sounds better, better flow. But didn't do too much for performance. It's still a giant chamber for exhaust gases to slow down, cool off, and plug up the works. Been wanting to get cans for a long time, but they're expensive. That and I always told myself, "If you really wanted them Loren, you would just build them". I thought about getting the Y-pipe, but discovered that to get the type I wanted, the same expensive rule applied. Thanks [MENTION=6338]TownsendsFJR1300[/MENTION] and [MENTION=15974]FinalImpact[/MENTION] for the suggestions.

I went down to my local exhaust shop (they do all welded work, all real steel, thick tubing, etc etc.) Talked to the man there about what I wanted. Our exhaust is 1.75" so don't want anything expanding too much larger than that. Especially since we have dual exhaust cans. Well, turns out the smallest "glass packs" he had were 1.75" ID. He tells me about how it's good to keep it like this (keep the 1.75" for the dual exhaust) because larger chamber (like stock muffler) means you have to be moving a LOT more air to keep up your exhaust velocity. More air=higher RPM=higher torque/hp curve. In our case, with the numbers already so close to our redline, having to move more air to keep up exhaust gas velocity pretty much = loss of power. Y'all know this, that's why we get rid of that stock exhaust in favor of aftermarket systems. All of which are similar in the fact that they are big cans, packed with sound muffling material, and a smaller perforated tube running through them to keep up this velocity unlike our stock systems do.

He goes on to tell me how he uses these on his quads and his bikes and he likes them. They're 24$ each, I can weld right on to them, and he has 2. Perfect.

So the easiest way for me to do this is to just post up the pics and describe them as I go. Hopefully somebody somewhere can take something good from all of this. Feel free to ask questions, advice, or tell me how crazy I am and how you are glad you just went with the scorpions Blah.


IMG_2623.JPGWell, There's my famed stock muffler gut. I'm going to need the brackets off of it. Also, you can see the 2 cans ans some spare tubing I picked up. Can we make something work with this and a TIG welder??


IMG_2624.JPGI should have taken pics of the backside where I cut it open and did the weld. It was my first wire feed weld, with the HF flux core. It's atrocious.


IMG_2625.JPGOk, now we're getting somewhere. For the first bend, it was the only one that was going to be a little severe. Not much room with that under seat/fender box. I wanted it to be smooth still, so I cut slits into the pipe so that I could bend it gradually in pieces. We can always weld that up later, I thought.


IMG_2626.JPGThere you go, better shot


IMG_2627.JPGHey hey, not bad. We can't see this part anyhow, but now we don't have any sharp edges in which gases can do their little vortex things and slow down the flow.


IMG_2628.JPGAnd again, another angle.


IMG_2633.JPGOh the atrocity is back again. This time sans brackets. I love plasma cutters.


IMG_2634.JPG
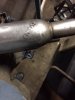
Oh geez, there it is. Looks like I was welding with a battery and coat hangers :rolleyes:


IMG_2636.JPGOk back to that bend. Good penetration on the welds. Good, we're doing something right this time.


IMG_2637.JPG
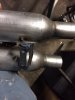
Alright so I've made a cut in the bent piece, and I'm sizing up where I need to cut the other can, so that I can weld together my "Y Pipe".

Oops, only 10 per post...to be continued....
 

KB2WYL

CQ CQ, DE KB2WYL
Joined
Jul 26, 2015
Messages
160
Reaction score
2
Points
0
Location
Ferndale, CA
Visit site
Ok back...

IMG_2639.JPGI think that this will work. Looks like the Y's that I see pictures of. Remember, I have never done this before. I figure as long as I don't give up something is bound to come together :).


IMG_2640.JPGThe angle was too big on the secondary can, so I added another piece to it to space them a little further apart back where the Y happens. Same plan though.


IMG_2641.JPGSuccess! Now, to make sure they don't move while I'm playing around, I put them into place, mark where the top hanger bracket goes, and get it welded on as well.


IMG_2642.JPGYup, that'll hang some cans.


IMG_2643.JPGAnd a better shot of the "Y". Not too bad for my first time. In retrospect I would like the Y to be a true Y, but then I would need much shorter cans. Besides, a LOT of the aftermarket systems everyone raves about are done just like this.


IMG_2644.JPGSo I skipped a few here, but I'm sure you get the idea. You can see I added a couple more pieces, slowly getting the angle close to parallel with the stock midpipe. When I finally got it, I used a piece that was a little bit too long. Then I cut back the mid pipe a little bit. Welded the two together using 308 stainless filler rod (all the rest is ER-70S6). The 308 works fine joining stainless (midpipe) to low carbon steel (my creation) as long as it's not some high stress situation, I.E. race car frame. Anyway, here I am, ready to have new mufflers. Well, almost...

IMG_2645.JPGGotta get on the bottom bracket. This one took me a little while, as placement is very important. I didn't want my tail tidy to be hanging out off center from the rear tire. People behind me would start to wonder.....


Ok next post....
 

KB2WYL

CQ CQ, DE KB2WYL
Joined
Jul 26, 2015
Messages
160
Reaction score
2
Points
0
Location
Ferndale, CA
Visit site
IMG_2647.JPGNow we're almost there. Bottom bracket on, centered and perpendicular to bike. Phew.


IMG_2650.JPGOh what's that, a tail tidy design I was fiddling around with. I like that the way it is made, it can be hooked up to ONLY the bottom bracket of muffler and still not move. That's what those welded box sides get you. That, and they make for great spots for turn signals. I know that one hole is extremely sloppy, but that's for the little plastic slot in the license plate light. You'll never see it. And, we get to stay legal, cool....


IMG_2651.JPGAnother shot, back side. Plenty of work left for painting, but there are more days for pics...it's getting late...


IMG_2652.JPGFinally!! Those ugle 4" long ends on the cans are gone. [MENTION=15974]FinalImpact[/MENTION], now they're not so long huh? Ha ha. Also ground down the factory welds. They had terrible start and stop thick spots.


IMG_2653.JPGYeah, THOSE look kinda like motorcycle mufflers. he he he


IMG_2654.JPGAfter all that grinding, we needed to re-do the edges. This is some of the TIG where I took my time a bit. Is it the classic "stack of dimes" TIG weld? No, because I was going for even but melted down as far as possible. Bought myself another 3/8" of space, and they look better. Yes!


IMG_2655.JPGTail tidy, I guess you get to see it after all....looks funky though when that bedliner paint is drying on it.


So thanks all for reading. In the next day or two there will be a bunch more as I paint all of this stuff and put it back on the bike. I did fire it up once today. And YES, I did make a sound recording this time :) Sounded nice, but a little bit tinny. That was before I sawed off the 4" and polished the ends though, which I'm sure makes a world of difference. I will say that throttle response was terrific :) Ok, gotta spray these things and hit the sac. "Til tomorrow,

Loren
 

Attachments

  • IMG_2646.JPG
    IMG_2646.JPG
    43.8 KB · Views: 66
  • IMG_2645.JPG
    IMG_2645.JPG
    44.7 KB · Views: 59

KB2WYL

CQ CQ, DE KB2WYL
Joined
Jul 26, 2015
Messages
160
Reaction score
2
Points
0
Location
Ferndale, CA
Visit site
Oh, the bedliner...Had to read back through and see where I mentioned it....i am using header paint on the mufflers. Black and clear header paint. The bedliner I mention in the last pic, that's just for the license plate holder/tial tidy hanger.

I agree. Bedliner for the mufflers would probably not work :)

Thanks,

Loren
 

KB2WYL

CQ CQ, DE KB2WYL
Joined
Jul 26, 2015
Messages
160
Reaction score
2
Points
0
Location
Ferndale, CA
Visit site
2 coats, 2 thick coats black 500 degree high heat flat, 1 coat 1200 degree clear. Now they look like proper cansIMG_2656.jpg
 

KB2WYL

CQ CQ, DE KB2WYL
Joined
Jul 26, 2015
Messages
160
Reaction score
2
Points
0
Location
Ferndale, CA
Visit site
Damnit!!! I had a great recording coming home tonight from the town over. I never use the voice recorder on phone so when I went to crop the 23 seconds of putting phone in pocket....10 mins gone with the wind so to speak. Bummer. But, like I said before, I do have the recording of when I first put them on before I sawed off the last 4" of pipe you see sticking out of them in the early photos. What a difference, I mean night and day. They went from sounding like one of those little imports the teenagers around here drive, to sounding like proper pipes. Plus, at idle it went from geez I think that might be a little too loud, to oh yeah I can definitely get away with that. Tomorrow is supposed to be nice, and so I will ride to machine shop class. I will make another recording, and then post them both here.

How can I post audio recordings, just as an attachment? "Go advanced" instead of "post quick reply", and then hit the "paperclip" and attach the sound files, right?

I rushed in to putting them on tonight, and since I had to put everything back on including lights and all, rushing got me to nick the paint (on the tail tidy, no big deal). You can't even tell in the pics, I don't think. The way the license plate and lights came out was a mistake, I hadn't mocked up correctly, and so I had to cut a little off of the stock "bar" that the license plate screws to (I attached it to my tail tidy). Had to do that so that I could point the turn signals straight, as things were so tight they were pointing up at an angle. But, I'm glad it happened, because now everything is as tight as it can possibly be.

I left the bottom of the "A" on, so tomorrow night I will take a piece of aluminum and make it into a long triangle that covers from the bottom of the "A" all the way to the tail mount. There's another member on here with a thread for that, where he covers the whole underside of the tail with a piece like this and lists everything step by step, screw sizes and all. I like that look.

Well, here she is. I need to go take down my wanted ad for cans. Funny, just today I got the first reply on that, pair of 2B with only 1500 miles for $375....smoking deal compared to going rate, but i'm pretty proud of these and absolutely love the sound and improved response.

With these and the timing advance, I can be at 55mph in 6th gear, only turning 5k or so, open it up, and absolutely no bogging down like before. Quick, crisp response. Thanks so much again for that [MENTION=15974]FinalImpact[/MENTION]. Well, you'll all hear tomorrow Blah

IMG_2657.JPGOh shoot, how'd you get in here! He was at work today, up on roof. So coverd in pollen that he had to stop, wipe some off, and then fly away again ha ha.


IMG_2658.JPGThere we go. Not bad for my first exhaust and tail tidy...ever :)


IMG_2659.JPGAnother view...


IMG_2660.JPGOne more view. I really like how the ends of the cans turned out after grinding and autonomous TIG welding them.


IMG_2661.JPGUp close to see how the tail tidy actually works. All functional lights including license plate.

Well, for now.....

Thanks all for reading!

Loren
 

FinalImpact

2 Da Street, Knobs R Gone
Site Supporter
Joined
Mar 16, 2011
Messages
11,137
Reaction score
184
Points
63
Location
USA, OR
Visit site
Way to crank it out and cheap too! Are you happy?

Soundcloud.com its free. I rip them into mp3 tracks put them there as I don't need a video of me breaking the l a w... Like I would do that!! Blah

FZ6 joy ride audio...
 

KB2WYL

CQ CQ, DE KB2WYL
Joined
Jul 26, 2015
Messages
160
Reaction score
2
Points
0
Location
Ferndale, CA
Visit site
I wasn't sure when I first read the reply, if you were being sarcastic, not that you would do that :rolleyes: Ha ha. Yes, I am very happy, indeed. Turned down the offer for the 2Bros exhaust. This thing sounds great! Then I thought the other comment was funny as well. When I was riding home last night, recording, there was a big to-do right before :I got on the highway. Looked like someone had tried to hold up the local quicky mart, and every cop from 2 towns was on scene.

Not that that affected how I rode home, no one watching highway, I'm just sayin'.....Blah

Loren
 

KB2WYL

CQ CQ, DE KB2WYL
Joined
Jul 26, 2015
Messages
160
Reaction score
2
Points
0
Location
Ferndale, CA
Visit site
Ok. I checked out soundcloud and added 2 files. First is real short, the pipes when I was first fitting, with the extension pipes still on. Second is starting up and leaving school to come home, today. Second one I did a bunch of editing. It's pretty much slow down to a stop sign, accelerate, another stop sign, highway, off ramp, one more stop sign, then long road into my town. I have the full versions still.

There are some great pulls in the second one. 1 min. in is the first stop sign, and then 0-100mph. Not giving it all I could, but enough so you can hear the exhaust.

1:30 I'm on highway, 70-90

2:15 there's a cut, then the Decel off ramp to stop sign, accelerate around a long corner, by 2:30 another stop sign and then over Fernbridge (It's always windy up there, really windy)

4:45 is coming into town, I always love that part of the ride. Slow, but she sounds nice, and being such a small town I'm pretty sure I have the nicest bike here. That's not gloating, there are certainly nicer bikes, but it really is a small town ha ha.


The rest, well you get it, you all ride. I really think it sounds great. Decel even, it doesn't pop, but rather gurgles....I've always loved that sound of an engine, timed right (or closer to right, now :) Probably need to re-adjust CO2, and at some point a logger (or flash, wink wink) would be nice, but it's close.

Enjoy, and please let me know what you think!

https://soundcloud.com/loren-coty/new-exhaust-first-try-no-saw-recording3

https://soundcloud.com/loren-coty/way-home-sawed-off


Loren
 

KB2WYL

CQ CQ, DE KB2WYL
Joined
Jul 26, 2015
Messages
160
Reaction score
2
Points
0
Location
Ferndale, CA
Visit site
For some reason (because I have no idea how to use soundcloud???) the links work fine, but when you play the first one it shows the 35 second file stopping, but the audio keeps going into the second recording? Since that second one, the ride home, is 5 min long, you can just close the window and click on the second link, if you want to jump around.

Loren
 

KB2WYL

CQ CQ, DE KB2WYL
Joined
Jul 26, 2015
Messages
160
Reaction score
2
Points
0
Location
Ferndale, CA
Visit site
Thanks much Scott :) Yeah, I thought so too, a tiny bit thinner, nut then again the physical size is about half as wide ;-)

Loren
 

FinalImpact

2 Da Street, Knobs R Gone
Site Supporter
Joined
Mar 16, 2011
Messages
11,137
Reaction score
184
Points
63
Location
USA, OR
Visit site
Way to go! It sounds happy now! :thumbup: :thumbup:

Busy weekend and just now had a chance to listen....Good job!

JM2C - but the money saved here could perhaps go towards a F/C!!!

So, you also advanced the ignition? By your calculations, how far?
 

KB2WYL

CQ CQ, DE KB2WYL
Joined
Jul 26, 2015
Messages
160
Reaction score
2
Points
0
Location
Ferndale, CA
Visit site
Thanks Randy, I appreciate that. And yeah, this PCFC that I have right now is a bit of a joke, and I know that. Keeps me from getting too lean, so it's doing A JOB, but certainly these cheaper fuel controllers don't do any jobs that real tuning can do. Sad part is that it can hold up to 10 maps, but with nowhere locally or even close by to get tuning done....

I took some measurements (ok, a lot of measurements) using vernier micrometer as well as dial indicator (on wheel, on bike, respectively) and came up with 4.5 degrees. My personal observations?

Idle- Not much difference for me

Low RPM-4k- Good increase in power, I like it

Mid RPM-4k-8k- Smaller increase, but still increase, definitely smoother and more responsive. 50mph in 6th for example, what 5k or so, used to be hitting gas was a dull "BAAaauuuuu" with power eventually coming on, like it was dumping more fuel than the spark advance could handle. Now more of a "WAAAAAA" as power is there instantly, and even. Yeah, it's 6th at 5k, downshift dummy, but I like that I have the option now to leave it if in traffic or ?

High RPM-8k-time travel- Not noticing much here. Like stock, no matter what gear you are in if you are past 8K and getting on it....Well let me rephrase that, after all the exhaust work I did, and dropping to 15T in the front, if I am past 8K getting on it, hold on.

I will say that to me, before the trigger mod, it felt like 8K and up was "yeah, this is fun, finally all that the bike can give me". Now, noticing all the other differences from the trigger mod, 8K and up feeling the same, I feel like I still have quite a bit that could be gained with fueling changes. As well as, eventually, changing ECU timing limits.

Loren
 
Top