Fuel level plug wire

Topher

New Member
Joined
Oct 18, 2016
Messages
51
Reaction score
0
Points
0
Location
Fl
Visit site
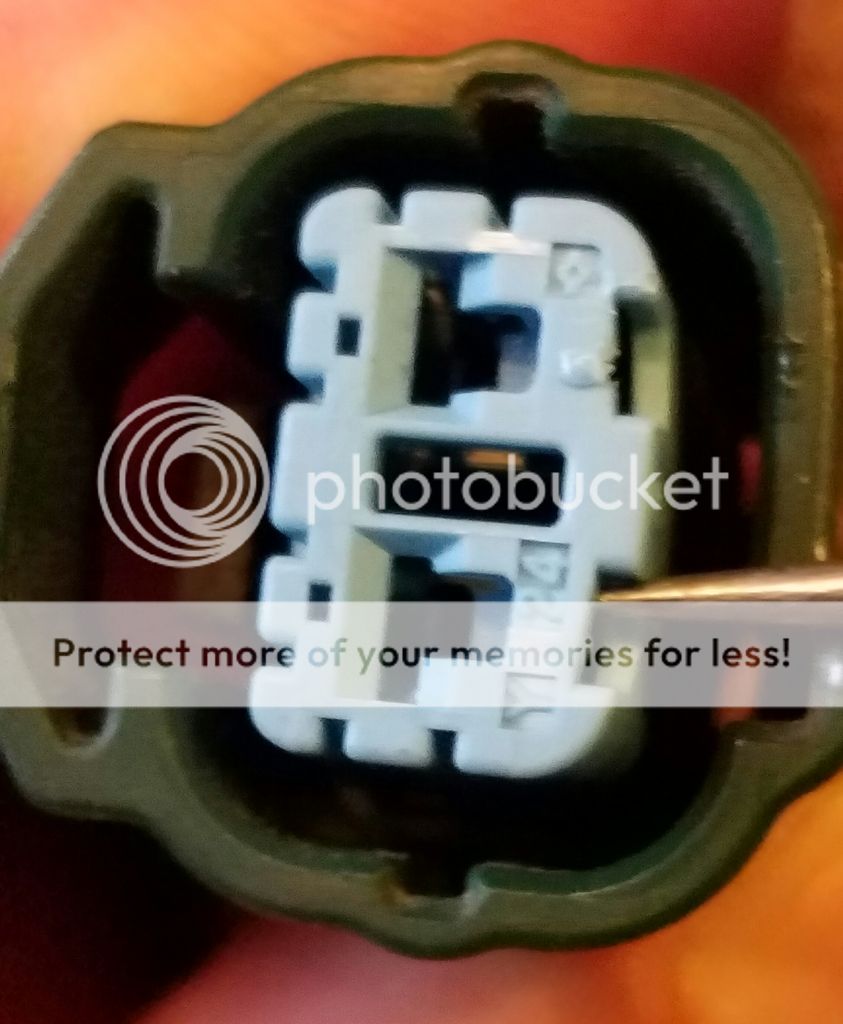
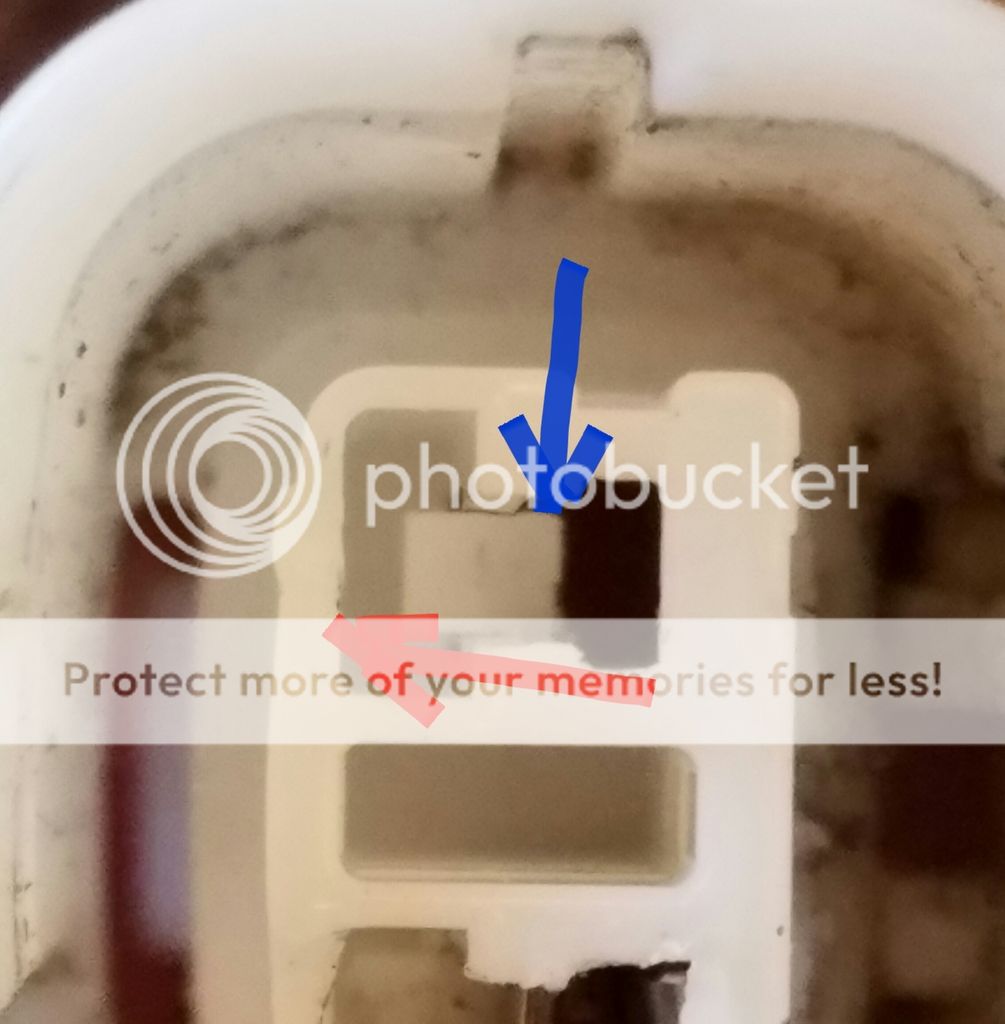
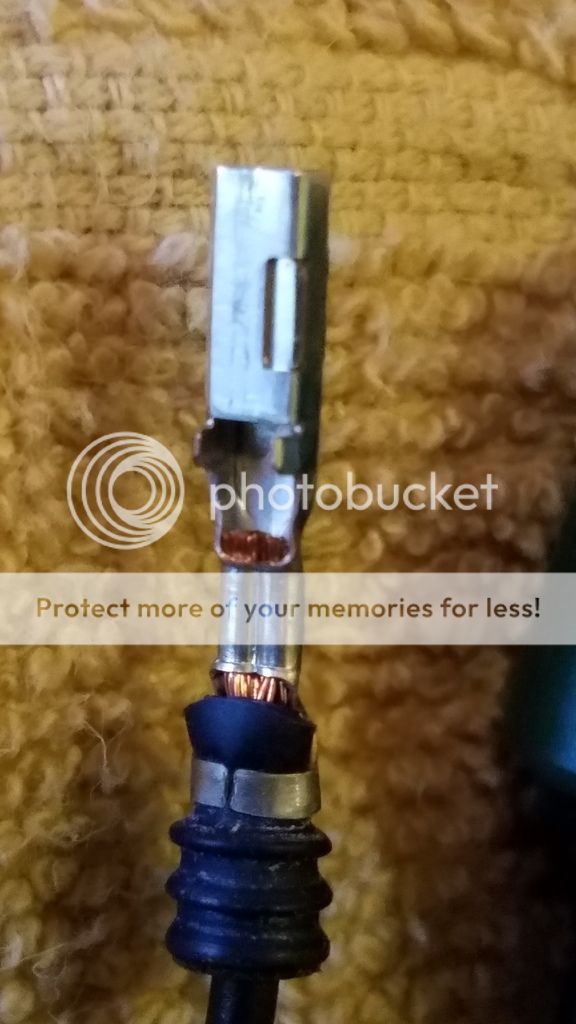
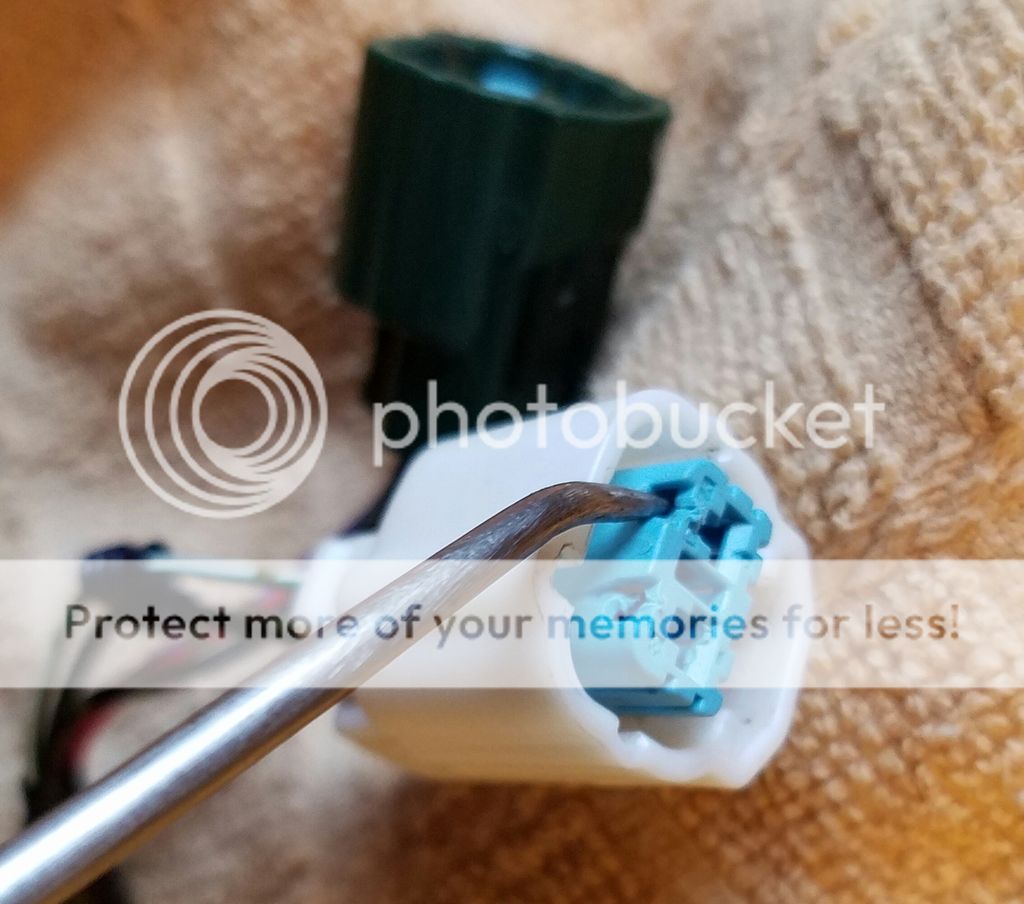
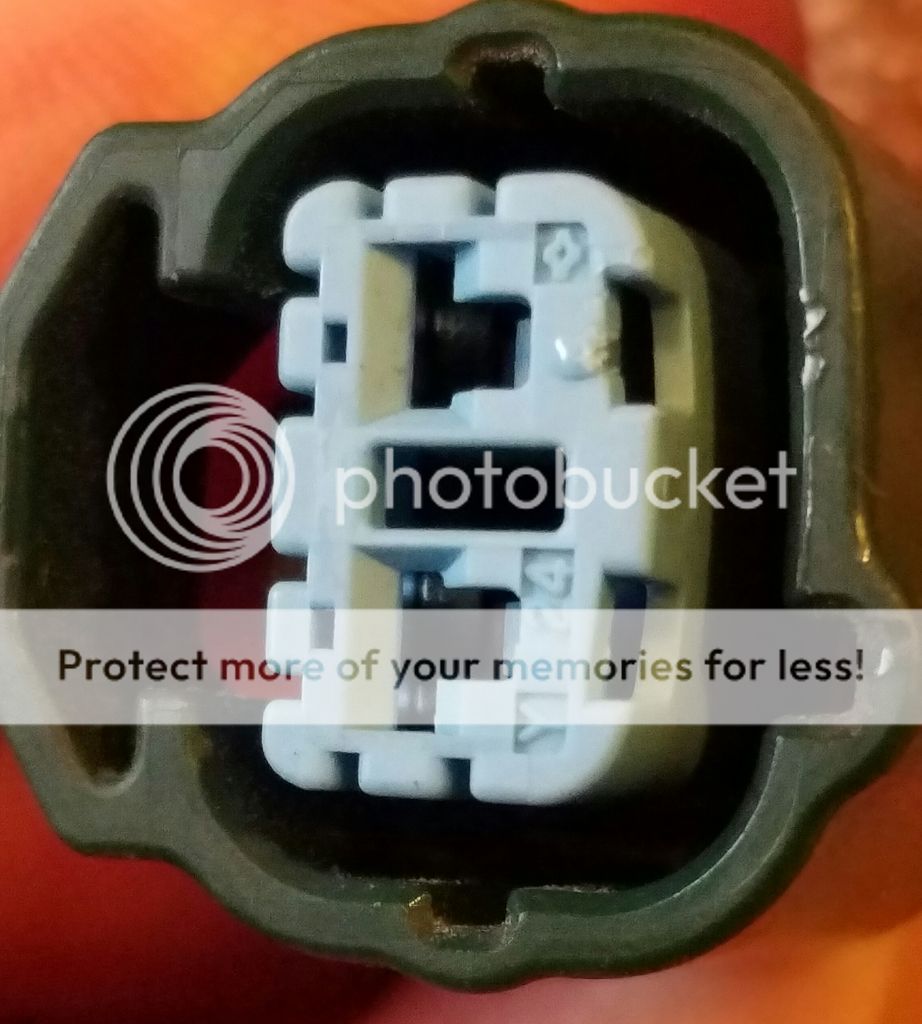
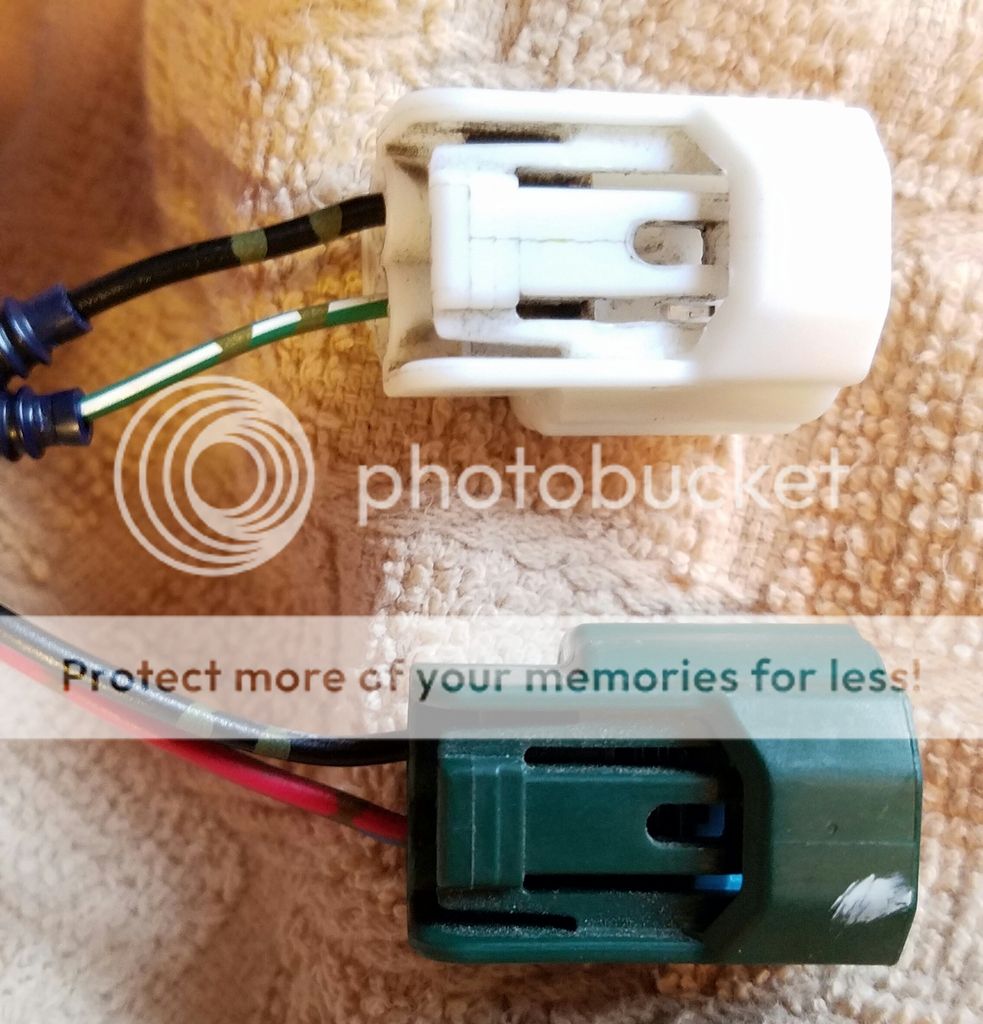
Hey Guys been busy with the bike got some bad gas and fried a plug or two. Anyways got the plugs changed, drained the radiator while I was in there and I also pulled a wire out while I was draining the tank it fell and pulled it loose from the plug at the bottom of the tank. Everything runs fantastic now with the new plugs but the fuel level gauge says full and continuously flashes now. So is there an easy way to fix this I tried pushing the wires back into the bottom of the plug and that's not working so any help would be great. Thanks in advance
 

TownsendsFJR1300

2007 FZ6
Site Supporter
Joined
Feb 7, 2009
Messages
12,532
Reaction score
1,178
Points
113
Location
Cape Coral, Florida, USA
Visit site
I'd un-plug the plastic part from tank first.

With access to that now, you should be able to push a VERY SMALL retainer tab on the
metal connector to release it from the plastic plug.

Once that terminal is out, and if your VERY PATIENT, you may be able to un-crimp that terminal
(open it up enough to get the "pulled wire" back in. Re-install the wire, re-crimp and install in the plastic plug.

If that doesn't work for you, these folks may have the correct connector for you:
Motorcycle Terminals, Connectors, and Wiring Accessories
 

Motogiro

Vrrroooooom!
Staff member
Moderator
Elite Member
Site Supporter
Joined
May 8, 2008
Messages
14,998
Reaction score
1,167
Points
113
Location
San Diego, Ca.
Visit site
I'd un-plug the plastic part from tank first.

With access to that now, you should be able to push a VERY SMALL retainer tab on the
metal connector to release it from the plastic plug.

Once that terminal is out, and if your VERY PATIENT, you may be able to un-crimp that terminal
(open it up enough to get the "pulled wire" back in. Re-install the wire, re-crimp and install in the plastic plug.

If that doesn't work for you, these folks may have the correct connector for you:
Motorcycle Terminals, Connectors, and Wiring Accessories

They have some nice supplies at that web site. :) ^^^^^
 

FinalImpact

2 Da Street, Knobs R Gone
Site Supporter
Joined
Mar 16, 2011
Messages
11,137
Reaction score
184
Points
63
Location
USA, OR
Visit site
If you have an ohm meter or a test lamp you could test the black grond wire.
With an ohm meter set to low like 20 ohms or less, insert a paper clip into the gauge black lead connector. Connect ohm meter lead here the other to the battery ground lead. You should get 1 ohm or less.

Using a 12v test lamp, same as above but instead of battery Neg, connect the test lamp to Batt. Pos. The lamp should light. You can do the same test on the pumps black wire.

Any chance the tank dropped backwards hard enough to stick the float?

In the tech section is a sticky on fuel pump and fuel meter trouble shooting. It has lots detail and how to diagnose.
 

TownsendsFJR1300

2007 FZ6
Site Supporter
Joined
Feb 7, 2009
Messages
12,532
Reaction score
1,178
Points
113
Location
Cape Coral, Florida, USA
Visit site
He simply has a pulled wire out from the connector


Quote from the OPs first post::

"I also pulled a wire out while I was draining the tank it fell and pulled it loose from the plug"
 

FinalImpact

2 Da Street, Knobs R Gone
Site Supporter
Joined
Mar 16, 2011
Messages
11,137
Reaction score
184
Points
63
Location
USA, OR
Visit site
And the info above lets you know Which Wire!
Given the tool, it's 10 seconds of labor to determine which wire.
 

FinalImpact

2 Da Street, Knobs R Gone
Site Supporter
Joined
Mar 16, 2011
Messages
11,137
Reaction score
184
Points
63
Location
USA, OR
Visit site
Re:How to repair fuel connectors

Have any tips removing the metal end from the plastic so he can re-attach the wire?

You need two picks with a fine point. Sharper than these would be best: Pencil is for size reference.
The protrusion from the blue locks are fillers that keep the connectors locked in the housing.
20170121_123446_zpskxmbvbzz.jpg


Insert pick here, a curved one works best: Pry on both sides, but over the alignment groove offers best angle/fit:
20170121_120826_zpsvky9mmo7.jpg


Once the blue lock is removed a straight pick can be used to release the lock on the individual wires:
The blue arrow is the lock on our connector. Use the pick to get under the tab and lift in the direction of the red arrow. DO NOT pull on the wire until the tab lifts. Apply gentle pry force, then a gentle pull on the wire. If it does not come free, push it back in as you may have bound them already.
**Pulling without release only binds it making it impossible to remove, push the wire back in, lift the tab, pull the wire.
20170121_121309_zpsvbymqwo6.jpg


Here is the stock connector in good shape:
It should only fit back in from one direction. Locking is achieved when the rectangle is fully seated into the housing. The wire crimp retention goes opposite the tang in the connector that locks it in place. Then the blue lock holds the assembly together.
SIZE: Externally the connector is 3.00 mm X 2.30 mm Total length is 18 mm it takes a special crimp tool to make that crimp!
20170121_131006_zpslcqja9ez.jpg


As you can see here, a dull pick slipped and tore up this lock. It is still usable.
20170121_121434_zpsycgrzsvs.jpg


Two good pries and this one came off: Extracting the pins should only take 20 seconds total if done right:
20170121_120917_zpspgdl206w.jpg


Wire orientation:
NOTICE the wires into the Green Fuel Pump Power are both the same size while the Fuel Sensor Wire has a Large Ground and Small Sender wire to the fuel Sensor. If all four wires need repair, Order 3X 16 - 18 gauge wire connectors and 1X 20 - 22 gauge wire connector. At 30 cents a connector, ORDER EXTRAS in case your crimp fails!

White: Fuel Sensor
Green: Fuel Pump Power
Black Wire is ground for both!
20170121_121348_zpsahztmcwi.jpg
 
Last edited:

FinalImpact

2 Da Street, Knobs R Gone
Site Supporter
Joined
Mar 16, 2011
Messages
11,137
Reaction score
184
Points
63
Location
USA, OR
Visit site
Not yet I'm going to try tomorrow I was wondering where you get the pics are those Automotive or something else

A deceased FZ devoted its neuro structure to science aka me!! Not free mind you but it has helped solve a couple of mysteries! Now if I just had the rest of the parts I could conduct my experiment! Blah

So no, not automotive! An actual FZ6! :rockon:
 

Topher

New Member
Joined
Oct 18, 2016
Messages
51
Reaction score
0
Points
0
Location
Fl
Visit site
A deceased FZ devoted its neuro structure to science aka me!! Not free mind you but it has helped solve a couple of mysteries! Now if I just had the rest of the parts I could conduct my experiment! Blah

So no, not automotive! An actual FZ6! :rockon:
Okay fair enough I deserve that one don't repost from a phone I was actually talking about the tools the picks you were using is that something I can get at a local auto parts store or are those like Jewelers tools
 

FinalImpact

2 Da Street, Knobs R Gone
Site Supporter
Joined
Mar 16, 2011
Messages
11,137
Reaction score
184
Points
63
Location
USA, OR
Visit site
Snap-On picks in photo. Could be just about anything though....

You will need a proper crimper tho. The most expensive part of the deal, but still cheap really.
Amazon, Grainger, NewEgg, Digikey are all good sources once you know the type of connector you are crimping.
 

Topher

New Member
Joined
Oct 18, 2016
Messages
51
Reaction score
0
Points
0
Location
Fl
Visit site
So the wire came outside of the crimping on the plug is there a way to open that and get the wire back in there or do I just need to order new plugs
 

TownsendsFJR1300

2007 FZ6
Site Supporter
Joined
Feb 7, 2009
Messages
12,532
Reaction score
1,178
Points
113
Location
Cape Coral, Florida, USA
Visit site
So the wire came outside of the crimping on the plug is there a way to open that and get the wire back in there or do I just need to order new plugs

If your real careful and PATIENT, with some very small screw drivers, you should be able to open the crimp up.

Re-strip the wire and re-install. I'm not EXACTLY of the clip end you have, but soldering (if possible) may not hurt either.

The links posted above, were so you could order that metal end new... Yamaha doesn't sell it or the end separate, just the wiring harness..
 

Topher

New Member
Joined
Oct 18, 2016
Messages
51
Reaction score
0
Points
0
Location
Fl
Visit site
wire1.jpg

So here is what I have now plus a stripped wire and one with a plug still attached. Can you order any of these parts?
 

TownsendsFJR1300

2007 FZ6
Site Supporter
Joined
Feb 7, 2009
Messages
12,532
Reaction score
1,178
Points
113
Location
Cape Coral, Florida, USA
Visit site
View attachment 67543

So here is what I have now plus a stripped wire and one with a plug still attached. Can you order any of these parts?

It looks like that blue part was torn out, is that correct?

The metal part, closest to where it clips in is what I referred to, to GENTLY open up and put your existing wire back in.


Your going to have to contact that parts link I posted earlier and see if they have it... Yamaha won't carry it..

Or find a bike being parted out and buy the connector / wires and tie into your harness...
 

FinalImpact

2 Da Street, Knobs R Gone
Site Supporter
Joined
Mar 16, 2011
Messages
11,137
Reaction score
184
Points
63
Location
USA, OR
Visit site
More links and info for parts sources here: Fuel Pump Connector Repair Information and links

Electrical Section has more links too!

Follow the link!!! ^^^^^ it leads you here and parts are cheap to make a proper repair! Look at the bottom here! Everything you need to know!

A quick How To Repair damaged Fuel Pump power and Fuel Sender wires. See link at the bottom and order the connectors $1.20 for all four connectors. You can also order the whole connector. Wire gauge size is different from Sender to Power so get the right ones. You will need the proper crimp tool too. I would not solder as the vibrations can crack a solder joint.

You need two picks with a fine point
. Sharper than these would be best: Pencil is for size reference.
The protrusion from the blue locks are fillers that keep the connectors locked in the housing. Remove the blue locks to Remove the metal connectors!
20170121_123446_zpskxmbvbzz.jpg


Insert pick here, a curved one works best: Pry on both sides, but over the alignment groove offers best angle/fit. Pop the connector off.
20170121_120826_zpsvky9mmo7.jpg


Once the blue lock is removed a straight pick can be used to release the lock on the individual wires:
The blue arrow is the lock on our connector. Use the pick to get under the tab and lift in the direction of the red arrow. DO NOT pull on the wire until the tab lifts. Apply gentle pry force, then a gentle pull on the wire. If it does not come free, push it back in as you may have bound them already.
**Pulling without release only binds it making it impossible to remove, push the wire back in, lift the tab, pull the wire.

If your wires are pulled from the metal connector, you will need a small paper clip or something to insert and push the connector our of the plastic housing.
20170121_121309_zpsvbymqwo6.jpg


Here is the stock connector in good shape:
It should only fit back in from one direction. Locking is achieved when the rectangle is fully seated into the housing. The wire crimp retention goes opposite the tang in the connector that locks it in place. Then the blue lock holds the assembly together.
SIZE: Externally the connector is 3.00 mm X 2.30 mm Total length is 18 mm it takes a special crimp tool to make that crimp!
20170121_131006_zpslcqja9ez.jpg


As you can see here, a dull pick slipped and tore up this lock. It is still usable.
20170121_121434_zpsycgrzsvs.jpg


Two good pries and this one came off: Extracting the pins should only take 20 seconds total if done right:
20170121_120917_zpspgdl206w.jpg


Wire orientation:
NOTICE the wires into the Green Fuel Pump Power are both the same size while the Fuel Sensor Wire has a Large Ground and Small Sender wire to the fuel Sensor. If all four wires need repair, Order 3X 16 - 18 gauge wire connectors and 1X 20 - 22 gauge wire connector. At 30 cents a connector, ORDER EXTRAS in case your crimp fails!

White: Fuel Sensor
Green: Fuel Pump Power
Black Wire is ground for both!
20170121_121348_zpsahztmcwi.jpg


THE REPAIR:

  • Before stripping and crimping your wire, insert the weatherproof rubber grommet onto the wire.
  • Strip the wire just enough to engage the crimp area of the connector. Try not to damage wire strands.
  • Crimp Wire using the crimp tool below. NOTE: wire gauge for the BLACK GROUND WIRE is the SAME for both connectors while the Sender wire is only 22 gauge. Pull firmly on wire and connector. It should not pull off with mild force. Do not solder as this will make the wire brittle and cause it to crack and fail.
  • Push grommet onto connector and fold over the remaining tabs. See picture above of wire.
  • Insert connector into socket. The Wire Crimp lead of the connector goes opposite the lock in the connector.
  • Repeat for other wire.
  • Insert blue lock. It should click and stay in place.
  • Done


Order parts from here:
FUEL TANK CONNECTOR REPAIR KIT:
SIZE: Externally the connector is 3.02 mm X 2.33 mm Total length is 18 mm it takes a special crimp tool to make that crimp!

Home » Shop » Connectors / Harnesses » Sumitomo » HX Sealed Female Terminal for 2 way Sumitomo Honda Injector Connector ( 22 - 20 AWG ) << Sensor One Side

Home » Shop » Connectors / Harnesses » Sumitomo » Sumitomo DL / SL Sealed Series Female terminal 18 - 16 AWG Terminal, loose piece << Fuel pump X 3 for repair of all 4 wires being pulled.


PS - Search for "Sumitomo connector" and you may find other sources.

Here is the whole connector. Not sure which though Power or Sendor.
2-Way Receptacle Kit

OEM Connectors for ECU, LAMPS, SENSORS, PLUGINS OF ALL KINDS, plus heat shrink and strain relief.
*** LOOK HERE ***
Corsa-technic.com - Motorcycle Specific Parts!

and the pins:
2-Way Receptacle Kit

The Crimp tool need for this repair:
http://www.corsa-technic.com/item.php?item_id=369&category_id=86
*********************************************
Another Source
Motorcycle Terminals, Connectors, and Wiring Accessories
 
Top