• Welcome to the Yamaha FZ6 Forums. Member registration disables ads and allows you to post and share. Register Here.

Error 33 breaking my bike abroad- urgent help please

Finally got the partzilla parts, and that permatex sealant.

I've seen some guys from the States complaining about the prices getting higher and higher. Well, parts listed $260 on partzilla (also bought some Honda stuff apart from the FZ6 piston and rings) actually costed me around $390, after adding the shipping + VAT + import taxes + currency conversion fee. And if I bought locally, it would have cost $500-600...

But now (I think) I got all the necessary parts. I'll try my best to squeeze in as much wrenching time as possible, as this month turns out to be the craziest at work.
 
I haven't been around much. So it looks like piston dropped into the crank case area allowing oil ring to expand and raise hell? Uhg... painful to read parts of this.
You win having far more patience than many! Good job moving forward.
 
I haven't been around much. So it looks like piston dropped into the crank case area allowing oil ring to expand and raise hell? Uhg... painful to read parts of this.
You win having far more patience than many! Good job moving forward.

"Dropped" is a bit of an understatement, but mostly that's what I did to it.

Pretty much everyone told me that they're surprised that I still didn't give up this project because they would have just parted it or sold as broken a long time ago. It's been frustrating at times (as proved by some of my previous posts) but I'm still determined to finish the project. I'm far from patient, but in the last years I've been working hard enough turning "nothing" to "something", constantly overcoming setbacks, that it now takes a lot more than a few curve balls on a rebuild to make me throw in the towel.
 
As for the painting process. Whatever they applied certainly wears like iron. As some of you know I took every remaining silver component off the otherwise Raven colored bike and media blasted it followed by lacquer thinner wipe and powder coated everything black.

Other than knocking the shine off the otherwise silver part, the media didn't do much in the way of taking the paint off. That said if it weren't for the expense I would almost say it may in fact be some form of powder coating. But I can't imagine baking every part and expense that goes with the process. Then again, waiting for paint to cure is production time and space too!

All that aside the powder coat application is what 4 or 5 years old now and holding up extremely well. No chipping, peeling, wear of anything.

Much like the OEM stuff... Wears like iron!
 
The OEM paint was far from wearing like iron- maybe it's the de-icing chemicals, but half of all FZ6s I've seen that had a silver painted engine had flaking.

I've finished the crazy stuff with work, so now I started working again on the bike.

I've installed and torqued all the rod bolts. One thing, however, I overtightened one of the rod bolts by around 10-15 degrees (target was 150 degrees). Considering that the real world tolerance of calibrated a click type torque is around 4% I don't think this is something I should worry about, but what do you think?
 
I've installed and torqued all the rod bolts. One thing, however, I overtightened one of the rod bolts by around 10-15 degrees (target was 150 degrees). Considering that the real world tolerance of calibrated a click type torque is around 4% I don't think this is something I should worry about, but what do you think?

From an earlier post:

Tomorrow I'm fitting the crank, however there's one thing- regarding the rod bolts,
-the 2007 "all versions" service manual says 15nm + 120 degrees
-the 2004 service manual says 15nm + 150 degrees except for CAL and 15nm + 120 degrees for CAL
-the R6 manual (same part number for the piston rod assy) says 15nm + 150 degress

Now, my bike is definitely not for California, and it's from 2004 so it should go 150 degrees, but what would you say?

_________________________________________________________________________________________

On page 5-86, (genuine Yamaha service manual), S1 manual (2004 would be in there) it show's 120 degrees. Am I missing something?

 
I hate to say it, but you are over torqued. If it was my bike, I'd order new bolts and install the at 15nM + 120 degrees before going any further.

I have an 05 and in the Yamaha shop manual it says for connecting rod NUTS, its 15nm + 150 degrees. For connecting rod BOLTS, its 15nm + 120 degrees. Only the California models use bolts, so for my 05 its 150 degrees.
 
Now I found this a couple pages BEFORE page 5-86:


Guess it depends on if you have nuts or just bolts

Also, the Yamaha shop manual is for both the Ca and regular models.
(Why they would use different methods is beyond me, has nothing to do with emissions)
 
Last edited:
Yes, mine is the one where the nuts are separate from the bolts. So it's definitely not the 120 degrees model.
So instead of 15nm + 150 degrees I did 15nm + 157-160 degrees.

Here is a picture (blue is 150 degrees, red is actual angle, nut edge to nut edge = 60 degrees, there's a bit of parallax):
 

Attachments

  • bolt_torque.jpg
    bolt_torque.jpg
    8 KB · Views: 22
I'd leave it.

Your so close, I'd bet the factory doesn't get it that close..

Most Yamaha mechanic's I've encountered would leave it.
(from experience where I've had to go back and "fix" their repair (under warranty)
 
Thanks, perhaps I'm just overanalyzing this. According to the torque angle tables I've found, the extra rotation could mean around 7-10nm more.

I've heard one local repair shop owner swear he successfully reuses the R6 rod bolts... twice, not to mention the R6 has 18% extra power and uses the same bolts, so perhaps the Yamaha guys engineered some extra margin with these bolts. The crank is spinning normally, so no noticeable extra biding.
 
Last edited:
small update: torqued the crank case, fitted a "new" oil pump (from a low mileage bike, mine was near the wear limit) + new OEM oil pump o rings
 
another update: managed to take half day off, and:
-smoothed out a bit one of the the exhaust camshaft journals using some scotchbrite
-fitted some small bits, such as the speed sensor
-fitted the oil pipe, strainer and relief valve
-fitted and torqued the clutch basket
-fitted the oil pan
-torqued the cyl head
-installed the new timing chain and guide, ape tensioner
-fitted the valve buckets and shims + the camshafts

Tomorrow I'm (hopefully) adjusting the timing, measuring the valve clearances (before taking the engine apart they were fine, but who knows...), and finally fitting the top cover with it's new gasket.
 
Cams were obviously out when you fitted the head so get it on TDC firing #1 when tightening the cams into place so the valves remain happy!
 
Cleaned the throttle bodies and checked for leaks (all of them fully seal).

However, I didn't manage to do the timing as planned.

I set it with the timing marks lined up as shown in the manual, lightly screw in the tensioner, then start to manually rotate the crank clockwise. It rotates as it should until 280-300 degrees then it is stuck, and the chain on the exhaust side is very tense. If I remove the camshafts so that the chain gets loose, it will rotate past that point with no issues.

It's not the guides- they're positioned correctly. It's not the manual tensioner - before the rebuild I set it the same way and it worked fine, and I've also tried multiple times just to make sure (from loose enough that it skipped, to medium, and to tight), so what the hell is it?

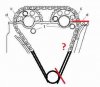
While I am writing this it came to me that maybe I should give it 1-2 links more slack on the exhaust side- what do you think? There is no reference that I can find anywhere regarding the right chain slack that should be on the exhaust side. I'm not sure how well I'm explaining this, so please check the attached picture.

But thinking again- giving it more slack should alter the timing, so that's not good either...

fz6_timing_chain_slack.JPG
 
Cams were obviously out when you fitted the head so get it on TDC firing #1 when tightening the cams into place so the valves remain happy!

Crap, only now I read this. I forgot that cyl #1 and #4 are 360 degrees apart, so while the crank was at the correct timing mark, it might have just as well been indicating TDC for #4 instead of #1. Hope I didn't bend any valves...

I'll try again tomorrow, this time with a screwdriver inserted in the spark plug hole, to make sure the #1 is up...
 
With the cams out, all the valves are closed.
With the trigger wheel at TDC the #1 piston is at TDC. That said you are fine. Its the cam timing in relation to the piston position that determines which cylinder is firing.

Does the crank turn pretty easy by hand?


Edit:
What direction were the cam timing marks pointed when you dropped them in? 180° apart yes? Exhaust pointed forward, intake pointed to the rear.
There should be ZERO slack from the intake to the exhaust; there should be zero slack from the exhaust to the crank. This is a pull system. The only slack that should exist is from the crank to the intake where the cam tensioner goes.

Read some of my posts in the valve adjustment thread.
I offered a lot of detail to help other members on this same topic.
 
Last edited:
Plus 1 ^^.

Make sure there is NO SLACK between the crank and EXHAUST CAM, NO SLACK between the CAMS.

So start with the crank on TDC, run the chain to the exhaust cam (it's taught and marks line up).
Then to the intake cam, nice and taught-mark lined up with the head.

Then take up ALL the slack with the tensioner..
 
Back
Top