How to: Install a 12volt power adapter (FZ6 specific)

Clovis

Junior Member
Joined
Oct 12, 2011
Messages
107
Reaction score
5
Points
0
Location
Colorado Springs, CO
Visit site
It's handy to have a 12v power adapter on your bike to charge your cell phone, GPS, radar detective or whatever. It's also cheap and easy to do.

Here's a tutorial:

Cost $ <50
Time $1-2 hours

First, here is what you'll need. Everything can be bought from NAPA auto parts.

IMG_1292.jpg


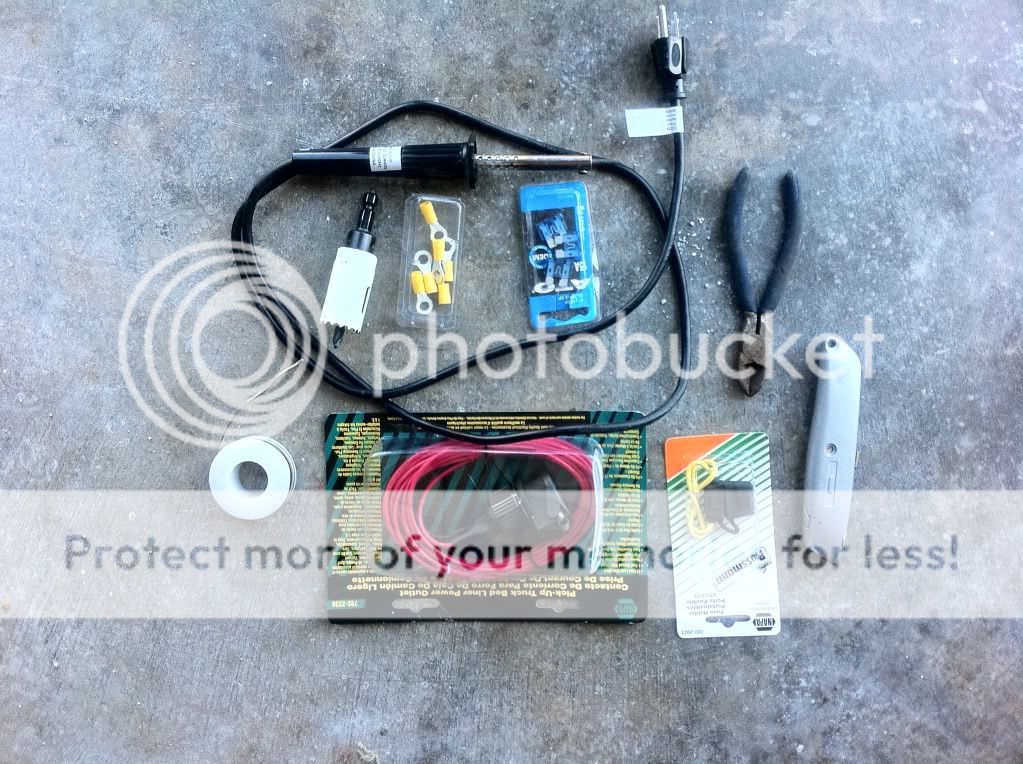
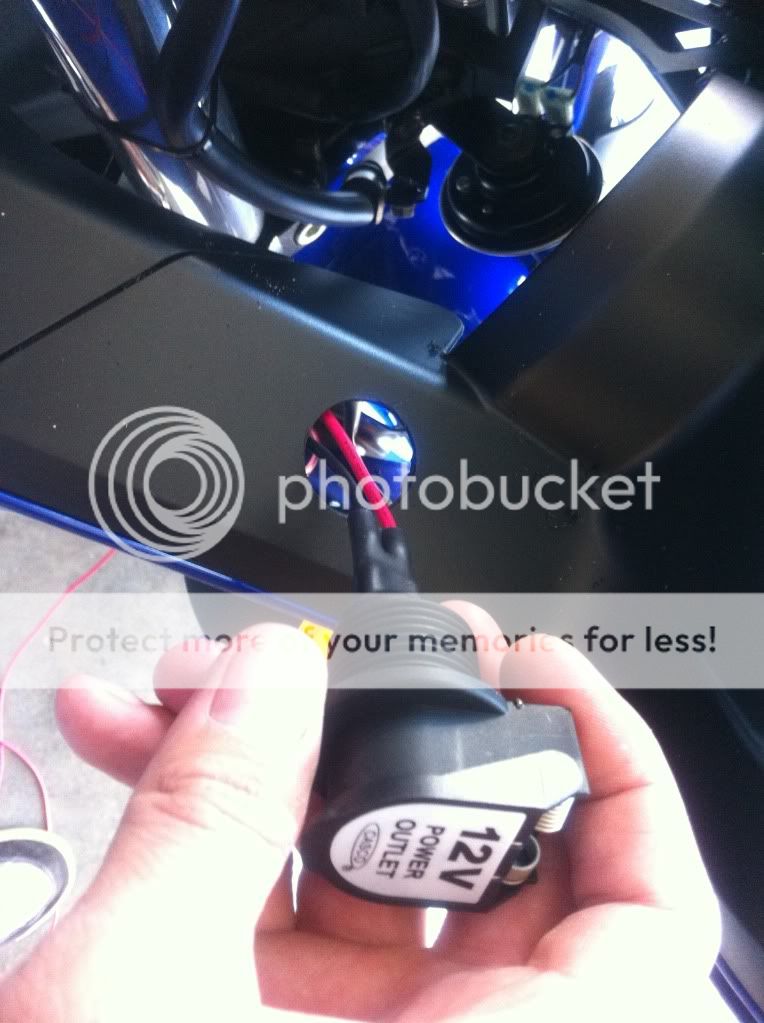
1) CASCO truck bed liner 12v power adapter ($21 from NAPA)
2) All weather fuse holder - at least 15amps (most are 30amps)
3) Package of spade type 15amp fuses
4) Solder Iron and metal
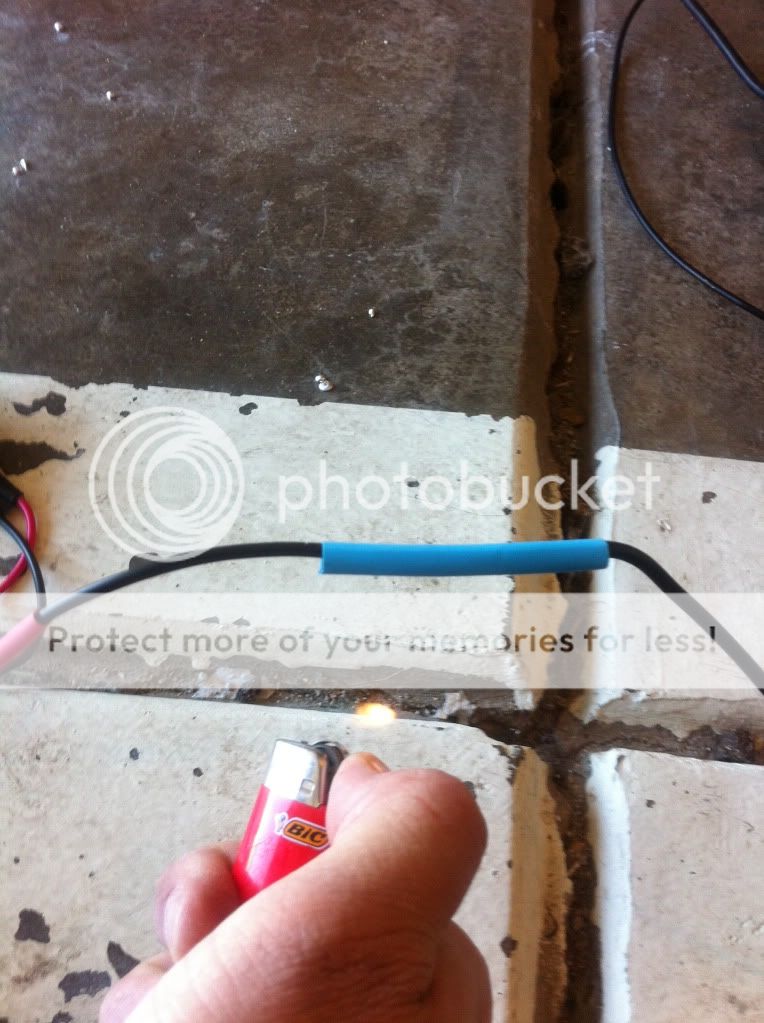
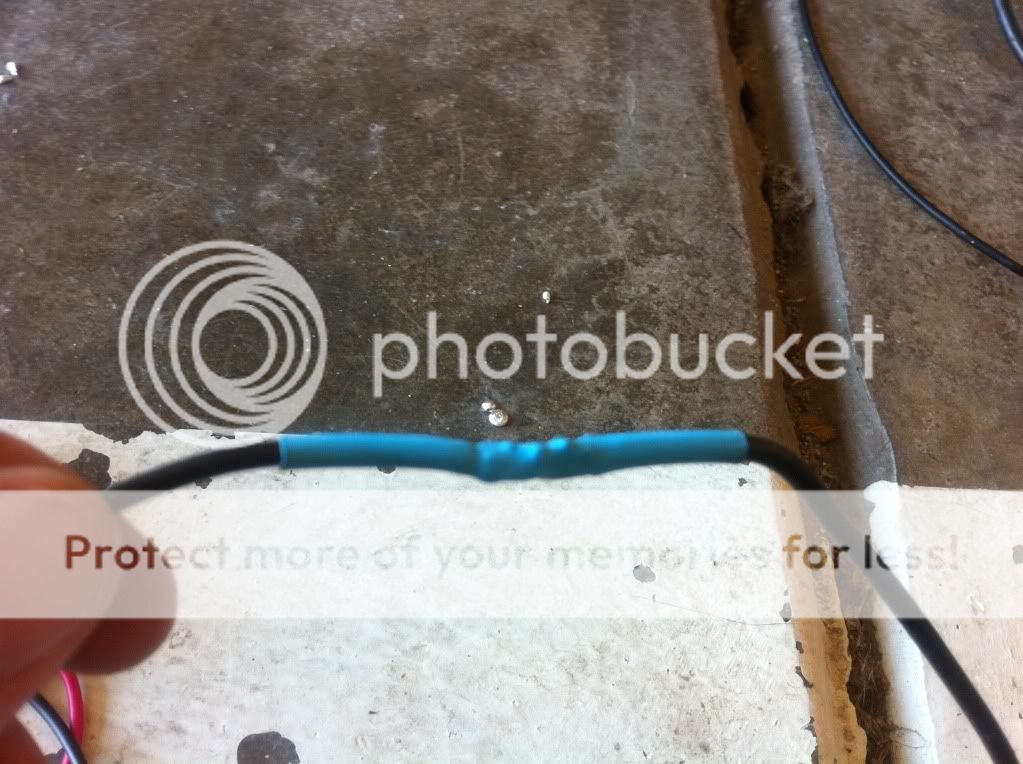
5) Shrink wrap tubes (to cover the soldered join wires).
6) Lighter or heat gun for the shrink tubes.
7) A drill with a 1 inch "hole saw" drill bit. You can buy this at Lowes for around $10. It has a small drill bit that drolls the pilot hole and then drills out a perfect circle that exactly matches the socket.
Wire cutters of strippers
9) O-ring terminals for 12gauge wire.
10) 12 gauge wire if you need extra (I did not).

Step one:

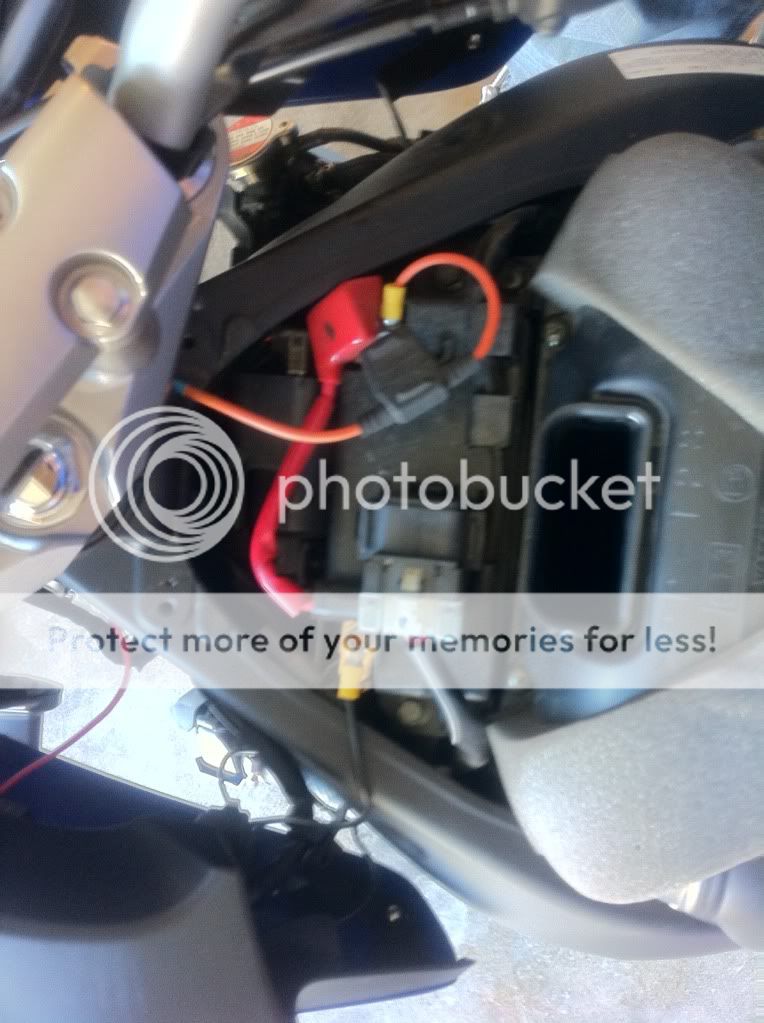
Locate your battery. For the FZ6 it is located under the tank behind the air box. The gas tank has 2 bolts near the handle bars and removing these allows the tank to open on its flange. Prop up with something to keep it out of the way.

IMG_1295.jpg


Step two:

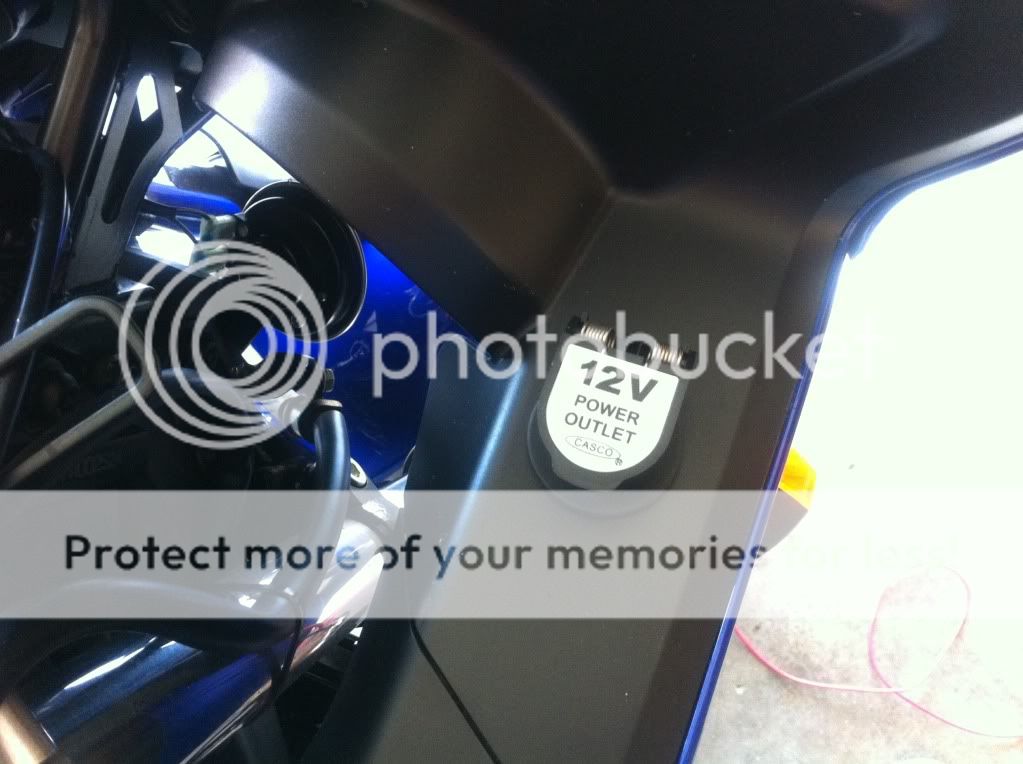
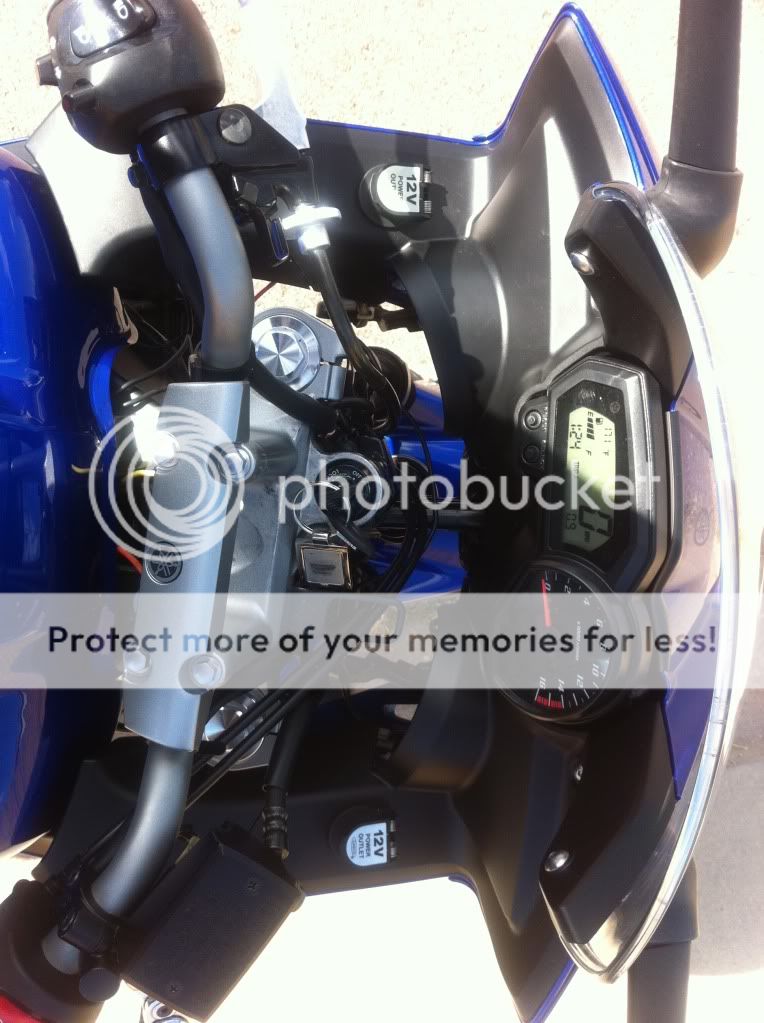
Decide where to mount. On my bike its easy - the top fairing. On my R1 I did it on the right side fairing, on the top.

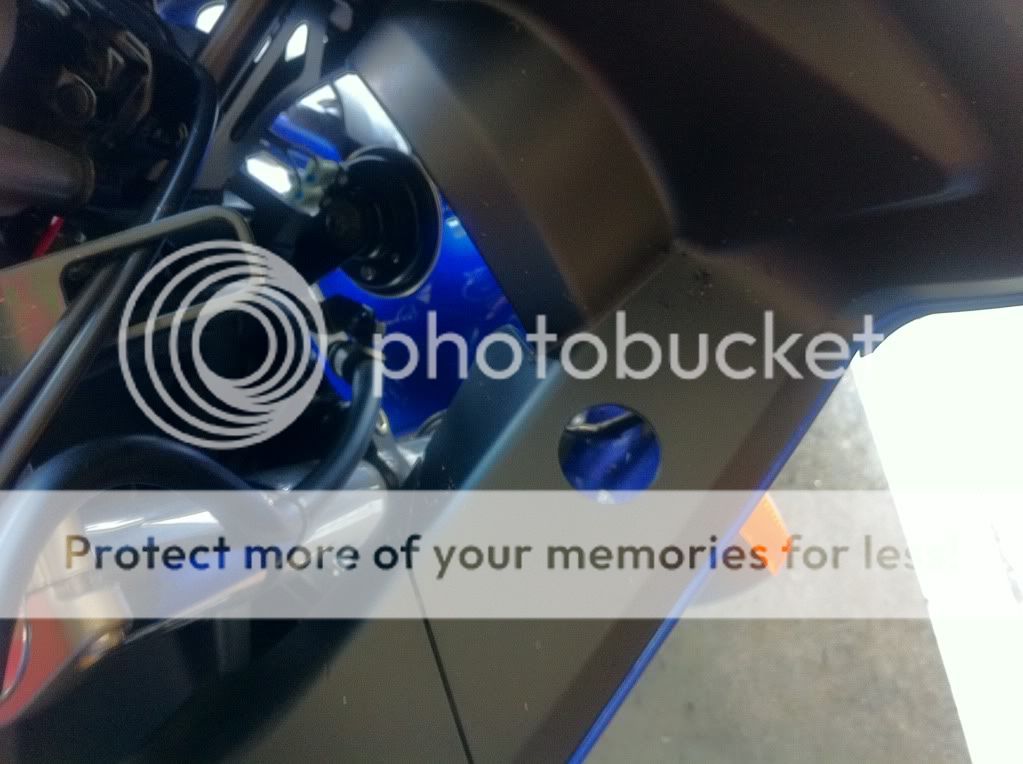
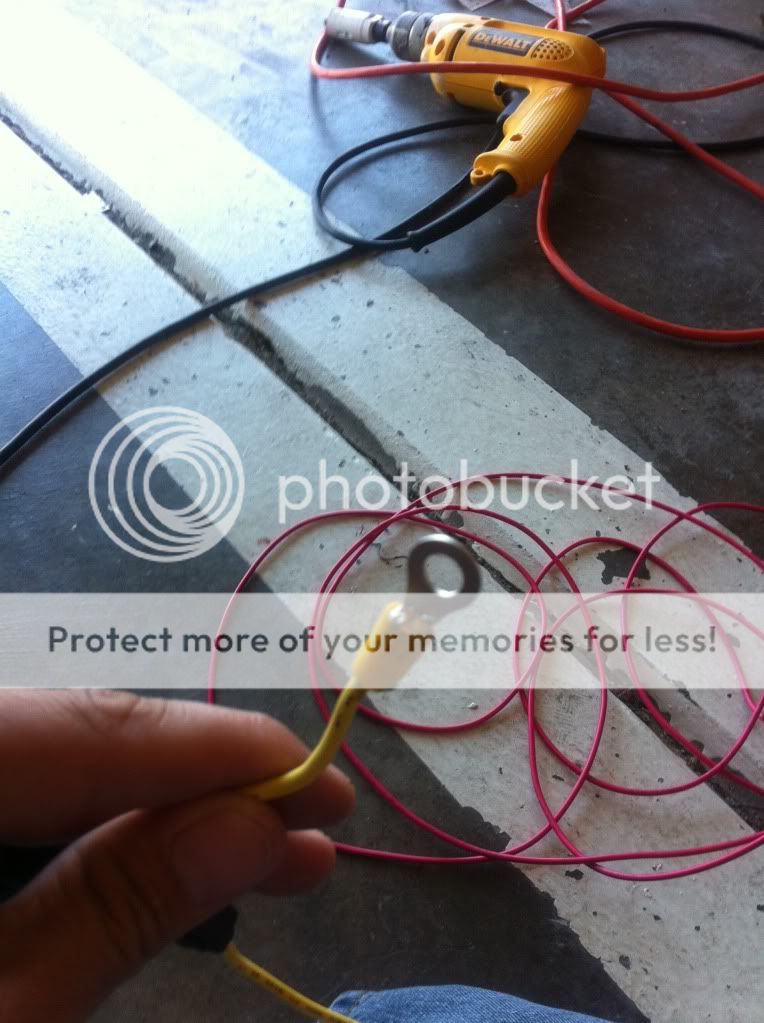
Pick the spot and drill the hole with the 1 inch hole saw drilling bit:
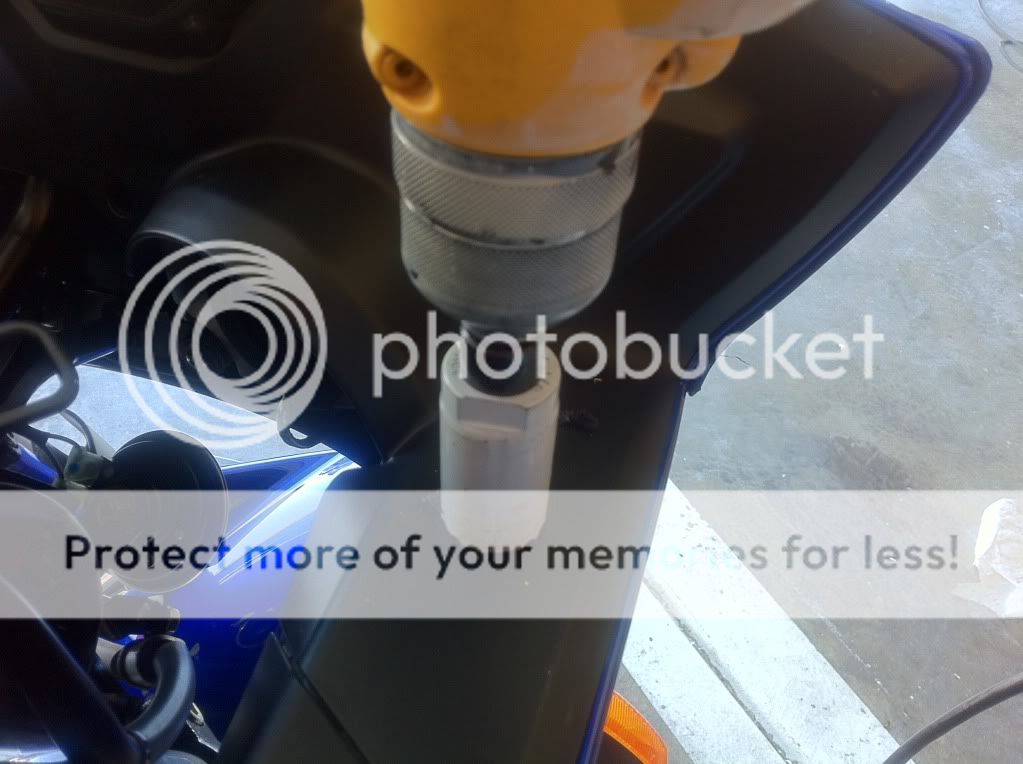
IMG_1297.jpg


Drill baby drill!

IMG_1299.jpg


Was it good for you?

IMG_1300.jpg


Step 3: Prepping the socket.

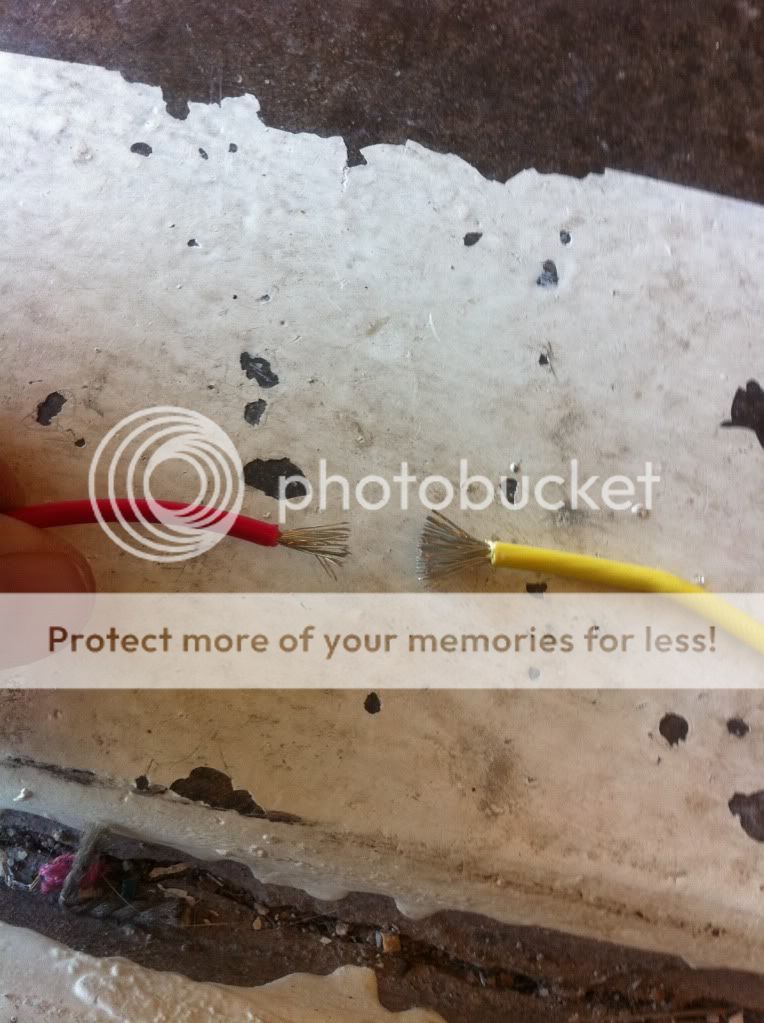
Do not install the socket just yet - you will need to prep it first. The socket comes with a 17ft red wire (power) and a 1 foot black wire (ground). Chances are you will need to extend the ground wire by a foot or two. You can either use black wire or some of the excess red wire supplied (maybe tape off the end to mark it as the ground).

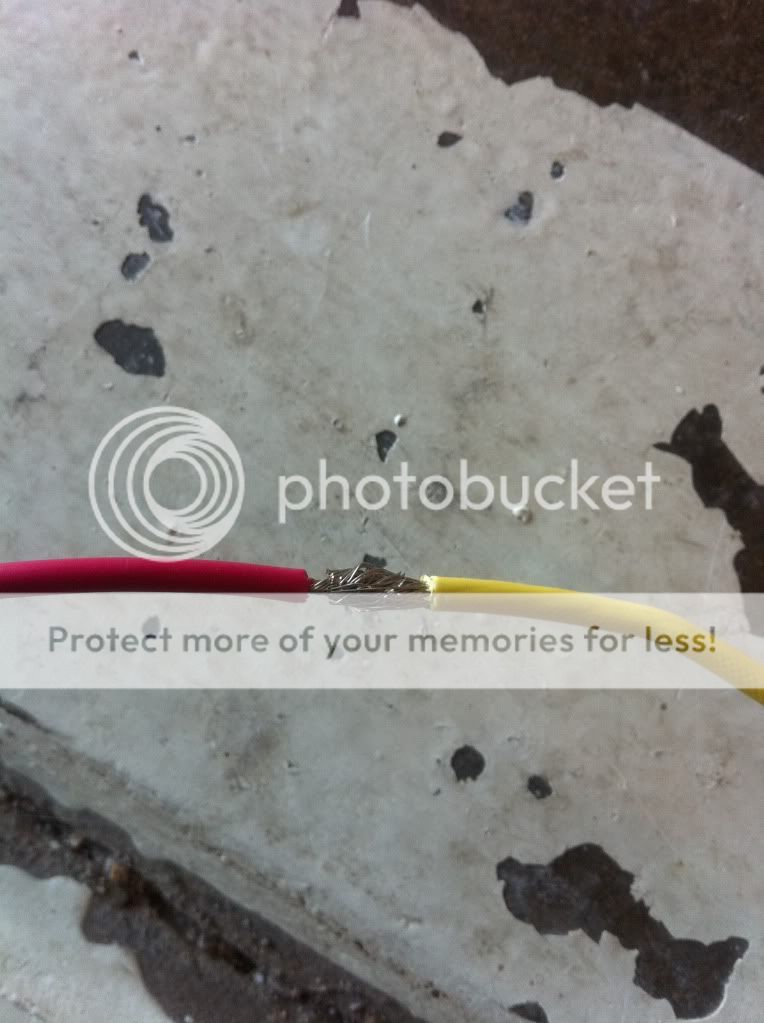
To join two wires - use a wire stripper (or knife) to cut around the wire and remove the insulation about a half inch on both wires. Fan out the individual wires, press together and twist tightly.

Then use a soldering iron to melt the solder over the wires, fusing them together.

IMG_1310.jpg


IMG_1311.jpg
 

Clovis

Junior Member
Joined
Oct 12, 2011
Messages
107
Reaction score
5
Points
0
Location
Colorado Springs, CO
Visit site
Then move the shrink wrap over the exposed wires (like a bandaid) and apply heat from a lighter. The wrap will shrink itself to fit the wires exactly.

IMG_1306.jpg


IMG_1308.jpg


Splice in the fuse holder on the power (red) wire placing it between the adapter and the battery.

Attach the o-ring terminals to the end of your two wires with sodering or crimping. These will connect to the battery terminals.

IMG_1309.jpg


Step 4:

Install the socket into the hole you created - secure with the underside plastic screw nut that was included. Run the wires however you wish to your battery.

IMG_1302.jpg


IMG_1303.jpg


Red connects to red (positive) and black to black (negative to negative). I ended up having to buy slightly longer screws since the terminals are now acting as spacers (M6 - 10mm nut and 16mm long for a FZ6)


Step 5:

Test to make sure there is power:

IMG_1333.jpg


Success! Finish clean up and now you've got power for GPS, Phone, Radar, whatever. I installed two.

IMG_1335.jpg
 

CanadianFZ6

Member
Joined
Nov 11, 2007
Messages
1,006
Reaction score
21
Points
0
Location
Baden, Ontario
Visit site
Good job, however you should have used "switched power" (meaning using a relay tied to the tail light or other ignition live only power source)... That way the plugs are only live when the ignition is on...So if accidently leave something plugged in, it won't kill your battery...
 

ChevyFazer

Redneck MacGyver
Joined
Jun 12, 2011
Messages
3,309
Reaction score
27
Points
0
Location
ATL
Visit site
Im the same way i like having the ability to charge things while off the bike

Sent from my R800x using Tapatalk
 

Clovis

Junior Member
Joined
Oct 12, 2011
Messages
107
Reaction score
5
Points
0
Location
Colorado Springs, CO
Visit site
A friend of mine cleaned up the wiring while installing my HID lights. The 12v outlets are still direct power (powered on full time, not just when the bike is turned on as in a relay setup) but no longer hard wired onto the battery.

I'll have to ask him what he connected them to.

It's really just a matter of personal preference. I prefer to have power without having the bike turned on (or the key in the on position) since this allows me to power things like my air compressor or charge my Q2 headset while stopped. Both methods work.

I just remember to unplug stuff when I park the bike ;)
 

William

Junior Member
Joined
Jan 23, 2012
Messages
152
Reaction score
1
Points
0
Location
Tampa, Florida
Visit site
Something to consider when the number of electrical accessories starts adding up is a fuse block, like the FZ-1 Fuzeblock. The main reason to use them imo is to stay off the factory harness as much as possible...because, who really knows if the harness or the components being spliced into were really designed to support whatever accessories are being added? There are other brands of fuse blocks, but the FZ-1 has an integrated relay for a turnkey solution to switched power needs…plus it’s one of the smaller of the models so it’s easier to hide under panels. I installed one on my S10 and now have my auxiliary lights, gps, extra outlet and my air compressor lead on it. Blog Entry for a look.
 

Clovis

Junior Member
Joined
Oct 12, 2011
Messages
107
Reaction score
5
Points
0
Location
Colorado Springs, CO
Visit site
My 12v outlets each have a fuse in the line as well as the heated gear.

As that what the fuseblock does or is it something else?

Btw, I'm jealous of your Super Tenere!!
 
Last edited:

William

Junior Member
Joined
Jan 23, 2012
Messages
152
Reaction score
1
Points
0
Location
Tampa, Florida
Visit site
My 12v outlets each have a fuse in the line as well as the heated gear.

As that what the fuseblock does or is it something else?

You'd mentioned ^^ that you prefer to have power with the bike turned on. This particular fuse block that I referred to has an integrated relay which is nothing more than an on-off switch, but it's inside the fuse block. The relay is triggered off a power source (that you choose) that powers on when you turn the key on (i.e. switched power...e.g. tail light). So when whatever power source (again, e.g. tail light) powers up, the fuse box powers up...and your accessories power up. It also allows you to choose between switched and unswitched power (basically direct battery connect through the block) simply by moving the mini-blade fuse. So you can have some switched circuits (lights, phones, gps) and some unswitched (air compressor) and, like I mentioned, you can easily go back and forth.

The other thing is most fuse block have negative bus, which means that all your accessories (and the relay) ground directly back to the fuse block which, in turn, is grounded to the negative terminal on the battery. The battery is the best place to ground accessories and the block requires only one wire to do it.

All in all, it's like a junction box where everything comes together. It keeps everything off the factory harness and another big plus I'll mention is that if you ever have an electrical problem with accessories, you know right where to go...or at least start.


Btw, I'm jealous of your Super Tenere!!

:)
 

phranK2k11

Chat Camper :)
Joined
Feb 4, 2011
Messages
469
Reaction score
10
Points
18
Location
West Virginia
Visit site
Nice install and wright up! :thumbup: The fuse block would give you multiple points of fused connection with only 1 extra lead going to your battery. And all your fuses are grouped together. BTW FZ-1 is the model # and has nothing to do with the Yamaha FZ1 LoL, i thought it was gonna be a swapped over part like the FZ1 bars :rolleyes: till i checked out the link.

FUZEBLOCKS.COM

If you're handy with electrical wiring/fabrication, could make your own.....
 

Reed

Southern Rider
Joined
Apr 17, 2011
Messages
105
Reaction score
0
Points
0
Location
Charlotte,NC
Visit site
Below are some wiring diagrams that I drew up today. The first is the way that I am thinking about wiring up my bike, so that I can choose to either have my accessories (through a fuse block) always powered on, or powered on with the ignition switch. The second diagram is a way that you could wire just a single outlet to do the same. Of course the LED light would just be a nice option to throw in there, so that you can see if everything is powered, but not necessary. Let me know what y'all think!

FuseBlockWiring.jpg


12VWiring.jpg
 

William

Junior Member
Joined
Jan 23, 2012
Messages
152
Reaction score
1
Points
0
Location
Tampa, Florida
Visit site
Let me know what y'all think!

Basically, your three-way toggle allows you to select either the switched power source or the battery as the relay trigger power. When it’s toggled directly to the battery, the relay stays lit with the ignition on or off. When it’s toggled to the switched power source, the relay only powers up with the ignition on. If your toggle accomplishes that, I think you’ve got it!

The only thing I’ll add is that relays have a finite life as to how many times they can open and close. It’s called the relay contact life. Depending on how you use that set up, your relay may not last as long as if it was just triggered off the switched power source. No big deal if it goes, just replace it.

If you go with the LED light in the diagram, that will need to be grounded too.

I’d suggest considering a grounding panel and bus all grounds back to the negative battery terminal, particularly if you use that 6 circuit fuse block (which tells me you might be adding more accessories). The battery is the best ground source and cleaner in terms of wiring. Here’s a link to one at Cyclenutz for $12 and here’s a photo of one I put together with stuff laying around my garage; this one has a terminal for the battery and grounds the relay and three accessories on my KL250. :)

GroundPanel.jpg
 
Last edited:

Reed

Southern Rider
Joined
Apr 17, 2011
Messages
105
Reaction score
0
Points
0
Location
Charlotte,NC
Visit site
If you go with the LED light in the diagram, that will need to be grounded too.

I’d suggest considering a grounding panel and bus all grounds back to the negative battery terminal, particularly if you use that 6 circuit fuse block (which tells me you might be adding more accessories). The battery is the best ground source and cleaner in terms of wiring. Here’s a link to one at Cyclenutz for $12 and here’s a photo of one I put together with stuff laying around my garage; this one has a terminal for the battery and grounds the relay and three accessories on my KL250. :)

Yeah, I just forgot to put the ground in the diagram, for the led. I would really like to be able to find a waterproof, 3 way switch with a led built in, but I don't think that is going to happen, I can not even find a non waterproof one. I should probably look at a marine store, hadn't thought of that until just now.

I should probably do something like that for the ground, for a cleaner install of anything that I might decide to put on the bike.
 

William

Junior Member
Joined
Jan 23, 2012
Messages
152
Reaction score
1
Points
0
Location
Tampa, Florida
Visit site
I would really like to be able to find a waterproof, 3 way switch with a led built in, but I don't think that is going to happen, I can not even find a non waterproof one.

If you can't find a waterproof switch, you can make a little rubber boot to go over the top of a rocker-type switch or you can do what I do…pack them with non-conductive dialectic grease. I go the dialectic grease route because it protects the electronics better with all the rain and high humidity here in Florida.

Here’s a switch (not a three way) that I got off the rack at autozone, right out in the open and packed tight. This one has a little LED light so I can find it in the dark. :)

1006-2.jpg
 

Reed

Southern Rider
Joined
Apr 17, 2011
Messages
105
Reaction score
0
Points
0
Location
Charlotte,NC
Visit site
If you can't find a waterproof switch, you can make a little rubber boot to go over the top of a rocker-type switch or you can do what I do…pack them with non-conductive dialectic grease.

Here’s a switch (not a three way) that I got off the rack at autozone, right out in the open and packed tight. This one has a little LED light so I can find it in the dark. :)

Yeah, that is a good idea! I just got to thinking, and I am sure that there is a way to wire it up, with a two way (OFF-ON) switch, but I just can't think of a way to do it, where it wouldn't mess anything up.... :confused: :confused:
 

degake

Stop flashing!! G$*%£#
Joined
Feb 7, 2011
Messages
604
Reaction score
9
Points
0
Location
Belgium
Visit site
Yeah, that is a good idea! I just got to thinking, and I am sure that there is a way to wire it up, with a two way (OFF-ON) switch, but I just can't think of a way to do it, where it wouldn't mess anything up.... :confused: :confused:

Take a look at EasternBeaver.com.
Scroll down the page to the Contura switches; they're exactly what you want/need :thumbup:

Grtz,


Degake


p.s. If you want to search for those switches online in the States, search for "carlingtech contura switch"...
Website of the manufacturer: Carlingtech.com
 
Last edited:
Top