- Joined
- May 6, 2014
- Messages
- 1,979
- Reaction score
- 1,927
- Points
- 113
- Location
- Amoungst the Twisty Roads
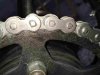
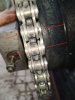
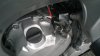
One of the many reasons I always safety wire my clip is that it makes the link very easy to identify during a pre-ride inspection. Of course, the main reason is that ensures that I’ll never have a clip come off in the first place.