Error 33 breaking my bike abroad- urgent help please

TownsendsFJR1300

2007 FZ6
Site Supporter
Joined
Feb 7, 2009
Messages
12,548
Reaction score
1,196
Points
113
Location
Cape Coral, Florida, USA
Visit site
Wow... Glad you found the issue for certain....

Yep, anything critical I have to work on, I start "fresh" the next available day. Keeps the boo boo's to a minimum.

While the engine is out, should that engine mount thread NOT clean up with enough material / threads, I'd opt for a Heli-Coil with red Loctite.
I use them somewhat often on customers machines, steel threads are WAY better than aluminum and very easy to do (especially with the engine out).

The Loctite is NOT called for however once it's installed (and the inner threads cleaned (BEFORE SETTING UP) its now very, very solid.


B&S engine float bowls I modify (super thin) to drain all the fuel for storage:

Machining the bowl:


Insert threaded with Loctite:


Installed /done with drain bolt/washer:


bigborer

Site Supporter
Joined
Feb 16, 2017
Messages
447
Reaction score
78
Points
28
Location
EU
Visit site
Thanks for the tip!

Hopefully it won't be necessary but at this point it seems that anything is possible, so... better to be prepared.
I've now ordered a set of 10pcs M10*1.25 helicoil style threads.
 

bigborer

Site Supporter
Joined
Feb 16, 2017
Messages
447
Reaction score
78
Points
28
Location
EU
Visit site
Today I cleaned and installed the water pump, bent the clutch boss locking tab and installed the rest of the clutch parts.

Anyone got any tips for installing the clutch cover? Didn't have time to fiddle with it too much today, but it seemed that it only caught the tip of the pull rod
 

TownsendsFJR1300

2007 FZ6
Site Supporter
Joined
Feb 7, 2009
Messages
12,548
Reaction score
1,196
Points
113
Location
Cape Coral, Florida, USA
Visit site
Today I cleaned and installed the water pump, bent the clutch boss locking tab and installed the rest of the clutch parts.

Anyone got any tips for installing the clutch cover? Didn't have time to fiddle with it too much today, but it seemed that it only caught the tip of the pull rod

From page 5-52, S2 manual, self explanatory really

(Admin, this expires in 7 days):

 
Last edited:

bigborer

Site Supporter
Joined
Feb 16, 2017
Messages
447
Reaction score
78
Points
28
Location
EU
Visit site
End of year update;

Good news- this week the weather has wormed up a bit over freezing, warm enough to be able to work outside using knitted work gloves. And I received the new head gasket.

Bad news- The rest (valves and taps) had to go through the national post service, which is now displaying a big sign saying "November to January intl parcels are expected to be delayed due to seasonal reasons", so yeah... I still don't have them.

I did try my best to get the engine inside the frame before the new year, but... it just wasn't possible. We'll see how it goes next year...

Last but not least, big thanks to everyone who contributed here!

Best of luck to everyone and have a happy new year!
 

bigborer

Site Supporter
Joined
Feb 16, 2017
Messages
447
Reaction score
78
Points
28
Location
EU
Visit site
I've finally received the valves and cleaned, installed and lightly lapped 2 of them.

One of them however has some pitting, as shown in the picture.

Is this something normal/ safe to use? I've seen engines with much more than 7500 miles (as the seller claimed the donor bike had) and they didn't have any pitting.
 

Attachments

  • photo_2019-01-05_00-18-14.jpg
    photo_2019-01-05_00-18-14.jpg
    60.2 KB · Views: 25

TownsendsFJR1300

2007 FZ6
Site Supporter
Joined
Feb 7, 2009
Messages
12,548
Reaction score
1,196
Points
113
Location
Cape Coral, Florida, USA
Visit site
Kinda odd.. Never seen that before.

I think I'd install the valves (just for that cylinder) with springs, etc.

Then flip the head upside down and fill with a liquid. We're looking to see if it leaks at all.

If it holds fluid over night, you should be ok...


*What kind of condition were they when you received them, rusted, carboned up, etc?
 

bigborer

Site Supporter
Joined
Feb 16, 2017
Messages
447
Reaction score
78
Points
28
Location
EU
Visit site
The intake valves were clean, and the exhaust valve had some carbon deposits - way more than it should have been for 7500 miles, but still a bit better than how the rest of my valves were before cleaning. Got them polished using a half worn scotchbrite pad and some elbow grease.

I'm 90% sure it would seal but who knows what caused that dent- it might also make that spot a starting point for a future fracture, especially as I tend to rev it as it should.

But finally the seller agreed to reship another valve. Hope I'll get it soon...
 

TownsendsFJR1300

2007 FZ6
Site Supporter
Joined
Feb 7, 2009
Messages
12,548
Reaction score
1,196
Points
113
Location
Cape Coral, Florida, USA
Visit site
The intake valves were clean, and the exhaust valve had some carbon deposits - way more than it should have been for 7500 miles, but still a bit better than how the rest of my valves were before cleaning. Got them polished using a half worn scotchbrite pad and some elbow grease.

I'm 90% sure it would seal but who knows what caused that dent- it might also make that spot a starting point for a future fracture, especially as I tend to rev it as it should.

But finally the seller agreed to reship another valve. Hope I'll get it soon...

That, ^^^, is by far, the best thing you can do..
 

FinalImpact

2 Da Street, Knobs R Gone
Site Supporter
Joined
Mar 16, 2011
Messages
11,137
Reaction score
184
Points
63
Location
USA, OR
Visit site
If it's an exhaust valve I'd be afraid it burn and fail. They rely on full contact with the seat to cool and although that pit (caused from sitting most likely) is small, it could lead to failure if on the exhaust side and lead to a burned valve.

Glad you have another on the way.
 

bigborer

Site Supporter
Joined
Feb 16, 2017
Messages
447
Reaction score
78
Points
28
Location
EU
Visit site
Small update:

-fitted the clutch cover. Turns out the instructions from the manual

When installing the clutch cover, push the
pull lever and check that the punch mark “a”
on the pull lever aligns with the mark “b” on
the clutch cover. Make sure that the pull rod
teeth and pull lever shaft pinion gear are
engaged.

are wrong. If you do that (start installing with the marks lined up) you'll end with the pull rod being grabbed 1-2 teeth too early, leading to the pull lever hitting the silver clutch cable holder (while also not engaging the clutch).
The correct way to install is to have the pull rod with the teeth in the right direction and then just press the cover in. No need to push anything, it will get the markings aligned by itself once the cover is fully seated to the engine case.

-got the tap and die set and cleaned all threads involved in engine mounting. Not very happy with the quality of these tools (but what would you expect for 5$ for the entire set including shipping?) but they've done the job regardless.

-got the sprocket nut removed from the old gearbox axle, which was still on as I originally didn't expect I'd replace the gearbox. Turns out all that was needed was a good air impact wrench - took my car for a small repair and also got this done there

-the "new" valve finally cleared the customs today and should get to me in a few working days

ps:tip of the day: a few small dabs of thick grease here and there will "glue" the gasket in it's place while struggling to fit the clutch cover
 
Last edited:

bigborer

Site Supporter
Joined
Feb 16, 2017
Messages
447
Reaction score
78
Points
28
Location
EU
Visit site
I managed to get the "new" valve today. Though it was poorly packed, it checked out OK (straight and no marks or pitting) so I gave it a very light lapping and did a "beta installation" using the old gasket as I didn't want to risk ruining another head gasket if something somehow required another disassembly.

As someone pointed during a talk via PM, the gasket isn't necessary for a try in but I was more comfortable not having metal on metal and risking scratching the head or block during installation or removal.

Everything now seems to freely spin by wrench (did 10+ 360 turns), so I measured the clearances.

I've thought of a much quicker way of measuring the clearances- instead of trying to combine gauges to get the exact number (as I've always done so far) , I just tried the largest and smallest possible. For example, for intake (ref values 0.13–0.20 mm) if the 0,15 gauge fits, and the 0.2 gauge doesn't, the clearance can only be between 0,15 and 0,19. Knowing this, and knowing the reference values, it's 100% safe to call it a pass.

All checked out fine, except the 2 new intake valves which measure 0.2 to 0.24 (most likely 0.22-0.23 as the 0.2 gauge felt quite lax). This was to be expected- as they come from a lower mileage engine, they have more "meat" on their faces and this makes them sit a bit more pulled in, finally resulting in more clearance.

So now I need to find 2 shims around 0.05mm thicker. Safest bet is finding a local seller and bringing in my micrometer.

I'll try my best to remove the head tomorrow and (retest) if all valves seal (hold liquid). 99% sure they will, but at this point I just want to be on the safest side with everything.

Next week (or the week after) I'll install and torque the new gasket, fit the thicker valve shims and remeasure everything.

Question: Will any shims work ? A quick search shows the same part # for pretty much any year FZ6, R6 and R1, but will the shims from say a GSXR600 fit?
 

TownsendsFJR1300

2007 FZ6
Site Supporter
Joined
Feb 7, 2009
Messages
12,548
Reaction score
1,196
Points
113
Location
Cape Coral, Florida, USA
Visit site
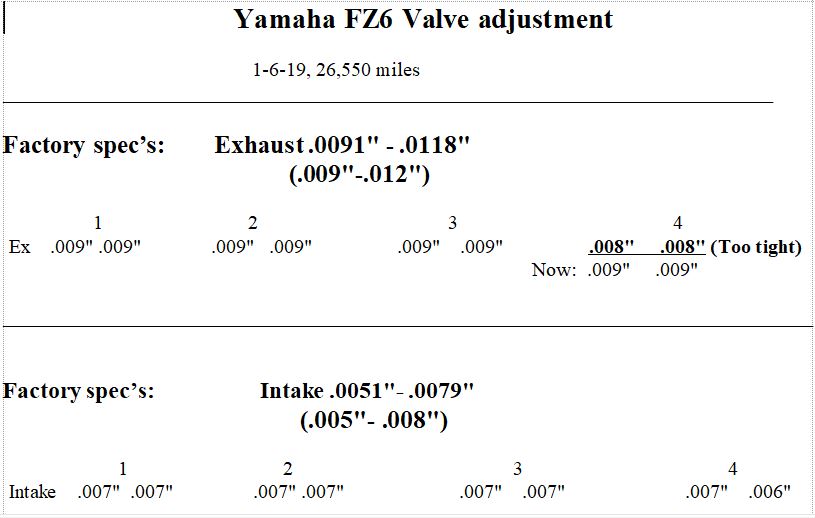
These are the spec's from a "Hotcams" shim kit ( HCSHIM01 ) I bought and just used to adjust mine (heck, the FZ isn't even shown here!):

7.48mm Complete shim kit 1.20-3.50mm in .05mm increments with 3 shims in each size. For Models: 2007 - 2014 Honda CRF 150R BIKE,2007 - 2014 Honda CRF 150RB BIKE,2004 - 2014 Honda CRF 250R BIKE,2004 - 2013 Honda CRF 250X BIKE,2004 - 2014 Kawasaki KX 250F BIKE,2004 - 2014 Suzuki RMZ 250 BIKE,2001 - 2013 Yamaha WR 250F BIKE,2016 - 2017 Yamaha YXZ 1000 UTV,2001 - 2013 Yamaha YZ 250F BIKE

Our valves take the 7.48MM diameter shims. I do NOT see that Suzuki bike in the above list.


However,

You didn't post the year Suzuk BUT an 07 GSX 600 uses the same size shim ( 7.48MM diameter) per Hotcams:
(you can look up the exact Susuk and see what it takes (looks like it'll probably be the same)

https://www.motosport.com/product?a...pssource=true&rkg_id=0&segment=badger&variant[HCM000G]=HCM000G-X001-Y001


** Bring the two shims in you need changed out to compare with once at the shop** .
I had to go thru several in the kit to get the correct ones..

May help you (I worked in thousands of an inch). I brought each cylinder around in order (1,2, 4, 3) checking exhaust and intakes one cylinder at a time. I simply slipped a single feeler gauge in-between the valve and bucket and recorded the #. As you can see below, cylinder #4 was definitly an .008" for both exhaust valves. Just a tad tight..

Pulled those two shims, found two .001" thinner, re-installed and checked (with CCT in and extended). Also rotated by hand several times triple checking alignment marks.

Also, (if not already known), the key to installing the CCT is to start the mechanism, turn the small INNER SCREW Clockwise and push the tensioner in. Tighten the securing bolts JUST till it contacts the CCT. Repeat and before ya know it, your CCT is seated. And using a long flat head screwdriver, once those bolts are broke loose, makes it 200% easier...


Last edited:

bigborer

Site Supporter
Joined
Feb 16, 2017
Messages
447
Reaction score
78
Points
28
Location
EU
Visit site
Thanks!

I thought these shims were like oil filters, where you have a ten page list of bikes using the same filter. But it turns out they aren't...

I found a Hotcams shim kit listed on a local store for around $125, but honestly it seems a bit wasteful to buy an entire kit for only two shims for one vehicle- the VTR seems to use 9.48mm shims and my car (which is also due for a valve inspection) uses only buckets of various sizes (no removable shims). And for shims too thick there's also the option of going ghetto and flattening down the current ones on a piece of sandpaper.

Some say there is a risk that any shim not OEM might be made out of different materials and expand at a different rate, screwing up the "real" (warm engine) clearances. But I can't really comment on this.

Regarding the CCT- I'll use an APE manual CCT. Hand tighten until there is no slack on the chain guide, spin the crank a few times, check for slack again. Then start the bike and do some 1/16- 1/8 adjustments- too tight sounds like a belt drive, and too loose rattles. I've already done this (once), hopefully I'll manage to do it again. Spring vs manual CCT is a debated topic, however seeing the marks on the rod of the OEM one (it actually works by taking quite large leaps, opposed to how it theoretically should gradually unwind) and hearing multiple stories of catastrophic failures with OEM CCTs, on the long run I consider the manual ones to be safer.
 

Motogiro

Vrrroooooom!
Staff member
Moderator
Elite Member
Site Supporter
Joined
May 8, 2008
Messages
15,013
Reaction score
1,183
Points
113
Location
San Diego, Ca.
Visit site
I also bought the Hotcams kit when doing my valve lash adjustment. I know it's a little pricey but the job turned out great and the engine is working great many mile later. :)
 

FinalImpact

2 Da Street, Knobs R Gone
Site Supporter
Joined
Mar 16, 2011
Messages
11,137
Reaction score
184
Points
63
Location
USA, OR
Visit site
I also bought the hot cams kit. I needed a few on the exhaust side. Bike has been happy ever since.
Then again our stuff is cheaper!
=/
 

TownsendsFJR1300

2007 FZ6
Site Supporter
Joined
Feb 7, 2009
Messages
12,548
Reaction score
1,196
Points
113
Location
Cape Coral, Florida, USA
Visit site
The kit over here is like $60(still expensive, but not like over there!!)

The shim and bucket both come out at the same time with a magnet. Re-installing the shim goes in first and MUST be "pushed into the valve", it won't fall out..

The Yamaha shims were sized slightly different from the HOTCAMs (thicknesses slightly different). Hotcams being a certain # between each (if that makes sense).. I only pulled two Yamaha shims and they were both the same thickness.

I would NOT be flattening shims, you don't want it coming out-holding a valve OPEN..

Any motorcycle shop should have the 7.48 shim's in the shop..

You've been apart for awhile now, another day or two (trip to the shop) won't make a difference. I wanted to be in and out in one day as it's 365 days of riding down here..

RE the "hot clearances" vs cold, Yamaha has that figured into the spec's. Hotcams is well known here (probably the biggest distributor). The Yamaha dealership down here are jerks and likely wouldn't sell/swap shims separately...

Again, I'd hit the local shops with your shims, measure while there and be on your way.
 
Last edited:

bigborer

Site Supporter
Joined
Feb 16, 2017
Messages
447
Reaction score
78
Points
28
Location
EU
Visit site
Well... pretty much multiply your prices by 1.5 to 2 and that's how much stuff costs in Europe. All this while in Eastern Europe countries the average yearly salary is under 10k USD. Fortunately I'm lucky enough to be able to make decent money, because there's no way you'd afford expenses such as what this project required if you earned the average salary. But it could be far worse, there are some 3rd world countries where they bust their asses for 1k USD/ year.

Going to a bike shop for shims is a good idea, but it's plan b- most of them are on "winter schedule" which makes it a bit tricky for me to reach them while they're open.

ps: just realized that I don't have an 8mm hex socket (required for the engine to frame bolts), so I've just ordered that as well.
 

TownsendsFJR1300

2007 FZ6
Site Supporter
Joined
Feb 7, 2009
Messages
12,548
Reaction score
1,196
Points
113
Location
Cape Coral, Florida, USA
Visit site
Well... pretty much multiply your prices by 1.5 to 2 and that's how much stuff costs in Europe. All this while in Eastern Europe countries the average yearly salary is under 10k USD. Fortunately I'm lucky enough to be able to make decent money, because there's no way you'd afford expenses such as what this project required if you earned the average salary. But it could be far worse, there are some 3rd world countries where they bust their asses for 1k USD/ year.

Going to a bike shop for shims is a good idea, but it's plan b- most of them are on "winter schedule" which makes it a bit tricky for me to reach them while they're open.

ps: just realized that I don't have an 8mm hex socket (required for the engine to frame bolts), so I've just ordered that as well.

If you have an 8mm allen key, cut it in two and slip one end in an 8mm socket. Now you have one!

*For the air filter clamp screws (buried deep under the assembly), I welded up a screw driver to a cut allen key.. Now I have the tool (used often on other machines as well) that reaches easily...

I know it's much more expensive elsewhere than the states for parts, bikes, cars, etc. We're very fortunate over here in that regard.

I am surprised, even thou it's winter, shops are closed altogether. I would think they'd carry snowmobiles, etc for the winter months and stay open..
 

bigborer

Site Supporter
Joined
Feb 16, 2017
Messages
447
Reaction score
78
Points
28
Location
EU
Visit site
If you have an 8mm allen key, cut it in two and slip one end in an 8mm socket. Now you have one!
Didn't think of this one! Might end up doing it if they won't have what I ordered on stock.

However (apart from the cheapest crap) tools are something I've never regretted buying or owning. Something like a socket, even if only of average quality, will last a LOT (might even use it for life). And you never know when and where it'll be useful again- sometimes tools can be used for the most random stuff, such as a bike hub wrench being the only thing that was thin enough to fit the nut of the pressure regulator of a espresso machine.

Shops aren't fully closed, but they are operating at reduced capacity, such as only 4h/day or only few days a week. Snowmobiles are few and usually kept in the mountains (closest place is about 2 hours away from here) and maintained by local mechanics there. Their bread and butter now is winter bike storage (many live in apartments), misc jobs done on the stored bikes (some want to pick up their bike "fresh" in the spring), and the occasional misc jobs on a "new" bike someone bought for a better price or new years resolution. Some shops also service ATVs so they might get a few of those as well...
 
Top