• Welcome to the Yamaha FZ6 Forums. Member registration disables ads and allows you to post and share. Register Here.

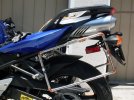
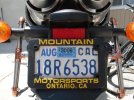
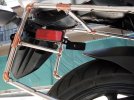
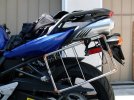
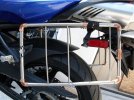
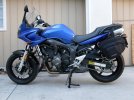
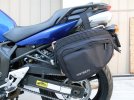
DIY Saddle Bag Mount Project

BusyWeb

Junior Member
Joined
Feb 14, 2009
Messages
429
Reaction score
29
Points
0
Location
Los Angeles
Visit site
Interesting idea, what did you use for the main tubing? If it had been all copper you could have soldered the whole thing together.
 
Interesting idea, what did you use for the main tubing? If it had been all copper you could have soldered the whole thing together.

Hi, there.
Yes, I thought about that...
The resons that I did not did with copper are..
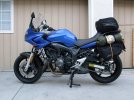
1. I had some scrap stainless tube (for laundary).
2. Do not need to buy soldering tools
3. Copper may be little bit weak at bending???
4. Stainless may be less weight ???
4. If soldered, can't change(adjust) the length and width incase of my measurment failure... ha ha ha.
5. After my install succeed, will consider to change to Copper or Steel tubing...

I put extra wood rod inside tube to inclrease strength....

By the way, thanks for your comments about copper solder idea.
 
Nice work!~
Copper is heavy and easily tarnished/bent though, so your probably best with steal (or even solid aluminium might work), unless you had really heavy duty copper, which again will weigh a ton. When I used to work at a factory it was also exp.

Just out of interest, at how many points is it connected to your bike, and is it easily removed? Also can a pillion still sit there comfortably (when that top pack isn't there), or is that not a concern for this project?

Looks pretty pro, with nice workmanship, so again nice work!
 
Great Job!

I like to see people build there own stuff...anyone can enter a credit card number and buy a finished product!;)

Well Done!:thumbup:
 
Please please please tell me you plan to paint it.

Aside from that, it looks pretty decent, and completely functional. It's a shame you lost your passenger pegs though.
 
very nice job, my one concern is how low the bags sit. I could see you scraping a bag pretty easily if you lean too far in a corner, might just be my imagination though

excellent fabrication :thumbup:
 
very nice job, my one concern is how low the bags sit. I could see you scraping a bag pretty easily if you lean too far in a corner, might just be my imagination though

excellent fabrication :thumbup:

If you scrape a bag, you're doing something really, REALLY wrong.
 
Just out of interest, at how many points is it connected to your bike, and is it easily removed? Also can a pillion still sit there comfortably (when that top pack isn't there), or is that not a concern for this project?

very nice setup, is it easily removable for when you are not using the side bags?

Thanks for the comments.. and all the other members with comments.

Yes, it is very easy (for Me??) to attach and dettach the mount.
It won't take total 5 minutes, um less than 5 minutes.

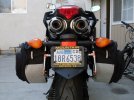
Only 2 bolts and 2 screws are required to do the job.
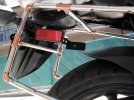
* 2 bolts are just behind the passenger pegs.
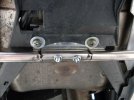
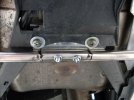
* 2 screws (bike's own) are under the muffler, they go into the metal body frame;
to use those screw I had to attach small metal plate on the cross bar tube under the muffler.

Initially, I had in mind couple of more places to join with body frame, but got tired... ha ha ha.

I'll paint on it after some time test riding. ^^ to make sure it is O.K.

I didn't think about the passenger at all... ha ha ha,
I wanted some steady saddle bag mount, lowering the center of mess (gravity) for the heavy loading, and some places used for the hooking bunge codes for the larger luggages....
as I like to go some touring with my precious FZ6....

Thanks again all.
 
I like it :) I was toying with an idea similar to that when I had my Bandit still. My attempt ended horribly though. I didn't get a chance to attempt it with the FZ since my dad surprised me a xmas with a set of Givis. Until I get some of the quick release mounts I'm using them for winter / long long rides.

:thumbup:
 
Looks plenty beefy. I built a setup for my bike with a very different philosophy. Yours seems to bear the vertical load of the bags. Mine only offer lateral support to keep the bags square and to avoid them drooping against the tail section

I'm pretty happy with the way they came out.

tailbag_supports-001-medium-300x225.jpg
 
Looks plenty beefy. I built a setup for my bike with a very different philosophy. Yours seems to bear the vertical load of the bags. Mine only offer lateral support to keep the bags square and to avoid them drooping against the tail section

I'm pretty happy with the way they came out.

tailbag_supports-001-medium-300x225.jpg

Hi, there.
Yours setup is pretty simple and looks doing its job for you.
I like it much.
Yes, mine's purpose is little bit differ from yours.
I needed some bigger, havier, and more luggage support,
so that I can put bigger and warmer sleeping bag for my next touring.... ha ha ha.
Thanks for your setup photos,
Um,, I'm actually having idea for the smaller saddle bag mount that borrowing you idea... whenever I have time...
After done, let you know. (I got some more extra tube to be used, ha ha ha)
 
Just to add to this, this is how i made a support, similar idea to gearheadstu

After trying out my panniers on the bike i decided i wanted them to sit lower and further back so there was more room for the other half and lower the centre of gravity. I looked on the net and found Givi has some soft pannier racks but i decided i could probably make a set easily enough myself.

Basically i had a couple lengths of stainless steel rod, 6mm diameter and bent them to suit the shape i needed. The rods pass through and replace the bolts used to hold the pillion foot rests on, follow up the side of the bike, bend up and then in toward the mounting point of the Givi top rack.

This keeps the panniers away from the indicators so not damaging them and provides support to stop them sagging into the wheel arch. Dont be fooloed by the flimsy ness of the rods, they are amazing strong and im bloomin chuffed with them hehe

Pics:

http://i10.photobucket.com/albums/a123/davekgti/DSC00259.jpg
http://i10.photobucket.com/albums/a123/davekgti/DSC00261.jpg
http://i10.photobucket.com/albums/a123/davekgti/DSC00262.jpg
http://i10.photobucket.com/albums/a123/davekgti/DSC00263.jpg


Everything is stainless steel so no rusting anytime soon
Hope someone can make use if this post

Cheers, Dave
 
Last edited:
However, after realising that i was going to struggle for space 2up and camping ive bought second hand givi boxes and a rack...doh
 
Please please please tell me you plan to paint it.

Aside from that, it looks pretty decent, and completely functional. It's a shame you lost your passenger pegs though.
Yeah, it's a good design, just needs painting black to blend in with the bike and also to make the copper/silver match!

I was looking at buying some pipe for something else on the bike and it was £20 for 2m! If you have a Givi rack, it would be easier & probably just as cheap to buy that.
 
Thanks for the comments.. and all the other members with comments.

Yes, it is very easy (for Me??) to attach and dettach the mount.
It won't take total 5 minutes, um less than 5 minutes.

Only 2 bolts and 2 screws are required to do the job.
* 2 bolts are just behind the passenger pegs.
* 2 screws (bike's own) are under the muffler, they go into the metal body frame;
to use those screw I had to attach small metal plate on the cross bar tube under the muffler.

Initially, I had in mind couple of more places to join with body frame, but got tired... ha ha ha.

I'll paint on it after some time test riding. ^^ to make sure it is O.K.

I didn't think about the passenger at all... ha ha ha,
I wanted some steady saddle bag mount, lowering the center of mess (gravity) for the heavy loading, and some places used for the hooking bunge codes for the larger luggages....
as I like to go some touring with my precious FZ6....

Thanks again all.

This was something I was planning on doing. I have a fender eliminator, so the 2 bolts under the exhaust aren't being used at all. Do you have any photos of this setup?

Thanks!
 
This was something I was planning on doing. I have a fender eliminator, so the 2 bolts under the exhaust aren't being used at all. Do you have any photos of this setup?

Thanks!
Wow, there's some post under the thread that I totally forgot..
Sorry not replying others.

@ewharper74
Hi, 74.
I don't totally understood what your question is?
But there are couple of photos at the my first post.
These two photos show under the muffler parts.

SDC12975.jpg

SDC12986.jpg

If it isn't what you asked, let me know.. ^^;
 
Back
Top