• Welcome to the Yamaha FZ6 Forums. Member registration disables ads and allows you to post and share. Register Here.

Catastrophic engine damage/noise?

I did get a gasket removal tool, but it was useless to be honest - must have got the wrong one. I had more joy very carefully using a razor blade.

Is cylinder head warpage something I should be concerned about, or is that a non issue as I had no overheating problems?
 
I did get a gasket removal tool, but it was useless to be honest - must have got the wrong one. I had more joy very carefully using a razor blade.

Is cylinder head warpage something I should be concerned about, or is that a non issue as I had no overheating problems?

Running a straight edge across it wouldn't hurt but, it never overheated (to your knowledge, nor signs of it) so that'd
probably be ok as it is..

As Gary points out, your doing great!!!


.
 
There is a spec in the FSM for head warping. The issue you will have is finding a certified/known flat surface to measure it against. Since you weren’t experiencing any symptoms of a warped head (low compression, coolant in the oil, a wet head gasket) there is no reason to suspect a warped head.

My favorite gasket removing tool(s) are ones that hold straight blades and utility blades in a holder with a long handle. The gasket tools that are about 1/2-inch wide with a square edge are for removing gaskets from the case/covers.
 
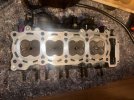
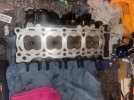
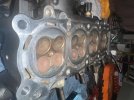
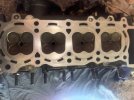
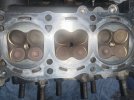
Hi Gents. Does this cylinder head look good enough for reassembly? I cleaned all the carbon off of the valves. There might be a stubborn dot here and there of old gasket but it’s very minor.

I notice there’s corrosion between coolant ports but I’m lead to believe this is minor. There are minor scratches here and there but no deep gouges and nothing I’m particularly concerned about.

I have a steel rule (which probably isn’t perfectly straight) but just used it as a quick way to measure the cylinder head for flatness, and I can barely get a 0.05mm feeler gauge underneath (which is the service limit).

In other news: my replacement piston rod arrived today and is almost an exact match for the old one. Weighs exactly the same at 215grams. All other parts are arriving tomorrow or Monday so hopefully I can start reassembling soon once all is clean, time permitting.

Thoughts please.


IMG_9010.jpegIMG_9012.jpegIMG_9013.jpegIMG_9014.jpegIMG_9015.jpeg
 
Do you know of a machinist that will very lightly smooth the cylinder head mating surface? Why take a chance of it leaking later ?
 
I don’t know anyone personally, but I hadn’t planned on removing the valves so that might be an issue were I to get it slightly flattened.


Regardless, I’m led to believe that as long as the surface is smooth as possible with no deep scratches or gouges, the gasket will seal it back up fine. Especially considering I had no overheating issues or evidence of oil/coolant cross contamination?
 
I don’t know anyone personally, but I hadn’t planned on removing the valves so that might be an issue were I to get it slightly flattened.


Regardless, I’m led to believe that as long as the surface is smooth as possible with no deep scratches or gouges, the gasket will seal it back up fine. Especially considering I had no overheating issues or evidence of oil/coolant cross contamination?
I see
 
Looks good, but I would use some WD-40 and some 00 steel wool on the surfaces near the coolant ports to remove the remaining gasket material. Probably not necessary, but those areas are very close to the sealing surface, so there is potential for a leak. If nothing else, the wet polish will remove any hard edges.
 
Looks good, but I would use some WD-40 and some 00 steel wool on the surfaces near the coolant ports to remove the remaining gasket material. Probably not necessary, but those areas are very close to the sealing surface, so there is potential for a leak. If nothing else, the wet polish will remove any hard edges.
Thanks for the advice Gary. I’ve just given it another once over with something similar to a nylon scotch brite, wd40 and a microfiber cloth. Measured again with my cheap steel rule and a feeler gauge and it seemed almost perfect.

My gut feeling tells me it’s pretty good now, just need to finish off the cylinder side of the gasket mating surfaces (which is much cleaner already), and I think I’m good to continue deep cleaning and possibly even starting reassembly in the coming days.
 
Hi gents. So I’ve installed my pistons and all bearings. I plastigauged all the rod bearings and they were within spec.

I’ve installed all my main bearings and torqued the crankcases back to their final torque setting and checked oil clearances. Didn’t get as perfect of a plastiguage reading but am pretty confident it was all within spec. Also checked how freely the crank turned by hand and it was pretty smooth. I’ve been adding assembly lube as I go along.

I had a slight issue when installing the transmission shafts - it was loud and grindy and I was struggling to find neutral, but kept checking it, reseated it and now can easily find neutral and the noise is much closer to what I expect. I’ll upload a video as I’d like some second opinions just to be sure.

In addition to that, the pistons are all moving smoothly within their cylinders, I had no issue with getting the rings back in and it all seems well sealed.

Also when bolting the crankcases back together, I only did bolts 1-10 as that’s all that is required for the oil clearance measurement, although I noticed about a 0.05mm gap between the surfaces. Is this passable and likely to close up once I install the other 20 or so bolts and add sealant?

If you have any other tips you can give me that would be great. I cleaned the cylinder head mating surfaces right up and I think they’ll seal fine with the oem mls gasket. I don’t think it’s warped at all.

https://drive.google.com/file/d/1-dSv7VI_QaKcigFaXUA8DEHDWwnkamTw/view?usp=drivesdk
 
Video looks fine.

Your probably ok re the torque, however, I would torque down ALL THE CASE bolts to know I
got an accurate reading. It doesn't take that much longer to do, at least for piece of mind.

Please clarify "Didn’t get as perfect of a plastiguage " .


.
 
Video looks fine.

Your probably ok re the torque, however, I would torque down ALL THE CASE bolts to know I
got an accurate reading. It doesn't take that much longer to do, at least for piece of mind.

Please clarify "Didn’t get as perfect of a plastiguage " .


.
Hey. I got a good reading on the main bearing journals, just it wasn’t as easy to read as the rod journals due to the main bearings having the oil channel. The readings were all within or close to spec and nowhere near the service limit.

I’ve run out of plastigauge now… need to order another strip so I can do the cam shaft journals.
 
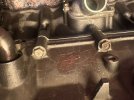
Ok, so I’ve dry fitted my crankcase back together, to the correct torque and in the correct sequence, but it seems there is some lippage between the mating surfaces.

It’s pretty minor, but I’m not entirely sure how much is acceptable… any ideas?
There’s no gap where you can see light through when I shine a torch, just for clarification. IMG_9051.jpegIMG_9052.jpegIMG_9053.jpegIMG_9054.jpeg
 
Last edited:
Those gaps are normal...that is why a sealant is used.

Regarding the sealant - don't use too much. Run a thin bead in the center. If sealant squeezes out, you've used too much. It's ok if a spot here or there has too much, but the goal is to add just enough - right around 25% of the width of the surface.
 
Hi all. Thanks again for your contributions, advice and support. This has been quite an undertaking and I’m making progress, I hope to have the engine back in the bike this week!

The bottom end is now assembled, I just need to give the cylinder head mating surfaces a once over, do the valve clearances and then put it all together with the new head gasket.

I plan on just putting the 10w40 oil I would normally use in, as well as flushing the coolant system out with tap water multiple times before filling it with coolant/distilled water.

Any tips on first start up would be most appreciated. My plan currently is to crank it multiple times without the plugs in, to build oil pressure. Then install the plugs and start it up, just idle it until it reaches operating temp, switch it off, and do that again once it’s fully cooled. Then once I know it’s runnng ok and I’ve checked everything over, I’ll do some short road testing. Any other tips such as what rpm to keep it in/ idle speed/ to idle or not to idle would be helpful.

Also, how soon after running should I be doing an oil/filter change?

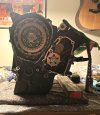
This has been a huge undertaking, I’ve tried my absolute best not to miss anything, keep everything clean, plenty of oil and assembly lube on moving parts, assemble things the correct way, although naturally I’m feel pretty anxious about trying to get it running once again…IMG_9061.jpeg
 
The cranking W/O plugs to build up oil pressure is good-20 seconds total I'd think should be
fine as you've lubed everything going together.

Your not breaking in rings, really just new bearings which don't require break in
(already "passed" clearance checks).

Once started, check for any leaks, warm up as usual. Then go for a ride taking it easy
for a couple of miles (warming up the oil to temp) before any high rev runs.

Re oil change, I'd think 100 miles is fine, again, no real break in to speak of, just get the
assembly lube/dust, etc out of the engine...

I suspect your start up / first run will be VERY un-eventful, except much quieter W/O
that rod knocking...

Good luck!!!
 
Back
Top