We can rebuild her— we have the technology

Amorousnerdium

Junior Member
Elite Member
Joined
Nov 15, 2010
Messages
166
Reaction score
13
Points
0
Location
Gulfport, MS
www.jasonwoodcock.biz
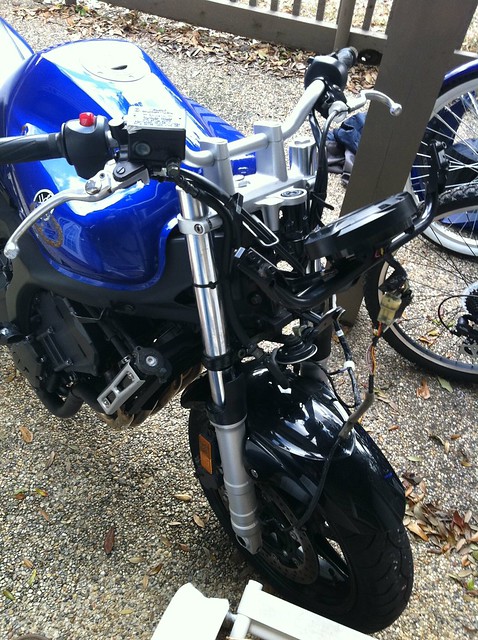
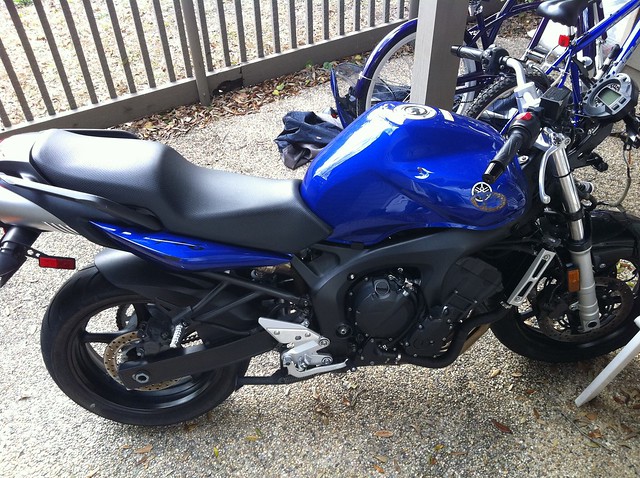
As a few of you my remember, a few months ago I wrecked my beautiful blue 06 FZ6 (http://www.600riders.com/forum/hall-shame/34827-wrecked-thank-god-my-riding-gear.html). Since I did not even have insurance yet, and the dealer SEVERELY inflated the repair cost (5900 dollars for a bike I only paid 3200 for), I decided to repair her myself. No sense in scrapping a bike that only has roughly 400 total miles on it (200 of my own, she had 213 on it when I bought her in November).

So, I spent the past few months skeetering around on my Ninja 250 and locating all of the parts I'd need for the rebuild. Well, this week the parts are in and I have a week of free time to rebuild her...

Here's my list:

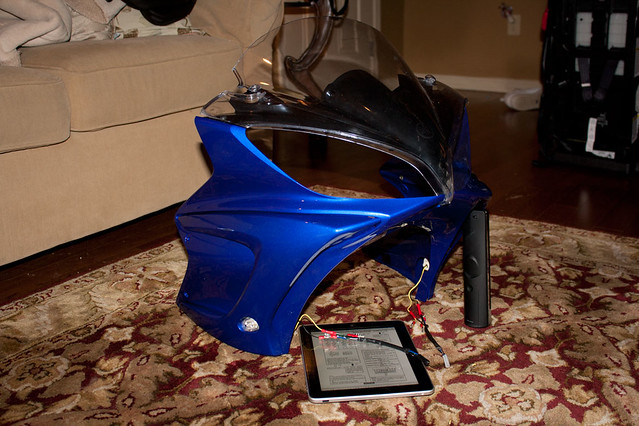
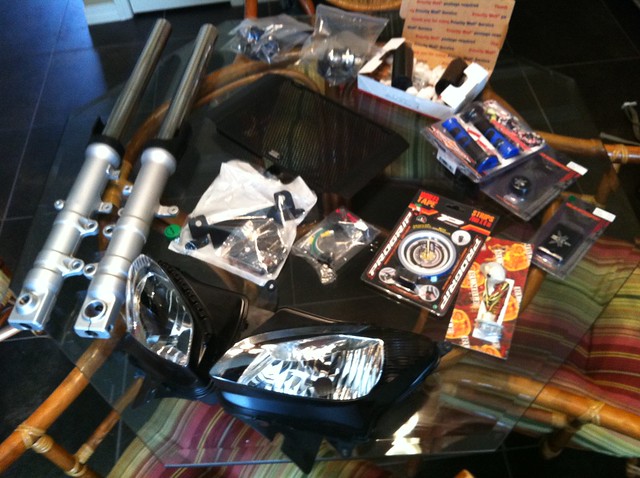
  • New main front fairing - Ordered from RonAyers.com
  • New front fairing stay - Ordered from RonAyers.com
  • New right inner fairing/dash - Ordered from RonAyers.com
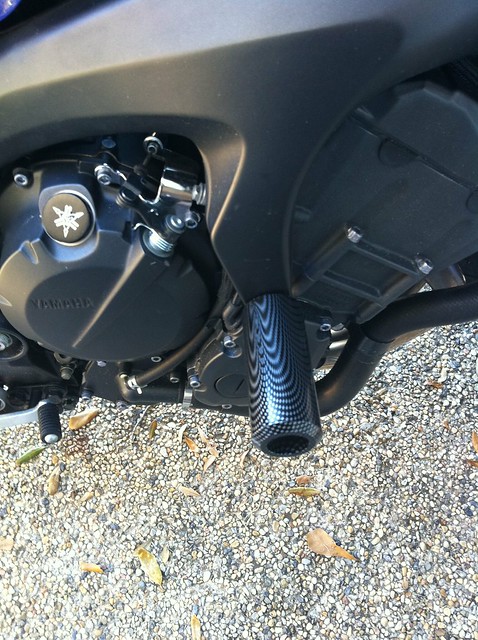
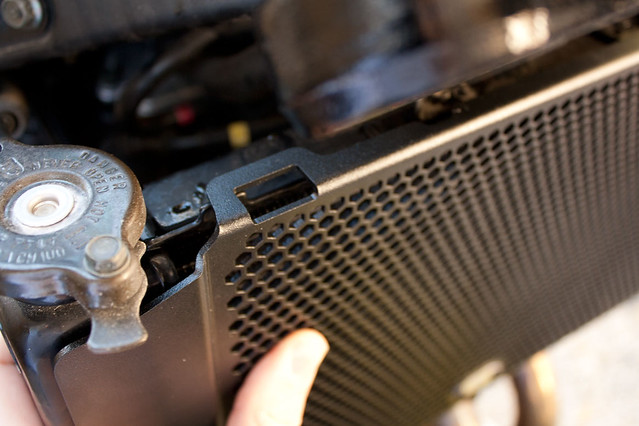
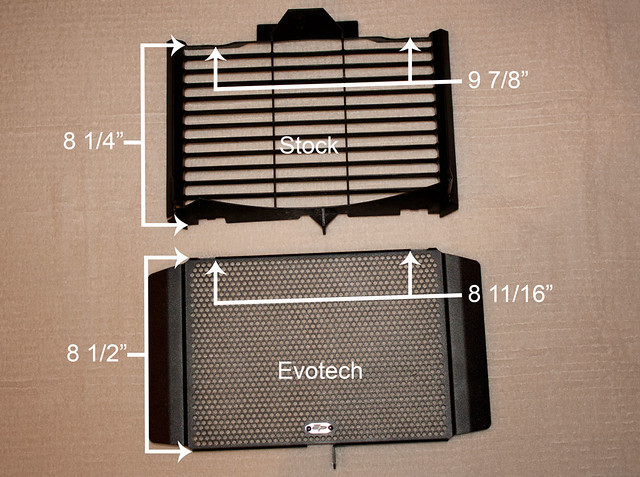
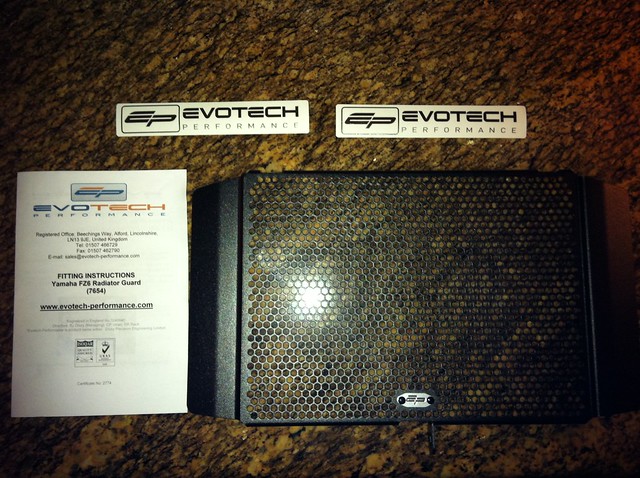
  • New Radiator Cover - EvoTech Aluminum Hexagonal Mesh (Black) - Ebay
  • Carbon fiber extended frame sliders - Ebay
  • Replaced the front pegs with a set of R6 pegs I bought off 4drfocus
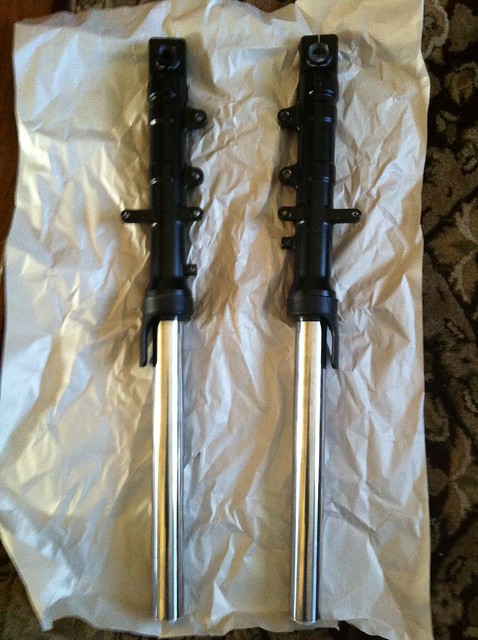
  • Replacing the front forks with a pair I purchased from Jj5cool1
  • New front rim - Simpson Cycles
  • New tires (just to be safe) - Tire Kingdom
  • Reflective blue wheel stripes -
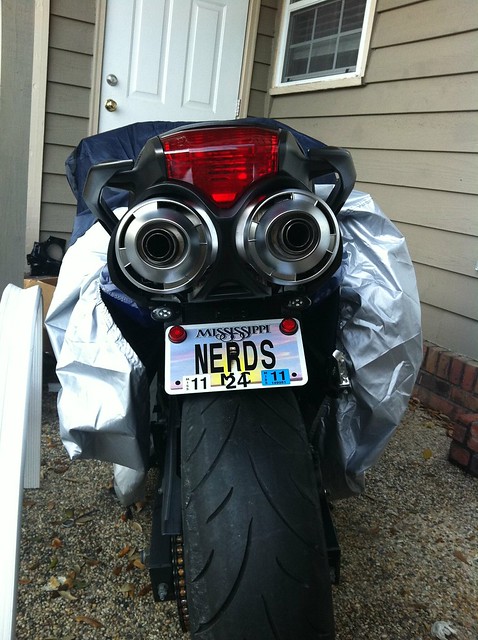
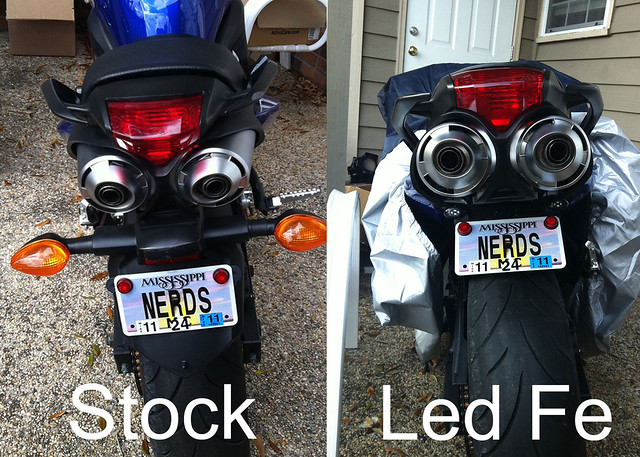
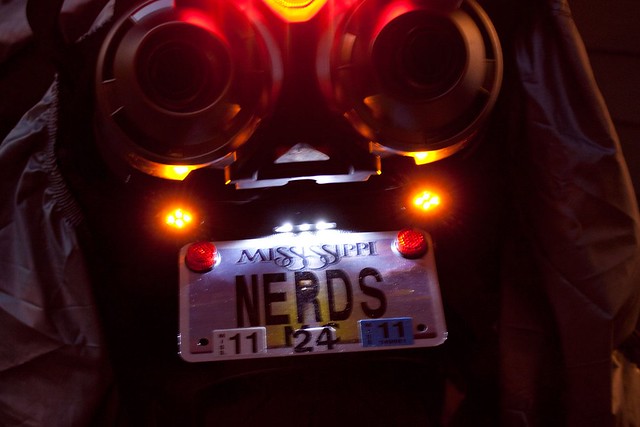
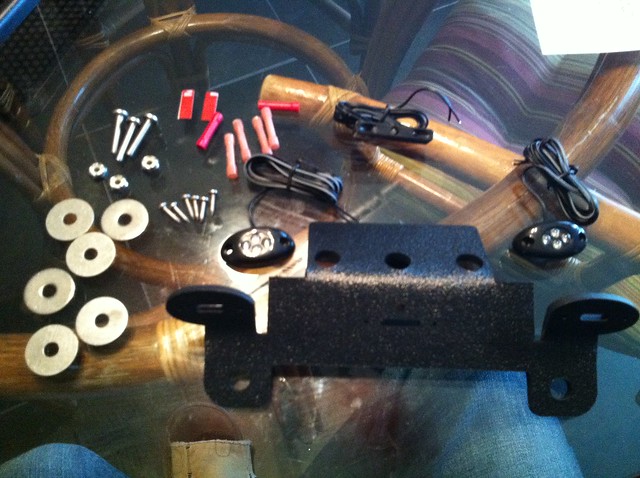
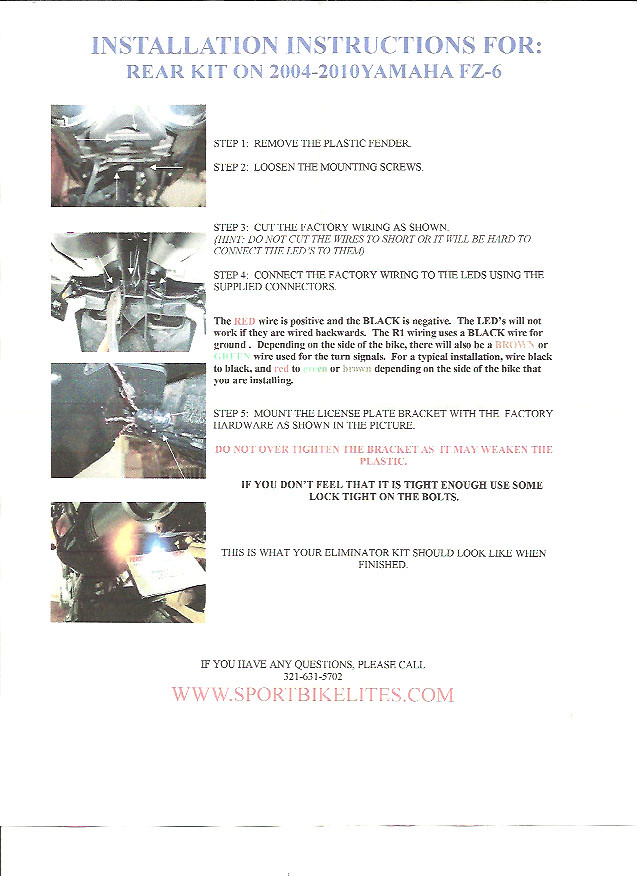
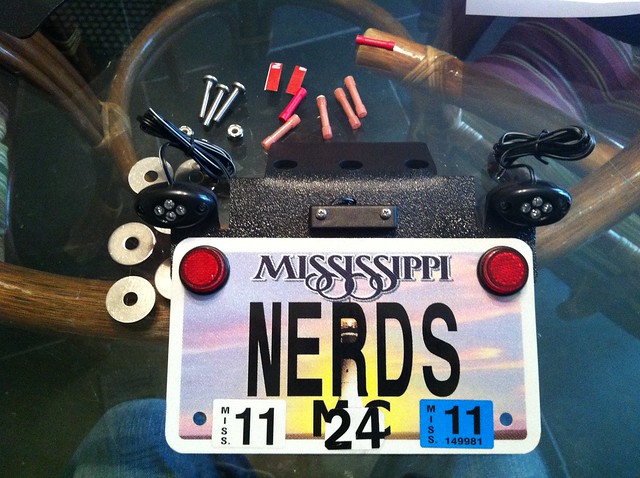
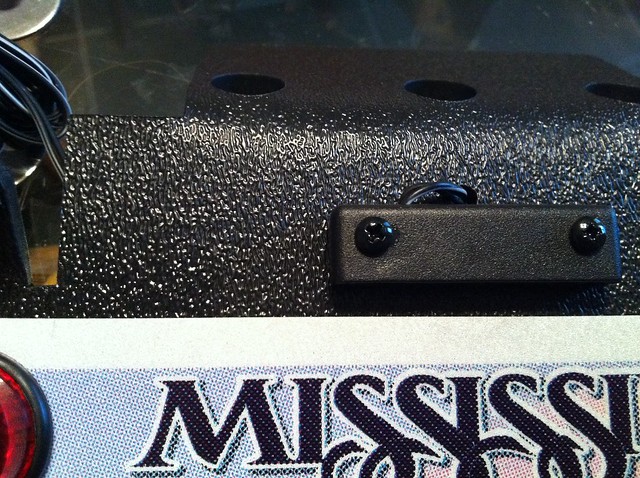
  • Fender eliminator w/ LED tailights & LED tag light - Sport Bike Lites
  • Flush mount front LED signals
  • Euro style LED corner signals (the kind in the corners of the headlight - Sport Bike Lites
  • Super Deluxe LED underglow kit - Sport Bike Lites
  • Hyper LED Halo Kit - Sport Bike Lites
  • Dual HID kit - Sport Bike Lites
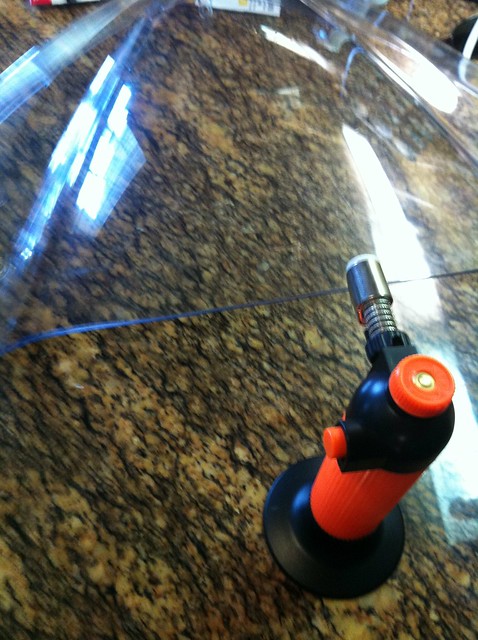
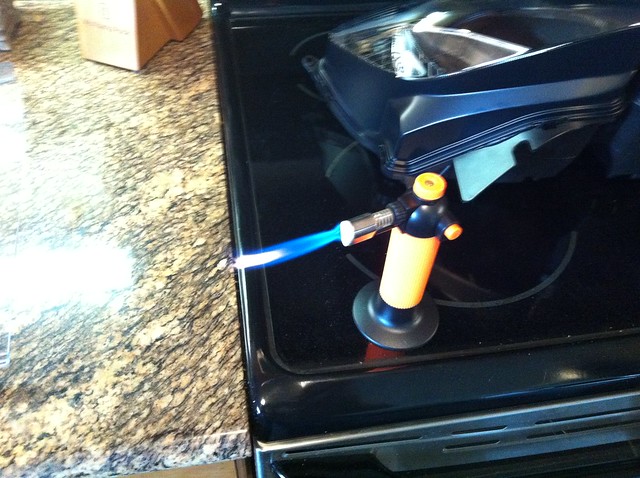
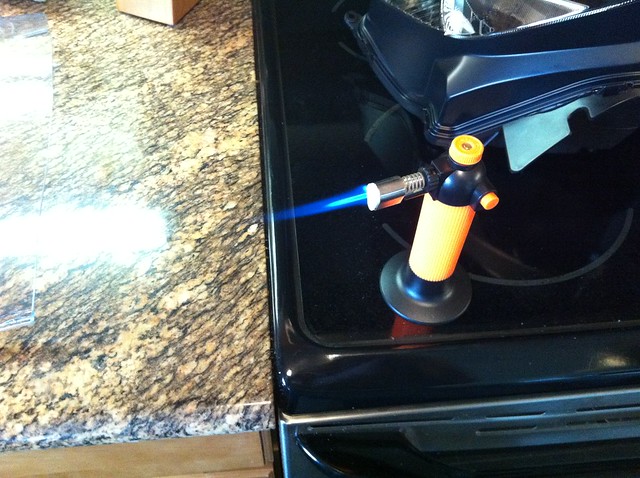
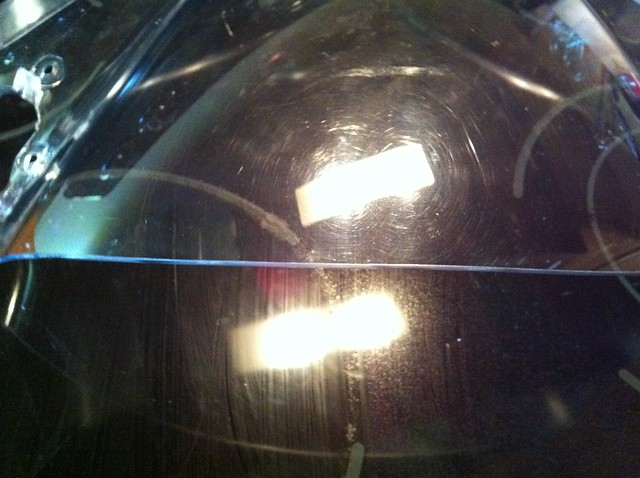
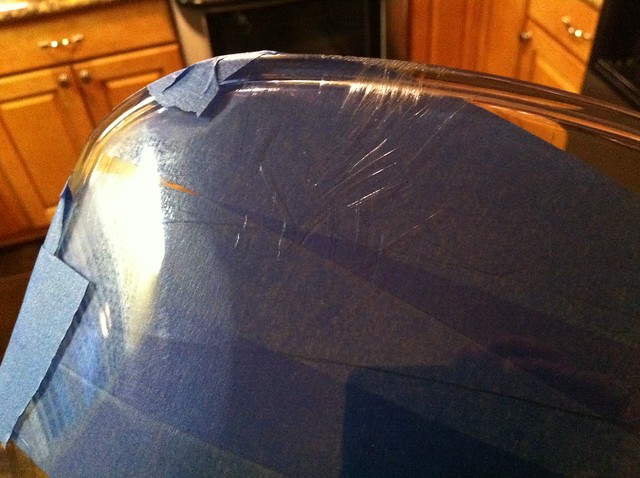
  • Cutting down the windshield four inches - It has road rash up top.
  • Tribal Yamaha Logo front windshield decal
  • New brake/clutch levers OEM - Ebay
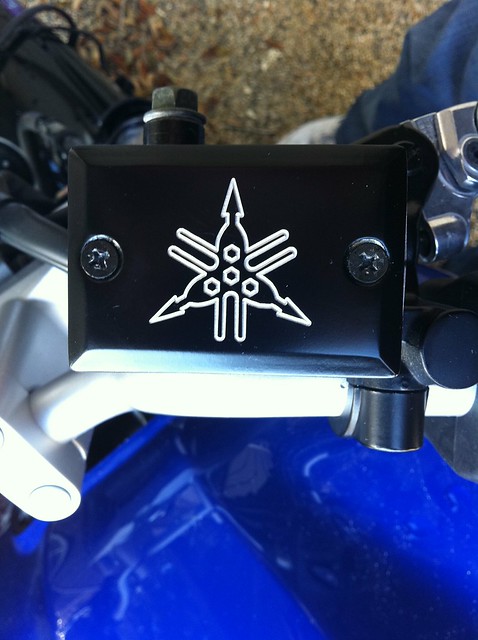
  • Yamaha Logo Fluid Caps - Ebay
  • Powder coating radiator side panels, levers, and fork outer tubes

So, now it begins... I'll keep it updated with pics as I go!

Also, I'm taking recommendations on anything else you guys think i should do.

5426670997_789430d98c_z.jpg


5426675545_df9df34cea_z.jpg
 
Last edited:

Wolfman

Member
Elite Member
Joined
Apr 24, 2008
Messages
13,584
Reaction score
127
Points
0
Location
Australia
Visit site
First up, here is the EvoTech Radiator Grill Cover. I have to say, it's a pretty nice piece. Aluminum, not plastic like the OEM.

5413354235_d6a23a0d1e_z.jpg

Looks like a nice piece of kit, i like the "Honeycone" pattern, very schmick!

I have an Aluminum radiator cover, they are much nicer, and probably a bit stronger too.

:thumbup::thumbup::thumbup:
 

aziebell

Junior Member
Joined
Aug 2, 2010
Messages
186
Reaction score
0
Points
0
Location
Alabama
Visit site
[*]Powder coating radiator side panels, levers, and fork outer tubes
[/LIST]
.

If you get a chance to post up some pictures of the build, I would be interested in how the powder coating turns out on the fork tubes. I have been wanting to get my fork tubes and rearsets done at one point. I actually just spray painted my radiator side panels tonight to see how well it would turn out. Looked good so far, will see tomorrow when the paint is dry.

Good luck with the rebuild!
 

Amorousnerdium

Junior Member
Elite Member
Joined
Nov 15, 2010
Messages
166
Reaction score
13
Points
0
Location
Gulfport, MS
www.jasonwoodcock.biz
So, now that I have all of the parts (as seen here minus the pegs - Getting powder coated, fairing - still in the box and too big for the pic, rims - also still in the box)

5427279700_e2d5f904fe_z.jpg


I decided to get down to business. I'm from the south and do NOT like cold weather. Today was 40-50 degrees. This meant for a southern boy like me, only the work that could be done indoors (ie my kitchen). So, I started with the fender eliminator and cutting the windshield down. I got the all in one kit from SportBikeLites.com. you know, the one with the LED blinkers and tag lights. Due to the laws down here and me being law enforcement (Dept. Homeland Security) I wanted to keep tag lights (big no no to not have one), LED blinkers (as long as they flash, they are happy), and a rear red reflector (again, big no no to not have one), so I went with this kit.

Here's everything in the package:

5427278578_5ea0653519_z.jpg


But wait! There's more! If you act now, they even include this incredibly detailed set of instructions!

5427320526_6360795130_b.jpg


And, thus began my experience. After stripping all of the old junk off my bike (including the original tail piece), I began assembling the fender eliminator.

Now, a note on the quality of this kit...

1st - It's plastic... Albeit, 1/4 thick plastic. Nonetheless plastic. Call me old fashioned, but nothing beats a good piece of solid metal. Whether it is steel, aluminum, titanium, whatever.

2nd - Attaching the LED blinkers and tag light to the frame leaves a sloppy wire routing system. The tag light wire feed THROUGH the frame, while the blinkers are routed over the top of the "pods". Sloppy, sloppy, sloppy.

3rd - The wire leads are WAY freaking too long (6 foot or so), so be prepared to cut them.

4th - Did I mention the joke of instructions? None available on their site as well.
So, off I went connecting things, screwing things, etc. etc.

5427297948_378d794c47_z.jpg


Now, as you can see, once things are together, it looks pretty good. EXCEPT FOR THOSE DAMN SILVER SCREWS... So I grabbed the matte black automotive touch up paint and hit the screw heads.

5426690225_9261e0ce81_z.jpg


Assembly time - 5 minutes
Tools - Screwdriver...

Too cold to put it on today, so I set it aside and on to the next little phase, cutting a few inches off the windshield to hide the road rash and tidy up the look. Pretty easy thing to do after reading all of the threads on here regarding it. First thing I did was cover the inside with blue painters tape, tie a string to the bolt hole on the front, and the other end to the pencil. Traced my line like an over sized compass. Broke out the Dremel and sliced it down.

Here's the road rash:

5427294962_75c0a0629e_z.jpg


The inside with a few runs of blue tape:

5427293700_9f8e23fe3f_z.jpg


Making the cut:

5426686313_e611d32195_z.jpg


And what we got left...

5426778201_fb6478ebd1_z.jpg


Now, a few notes:

1. Measure twice, cut once... Actually, measure at least 5 times... Don't cut until you are 100 percent happy with EXACTLY what you see...

2. Only use about 4-5 thousand RPMS on the Dremel. Faster and the plastic will starts to melt and gum up.

3. Sand the edge with some high grit sand paper before hitting it with a flame to smooth out the edges. Otherwise, the bits of tape will burn and leave black speckles down the edge.

Tomorrow's agenda:
  • Finish out the windshield.
  • Install the fender eliminator.
  • Install the pegs.
  • Drop of the fork outer tubes to be coated.
  • Install reflective tape on the rims.
  • Locate some new tires.
 

Amorousnerdium

Junior Member
Elite Member
Joined
Nov 15, 2010
Messages
166
Reaction score
13
Points
0
Location
Gulfport, MS
www.jasonwoodcock.biz
Alright, so the weather is nice today, so i have decided to finish out the windshield and get some actual outside work done.

First up, finishing out the windshield. Yesterday we cut it down to the shape we wanted with the Dremel tool. Today we are cleaning that cut up and polishing the window.

For that, I am using:

120 Grit automotive sandpaper
400 Grit automotive sandpaper
800 Grit automotive sandpaper
Small butane torch
Mequiars PlastX Clear Plastic Cleaner & Polish

5431609334_39b927455f_z.jpg


First thing I did was get down with some 120 grit sandpaper to smooth out the cut some, get the little jagged crap off and rough out the shape. I sanded FLAT against the cut and rolled it to 45 degree angles on the inside and outside. Just to make it look nice.

Take your time here. One "whoops" and your window looks like poo. No laughing at my Sketchers Shape Up shoes... They really do make your butt rounder.

5431625866_0f24e59758_z.jpg


Now, after washing everything off and drying thoroughly, I double checked, make sure everything was gravy. Then it was time to start some wet sanding action in the kitchen sink :D 
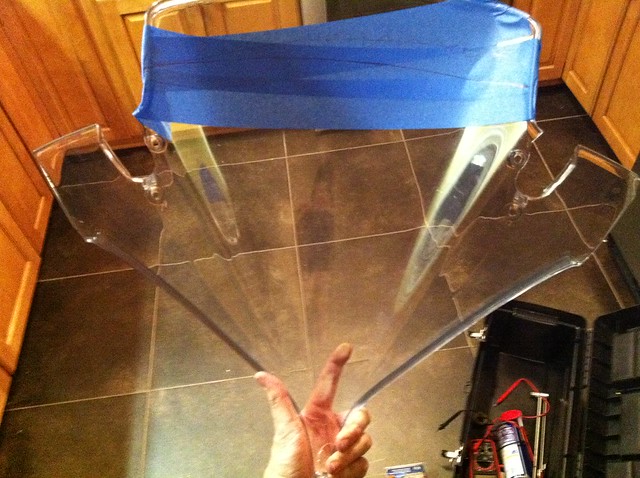
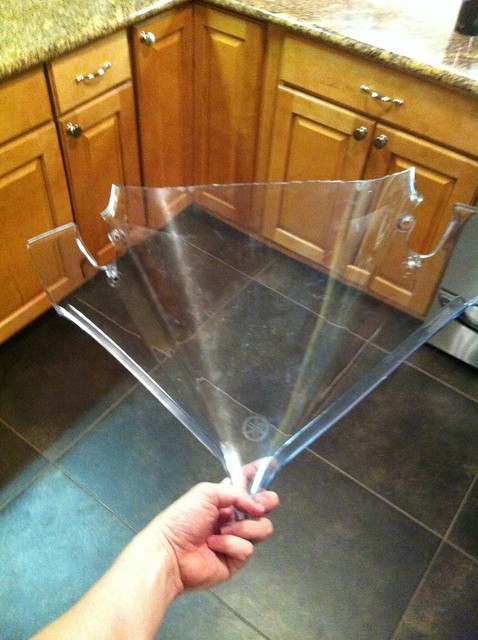
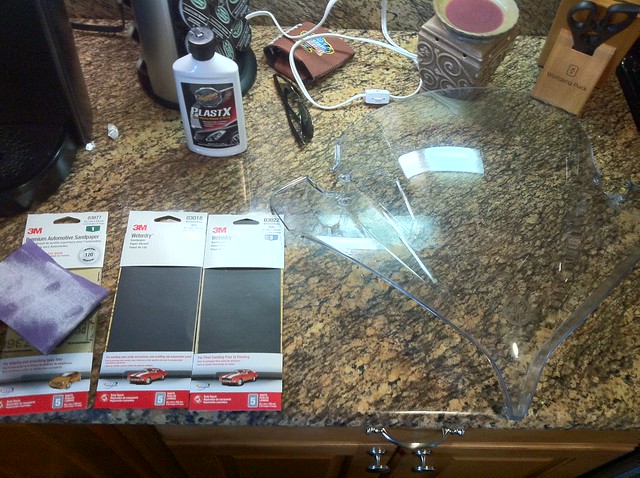
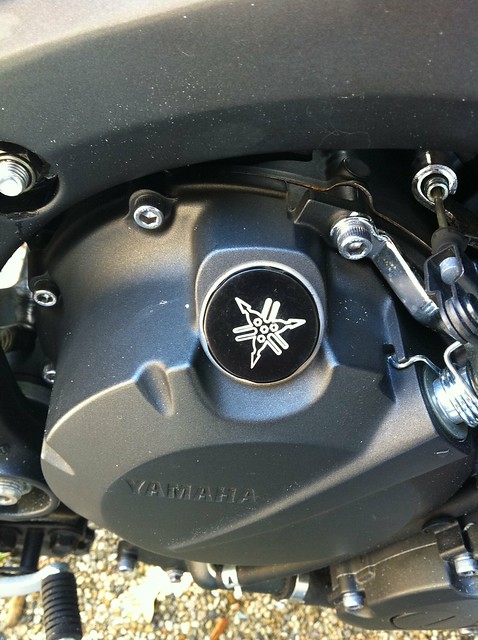
My extensive history in modding video game consoles and PCs came into play here. Plastics are fun to work with.

Started with the 400 grit wet to smooth everything out. Then moved on to the 800 to smooth the finish out. The key here as with everything else, is to TAKE YOUR TIME. Don't rush it.

5431607696_68d14abd4b_z.jpg


Now, after it's all sexy sexy most people would stop here. Not me... I want it SMOOTH... GLASS smooth. So, it's time to kiss it with a little flame. I'm going to use a small butane torch you can pick up anywhere,

You want the flame to be nice and focused before you start. Give it thirty or fourty five seconds to stabilize too.

Bad flame:

5431606252_692f64fe54_z.jpg


Good flame:

5431604780_aed1ea1d49_z.jpg


Start at the corner, make LONG flowing passes all the way down the edge of the cut, with the flame hitting the cut FLAT as if you were sanding the side flat. Don't worry about the edges, the rippling of the flame will get them. Don't go at an angle either or you will scorch your windshield. LONG FLUID PASSES. Quick, with multiple passes. You want notice a visible difference until about 5-6 passes. After you get the edge looking like glass, set it aside, do NOT touch that edge or you will warp it. Let it cool all the way.

After which, enjoy your work :D

5431603396_a197fa2408_z.jpg


Then I used the Meguiars PlastX to remove all of the swirls and nicks that where in the window initially. The result, brand new low cut windshield :D

Now it's off to put that fender eliminator on the bike, and see if the forks are ready to be picked up.
 

Amorousnerdium

Junior Member
Elite Member
Joined
Nov 15, 2010
Messages
166
Reaction score
13
Points
0
Location
Gulfport, MS
www.jasonwoodcock.biz
Alright, so far today, I have the Fender Eliminator put on the bike.

5434822540_7597f2a68a_z.jpg


Pretty easy, took a few minutes to splice everything together nicely. No thanks, however to the SportBikeLites.com instructions... First, they are completely wrong... Well, I mean, other than the fact that black wire is ground. The tag light wire on the 06 FZ6 is not red, it's blue... Nonetheless, I got the thing hooked up and working. A little heads up though, along the left hand side of the bike on top of the frame that the FE bolts up to, there is a rectangular plastic cover that goes over the wires. To get that lined up and back on, the wires have to be FLAT and pushed up against the frame.

Also, the LEDS are NOT very bright at all. I have some units laying around from game console modes that are 10x - 15x brighter than these things, so in the near future, I'll be digging those out and using them instead. Here's a short video of the light on. I'll take a night video/pic set when the sun goes down tonight so you can see the brightness.

[ame=http://www.youtube.com/watch?v=I4ZNefCqpA8]YouTube - SportBikeLites.com Fender Eliminator[/ame]

Put the new oil cap and master cylinder covers on too:

5434528544_732d5cb1b7_z.jpg


5433913195_082fa16c35_z.jpg
 

Amorousnerdium

Junior Member
Elite Member
Joined
Nov 15, 2010
Messages
166
Reaction score
13
Points
0
Location
Gulfport, MS
www.jasonwoodcock.biz
Frame Sliders replacement day!

These things were a breeze. Bought a set of extended frame sliders off of Ebay. They look just like my old ones except longer and didn't have YZF in white on them.

So, first I had to remove my old one:

5436948900_f888fc9447_z.jpg


Grabbed the 16 mm socket, and unbolted both of them. As you can see, the new ones are a good bit longer. I was a little confused though because everywhere I have read says put the shorter bolt on one side, but these bolts were the exact same length (over all and thread wise) as the ones that were one there, and both of those were the same length as well...

5436947712_a5c3df739c_z.jpg


So, first I just bolted them on to make sure they'd fit, then I backed them all the way out, added a little LocTite and torqued them down to 40 lbs.

5437057864_5824944218_z.jpg


And that phase is a wrap :D
 

macem29

Banned
Joined
Aug 14, 2009
Messages
610
Reaction score
7
Points
0
Location
Eastern Ontario
Visit site
I remember a while back a lot of chatter on the board here
about sliders having no value, broken frames etc....

those last few pics of yours tell a different story
 

Amorousnerdium

Junior Member
Elite Member
Joined
Nov 15, 2010
Messages
166
Reaction score
13
Points
0
Location
Gulfport, MS
www.jasonwoodcock.biz
I think it has a lot to do with the accident... Mine the bike simply slid on its side at about 45 mph. I'd imagine that if it had something to catch on that it may have done some frame damage. However, after seeing how they DID safe my bike, I will ALWAYS have them. The situations they save the bike from far outweigh the situations they damage the bike.

What about you? Frame sliders?
 

Amorousnerdium

Junior Member
Elite Member
Joined
Nov 15, 2010
Messages
166
Reaction score
13
Points
0
Location
Gulfport, MS
www.jasonwoodcock.biz
Well, ran into my first problem... I'm at the point of reassembling everything and I went to install the radiator cover...

It doesn't fit...

5446853739_c6f8fc524b_z.jpg


As you can see, the mounting tabs are too far in, and the whole unit is a too big. I contacted the seller and he in turn has contacted the manufacture. He's swearing up and down that part number is for the 06 FZ6... Evotechs website says the same...

Here's some measurement comparisons:

5446853679_0733322025_z.jpg


I guess tomorrow I will find something out.

I got the flush mount LEDS on the fairing. For future reference, stay clear of Rumble Concepts flush mount led signals. The fit is HORRID. I made some custom connector so that I can quickly connect the wires to the front Euro style corner lights to the signal harness. Here's my test fit of the windshield (cut down), visors, flush mouth signals, and fairing:

5446888815_53d65d8308_z.jpg


I should have everything finished and back together tomorrow... Providing I can find some Michelin tires... I want the Pilot Road 3s but i cant seem to find them around here...
 

Amorousnerdium

Junior Member
Elite Member
Joined
Nov 15, 2010
Messages
166
Reaction score
13
Points
0
Location
Gulfport, MS
www.jasonwoodcock.biz
Well, as it turns out for radiator cover, according to EvoTech the UK radiator has the same part number throughout those years, however here in the US we have had a few different part numbers from 04-09. So somewhere the mounting points shifted a half of inch. However the seller says he will refund the full sale including return shipping. Guess I am back to square one there...

Anyone know of a good radiator cover for the US 2006 FZ6? Looking for black aluminum.
 

Amorousnerdium

Junior Member
Elite Member
Joined
Nov 15, 2010
Messages
166
Reaction score
13
Points
0
Location
Gulfport, MS
www.jasonwoodcock.biz
Okay, no major updates over the past few days... However... Everything is together. Except for the radiator cover and my right mirror... Forgot to order it...

I'll be posting pics tomorrow. I spent nearly eight hours riding her around Harrison County today testing put the new Pilot 3 tires... Sexy... And it feels so freaking good to be back on my FZ!!!
 

MoMo

Junior Member
Joined
Jul 1, 2010
Messages
22
Reaction score
0
Points
0
Location
France
Visit site
Well done for your repair !

Did you paint your fork yourself ?

I allready saw a black fork on a S1 with black frame, it was really nice.
 
Top