• Welcome to the Yamaha FZ6 Forums. Member registration disables ads and allows you to post and share. Register Here.

Broken Frame Bolt

fazil

Junior Member
Joined
Jan 7, 2009
Messages
942
Reaction score
31
Points
28
Location
Istanbul
Visit site
Today i suspected a loose frame bolt while cleaning the bike.
Then i tried to tigten it but it just turned freely and suprise!
It has been broken and some part of the bolt was in the engine side.
So how can i extract it? The diameter of the hole looks narrow like 10mm.

This bolt:

frame.jpg


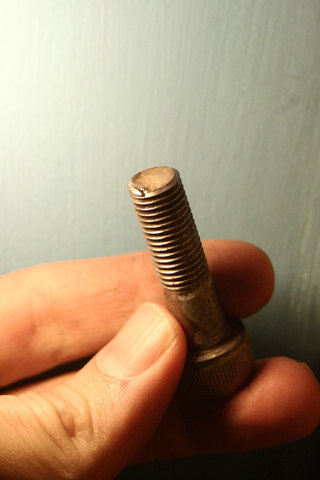
I don't know the original length of the bolt but it is now like this:

image.jpg


Can i ride without repairing it for sometime or is it urgent?
How many bolts hold the engine in it's place i don't know.

:(
 
It cannot be ridden without the engine fully secured. The additional load on te other bolts and the vibration will likely cause serious problems and danger.

You will need an eazy-out to extract the broken piece. I have seen posts about unstressing the engine bolts by loosening them all and retightening them, and am thinking it might be the right thing to do.
 
Are you sure it is broken. From the picture it looks fine to me or that's a really clean break.

+1 on the above.

Its not a long bolt and just goes into the block. You should be able to look into the hole and see threads. If not, it sounds like the block is now stripped with no threads as that steel bolt looks fine. Search Heli-coil (theres also some other thread repair kits). If your not comfy doing it, a machine shop should be able to take care of it. You don't want that block any more messed up

There is a bolt #15 (the same bolt) on the other side, see the diagram and compare the bolt lenths. Torque is 40 ft lbs, clean threads...

And yes, I wouldn't ride it as the engine is a stressed member with the frame.


Please post your findings....
 
Last edited:
Looking at the diagram picture it seems the length is alright but i saw the remaining part deep inside where the frame bolts to the engine.
It looks to me really a clean brake.
But i'll check again tomorrow to be sure.
 
Last edited:
That one is only present on the left side. #13, the one frame sliders use, is on both the left and right sides.

If you can see the rest of the bolt in there, chances are it sheared at the engine/frame junction. It doesn't look like it pulled threads, unless you cleaned the bolt off before you snapped a pic... usually when you pull threads out of aluminum, you do literally that- the threads come out wrapped in a spiral around the bolt, you end up with a semi-smooth hole, and you need to rethread it larger, or use a Helicoil or Timesert.

Bright side is if it's in there, it might be easy to get out, and it should be easy to make a centering mark. Just get a sharp punch that's a decent fit to the hole, slide it in, and give it a sharp hit or 5. Spray some penetrating lube in first, if it is siezed up, the hammer hits can help work lube into the threads. Then I'd start with a left-handed drill bit. No, I'm not joking. Yes, it's a real thing. :p If the threads aren't siezed in the engine side, without the tension of the bolt being tight, odds are once you get a little nibble into it with the drill, it'll start to work itself out, rather than in like a standard bit. I've sheared off weak bolts and used this method, and had the broken bolt come right on out as soon as that bit catches. Start small, 1/8" to 3/16", you can always go bigger if needed, and it lowers chances of messing up those fragile, expensive aluminum threads in the head.

If it doesn't come out with the drill bit, you can try splined bolt extractors. Snap-On calls them "straight bolt extractors", like this: E1, Extractor, Straight Screw, 1/4"
The depth might not let you use more conventional types of extractors. You might be able to get away with a smaller conventional spiral fluted one, if you're lucky. I hope you are, because my experience with the straight splined ones is that they're not very strong, unless you snap one off, then it'll resist any attempts to drill the now-broken extractor out. :eek:

Also, definitely check and re-torque all the frame-to-engine bolts after this, and definitely don't ride until it's fixed. My experience with a shear like that is that it's almost always caused by other bolts holding the same component being loose or broken. If there's 5 bolts and you lose one, you just lost about 20% of the strength, and it just got that much easier to break another one... then you're down about 40%, and so it goes. Used to happen a lot with Humvee 2-piece wheels- there were 12 bolts holding the halves together, and if they weren't torqued right, one would snap. And while it might have taken 4000 miles for that first one to snap, the next one would only take 500, and the next would only take 100.

 
Last edited:
That bolt does look like a clean break and probably at the engine. You actually can see the beginning of the thread with no leading chamfer present.
I also agree with everyone to not ride the bike till this is fixed. The engine is a stressed member of the frame system and you can minimally stress and crack the frame.
 
That one is only present on the left side. #13, the one frame sliders use, is on both the left and right sides.

If you can see the rest of the bolt in there, chances are it sheared at the engine/frame junction. It doesn't look like it pulled threads, unless you cleaned the bolt off before you snapped a pic... usually when you pull threads out of aluminum, you do literally that- the threads come out wrapped in a spiral around the bolt, you end up with a semi-smooth hole, and you need to rethread it larger, or use a Helicoil or Timesert.

Bright side is if it's in there, it might be easy to get out, and it should be easy to make a centering mark. Just get a sharp punch that's a decent fit to the hole, slide it in, and give it a sharp hit or 5. Spray some penetrating lube in first, if it is siezed up, the hammer hits can help work lube into the threads. Then I'd start with a left-handed drill bit. No, I'm not joking. Yes, it's a real thing. :p If the threads aren't siezed in the engine side, without the tension of the bolt being tight, odds are once you get a little nibble into it with the drill, it'll start to work itself out, rather than in like a standard bit. I've sheared off weak bolts and used this method, and had the broken bolt come right on out as soon as that bit catches. Start small, 1/8" to 3/16", you can always go bigger if needed, and it lowers chances of messing up those fragile, expensive aluminum threads in the head.

If it doesn't come out with the drill bit, you can try splined bolt extractors. Snap-On calls them "straight bolt extractors", like this: E1, Extractor, Straight Screw, 1/4"
The depth might not let you use more conventional types of extractors. You might be able to get away with a smaller conventional spiral fluted one, if you're lucky. I hope you are, because my experience with the straight splined ones is that they're not very strong, unless you snap one off, then it'll resist any attempts to drill the now-broken extractor out. :eek:

Also, definitely check and re-torque all the frame-to-engine bolts after this, and definitely don't ride until it's fixed. My experience with a shear like that is that it's almost always caused by other bolts holding the same component being loose or broken. If there's 5 bolts and you lose one, you just lost about 20% of the strength, and it just got that much easier to break another one... then you're down about 40%, and so it goes. Used to happen a lot with Humvee 2-piece wheels- there were 12 bolts holding the halves together, and if they weren't torqued right, one would snap. And while it might have taken 4000 miles for that first one to snap, the next one would only take 500, and the next would only take 100.


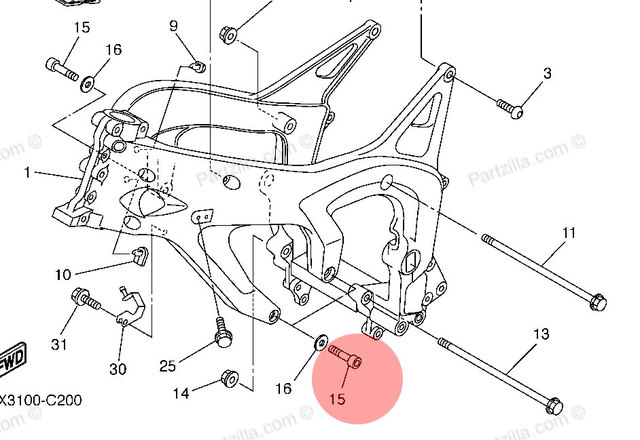
Just a side note, bolt #13, if you look closer is a bolt and nut that goes fully the the frame and engine. Its usually NOT used for sliders. #15, again if you look closer at the picture, theres TWO on the left side "frame arms"and ONE on the right side frame arm.

The rear most LEFT "arm" bolt and right frame "arm" bolt holes (#15) are where TOG's are usually attached...

And +1 on the aluminum threads, if stripped, coming off with the bolt.

**Something not addressed, was the bolt stripped by the previous owner ( or shop mechanic) and just shoved back in (not unusual). Between the galvanic action between the steel and aluminum, wether(water) conditions, it may have seized years ago and someone tried removing it and took the aluminum threads with it...

Hopefully its just a broken bolt but the bolt removed looks normal.
 
Last edited:
**Something not addressed, was the bolt stripped by the previous owner ( or shop mechanic) and just shoved back in (not unusual). Between the galvanic action between the steel and aluminum, wether(water) conditions, it may have seized years ago and someone tried removing it and took the aluminum threads with it...

Hopefully its just a broken bolt but the bolt removed looks normal.

That's a scary thought! One of the reasons I like to do my own work. I know it's done right even if I have to re-do it. My life is dependent on the bike not falling apart under me.

Thanks for the great writeup about the bolt extraction - have not had to do that in a while but the tip about the drill bit is a good one.
 
I still have my original bolts that I removed when the frame sliders were installed. They are 2.35" long. How long is the one you are holding?
 
Just a side note, bolt #13, if you look closer is a bolt and nut that goes fully the the frame and engine. Its usually NOT used for sliders. #15, again if you look closer at the picture, theres TWO on the left side "frame arms"and ONE on the right side frame arm.

The rear most LEFT "arm" bolt and right frame "arm" bolt holes (#15) are where TOG's are usually attached...

And +1 on the aluminum threads, if stripped, coming off with the bolt.

**Something not addressed, was the bolt stripped by the previous owner ( or shop mechanic) and just shoved back in (not unusual). Between the galvanic action between the steel and aluminum, wether(water) conditions, it may have seized years ago and someone tried removing it and took the aluminum threads with it...

Hopefully its just a broken bolt but the bolt removed looks normal.

My bad, all 3 are "#15". Sorta looked like #13 was pointing at the rear hole, but I see the little line there now.

I don't really see it being likely that the threads are stripped if he can see the remnants on the bolt in there, unless there was just enough thread to keep it from walking out, but not enough to provide some clamping force to lower shearing forces. That bolt end definitely looks sheared to me, but there does seem to be more length than I'd expect.... hmmm...

Easy enough, and stronger too, to sink a Heli-Coil in there if needed. I hate torquing bolts into threaded aluminum anyway. Even with a good torque wrench, it scared the hell out of me doing my frame sliders.
 
I still have my original bolts that I removed when the frame sliders were installed. They are 2.35" long. How long is the one you are holding?


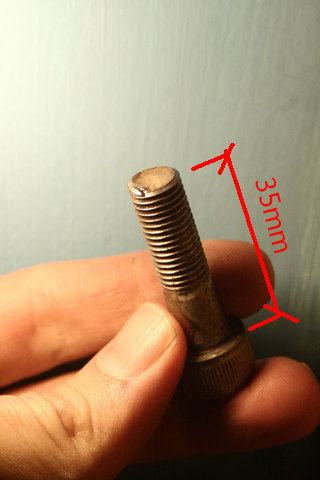
I looked at the hole again this morning and yes it some part of the bolt is there like a cavity.

I measured the bolt and it is 35mm long.

Untitled_1.jpg


I think 20-30mm of the bolt is at the engine side. I don't know about the alumunium threads but if they are stripped i don't think it is possible to make a helicoil operation because that hole is narrow at the fram and to helicoil it i guess engine should be taken out.

I'll go to a machine shop tomorrow. I'll keep posting.
Thanks for all the replies.
 
If the bolt were over torqued by a clumsy mechanic it should have snapped off at the head so perhaps it was uneven stress.

As previously suggested, probably good to loosen and retorque the set of them.

My bike has the T-Rex frame sliders and the bolts in the kit replaced #13.

Good luck and top marks for inspecting your ride and catching the problem before it caught you. :eek:
 
I looked at the hole again this morning and yes it some part of the bolt is there like a cavity.

I measured the bolt and it is 35mm long.

I think 20-30mm of the bolt is at the engine side. I don't know about the alumunium threads but if they are stripped i don't think it is possible to make a helicoil operation because that hole is narrow at the fram and to helicoil it i guess engine should be taken out.

I'll go to a machine shop tomorrow. I'll keep posting.
Thanks for all the replies.

Why not EZ-out the thing and try a replacement bolt in there? A bolt should break before the threads fail so they may be ok.
 
I don't know about the alumunium threads but if they are stripped i don't think it is possible to make a helicoil operation because that hole is narrow at the fram and to helicoil it i guess engine should be taken out.

I'll go to a machine shop tomorrow. I'll keep posting.
Thanks for all the replies.

To truly do it right, yeah you should take the engine out. I'm guessing the frame hole is just a hair over the bolt shank size, so just a little bit over the major diameter of the threads.

Option B, if you needed to do it, would be to just use the Helicoil tap through the whole thing, frame and all, then run the Helicoil into the head. *In theory* the clamping force of the bolt should be doing most of the work, not the fit between the bolt and the hole in the frame. Whether you want to try that, or unbolt the engine enough to do it right, is up to you. Personally, I'd much rather sink a bolt into a stainless Helicoil insert that's got oversized threads holding it in, than straight into tapped aluminum.

However, my bet is on the threads on the head side being just fine. If a new, clean bolt threads in smoothly without feeling loose, I wouldn't worry about it. Don't forget threadlocker, and not the permanent, needs-a-torch-to-remove kind.
 
I have no intention to take out the engine.
Option B looks fine to me.
May be i can use some epoxy to bond the helicoil to the engine side.
Or something like that:

5357.jpg


Here is the vide how it works:

[ame="http://www.youtube.com/watch?v=FqpStMLTE6E"]Stripped Thread Repair Kit - YouTube[/ame]
 
Problem isn't getting the Helicoil to hold, it's getting it into the engine side in the first place, since the hole in the frame wouldn't clear the extra couple mm of diameter without modification.

Tips for helicoiling...
Find out how much length you have in there, and use the longest insert you can.
Use some permanent threadlock on the outside. Install the insert, remove the install tool, then let that red threadlock dry and clean the threads before installing the bolt. You want the sleeve held into the engine harder than the bolt is held into the sleeve, so the insert doesn't try to back out with the bolt.
 
I still have my original bolts that I removed when the frame sliders were installed. They are 2.35" long. How long is the one you are holding?

If his left over bolt is 35 mm, 25mm is an inch, so he's got a bolt approx 1.25" vs 2.35" which is likely a good thing, better to remove a bolt than have no threads to work with(that's almost an inch of threads). A good machine shop should be able to fix you up, there's secrets and they usually know most of them. Its also possible someone shoved a shorter bolt in the hole after they ...ed it up. The bolt end in the picture does NOT look broke off. My bet is the PO or mechanic screwed it up and shoved a shorter bolt back in.

For the OP, if you have the ORIGINAL BOLT (I don't believe that is the original and even if it is, its TOO SHORT NOW), or pull one from the other side to match it up to when you go to the machine shop... I've read many a thread where the TOG bolt is slightly shorter than the stock bolt and strips the hole when torqued to 40 lbs.

+1 on doing your own wrenching. I've paid an occasional dealer to screw up my old FJR doing a throttle sync (they adjusted the butterfly screw vs the air acrews, simliar to the FZ)...
 
Last edited:
May be i can go one size smaller bolt like M8 with a helicoil, without tapping it i can just use some epoxy in the outside of the helicoil and let it dry.
Then fasten the M8 bolt with a collar on the frame.
Do you think helicoil can be epoxy bonded to aluminium engine case?
 
A properly installed heli coil will be stronger than the original aluminum threads.

IMO, with the demensions you provided, and the lenth mentioned of the original bolt, you likely still have part of the original bolt in the block. I'd concentrate on getting that removed, it be the easiest and the best at this point unless something major changes...
 
Back
Top