How to: Make your pipes shine like new!

pedrolima88

Junior Member
Joined
Jun 20, 2011
Messages
46
Reaction score
0
Points
0
Location
Brazil-RJ
Visit site
Thank Hoshiko, I tried to let go of my collectors, but it is not a single piece is a whole set to the dual exhaust. Could tell me if it goes all round? then it is easy to install?

Thank you!
 

pedrolima88

Junior Member
Joined
Jun 20, 2011
Messages
46
Reaction score
0
Points
0
Location
Brazil-RJ
Visit site
I think u say, its simple to install ?

I tried today remove, but is very hard. I think I need oil.

And after you paint, still painted or will be dark? Sorry for my english :p
 

greg

UK Luchador
Moderator
Joined
Aug 3, 2010
Messages
1,771
Reaction score
12
Points
0
Location
Stockport, UK
Visit site
I have taken off and put my headees back on heaps of times....is not an issue, re shearing the bolts....

Even the gaskets are re-usable, and very sturdy...

:thumbup::thumbup::thumbup:

for the record i took mine off to polish, was fairly easy, thoguh i realise now i should have used some copaslip on the bolts when i put them back in

used a rubber mallet to get the rear bit into my exhaust, and it took a bit of fiddling to get off in the first place

much easier than crawling around under the bike, though still couldn't get them quite as shiny as i would have liked
 

Hoshiko

Hoshiko
Joined
Aug 27, 2008
Messages
462
Reaction score
9
Points
18
Location
Brooklyn NY
Visit site
You will get little stones hit the pipes so the paint will chip but it will look good/better then no having anything.

I think if you have the money, just have them ceramic coated.
 

pedrolima88

Junior Member
Joined
Jun 20, 2011
Messages
46
Reaction score
0
Points
0
Location
Brazil-RJ
Visit site
for the record i took mine off to polish, was fairly easy, thoguh i realise now i should have used some copaslip on the bolts when i put them back in

used a rubber mallet to get the rear bit into my exhaust, and it took a bit of fiddling to get off in the first place

much easier than crawling around under the bike, though still couldn't get them quite as shiny as i would have liked


Greg,

the original tool kit is the key to remove the exhaust? if not, what key was used?

Thank you.
 

greg

UK Luchador
Moderator
Joined
Aug 3, 2010
Messages
1,771
Reaction score
12
Points
0
Location
Stockport, UK
Visit site
Greg,

the original tool kit is the key to remove the exhaust? if not, what key was used?

Thank you.

i used a 13 or 14mm socket i think, plus the usual extension bar and 1/2" ratchet driver, and moving the front wheel to gain better access

it's simple, but you might need to use a bit of force to get everything loose

if you don't have the tools then it's probably best to leave them on, all i needed was a socket set, allen keys, and rubber mallet though
 
Last edited:

turbid

Senior Member
Joined
Jun 23, 2009
Messages
649
Reaction score
11
Points
0
Location
malta
Visit site
i tried to remove the headers on my 06, but the nuts are badly stuck, no matter how much wd 40 i spray on them but they dont budge, and im afraid of using excessive force for fear of shearing the bolt, i wasnt going soft on the nuts but i was afraid to use more force.

anyway i used 800 grit water sand paper to remove the dark stains, then 1200 then 1500 then 2000 and finally 2500, the 800 grit leaves some tiny to the finish that go away with some persuasion from the following rounds of sand paper. dont go lower than 800 or the scratches will be deeper and would be tought to eliminate. then i used g3 polish and rubbed hard and finally a light car polish to finish off. i forgot to take pictures but i ll try to and post them later on. they didnt come bad but they would benefit from a bit more polishing etc. ill try Azz way next time
 

pedrolima88

Junior Member
Joined
Jun 20, 2011
Messages
46
Reaction score
0
Points
0
Location
Brazil-RJ
Visit site
Turbid,
I'm worried about sand collectors. Sanding remove the chemical treatment on the metal? it continues with copper-colored or has some rust spots?
 

Nick329

Junior Member
Joined
Jul 13, 2011
Messages
98
Reaction score
0
Points
0
Location
Lawrenceville, Ga
Visit site
Polished mine today. Used a Mothers PowerBall Mini on a drill and metal polish (Blue Magic Metal Polish Creme) I got at Advanced Auto.
Did not have to remove the headers and it took about one hour. The results were much better than I had expected, and without having to kill myself scrubbing by hand. ;)

First pic is a comparison after polishing the two right side pipes.
Second one is what the header looked like before polishing.
And the last two speak for themselves...mirror-like finish. :thumbup:
 

jrevans

Old-School Member
Joined
Feb 5, 2008
Messages
520
Reaction score
14
Points
18
Location
Eastern Pennsylvania
jrevans.fbody.com
Polished mine today. Used a Mothers PowerBall Mini on a drill and metal polish (Blue Magic Metal Polish Creme) I got at Advanced Auto.
Did not have to remove the headers and it took about one hour. The results were much better than I had expected, and without having to kill myself scrubbing by hand. ;)

First pic is a comparison after polishing the two right side pipes.
Second one is what the header looked like before polishing.
And the last two speak for themselves...mirror-like finish. :thumbup:

Looks good Nick! Glad to know there's a way to clean them successfully without lots of manual scrubbing.

I rarely wash my bike, let alone clean the headers, but someday I'd like them to look good again....
 

Nelly

International Liaison
Elite Member
Joined
Jul 8, 2007
Messages
8,945
Reaction score
125
Points
63
Location
Co Offaly, ROI
Visit site
Hey guys,

Just took a few pictures while I was polishing my pipes this arvo and thought I'd share the basic procedure with you so you can have a go yourself!
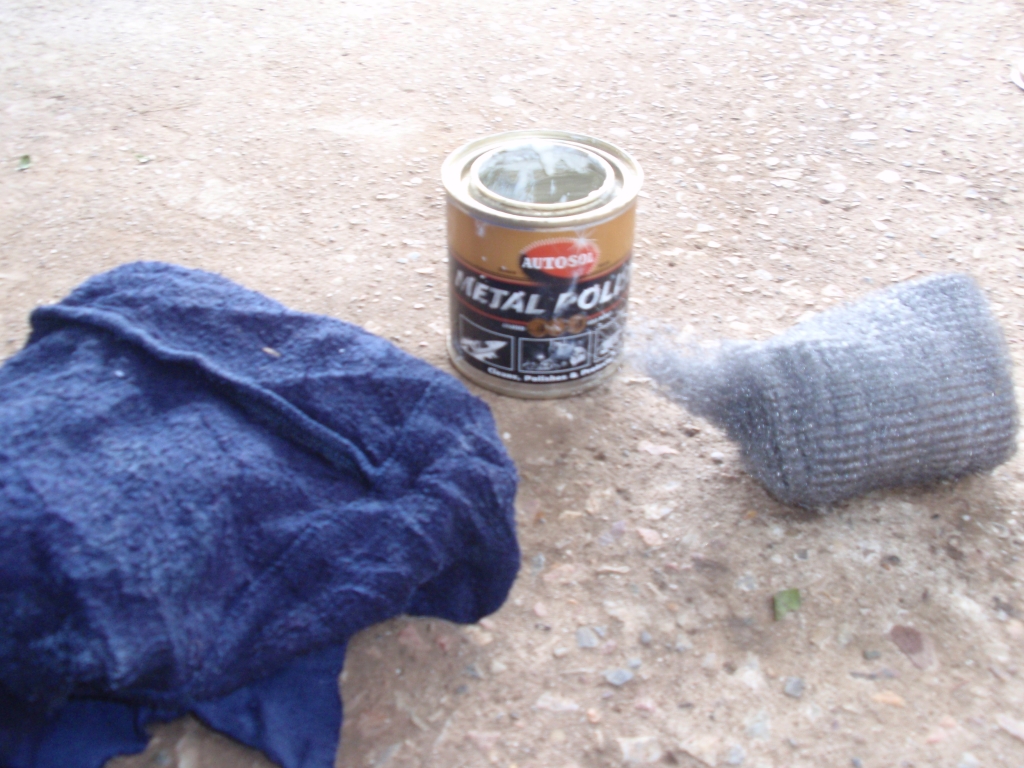
You will need:
  • Metal polish (I'm using Autosol, but use whatever you like best)
  • Steel wool
  • Mr. Sheen
  • Dirty/stained exhaust pipes
  • A strong arm!
  • A clean rag (or two)
  • Beverage of your choice

4936325037_50f7437b00_b.jpg


It will take about 2 - 6 hours depending on how pedantic you are and how perfect you want them (and if you run out of polish half way through :shakehead:)

Also, be prepared to be stabbed in the hand with steel wool a LOT.

Be sure to start on the part you want looking the best, because your arm will get dead after a while.

Caution: PLEASE don't use steel wool on chrome, it will scratch it badly..
Also, I'm not sure what else it works on, but stainless steel cans should be alright, and probably most other metals.

So, lets get into it!

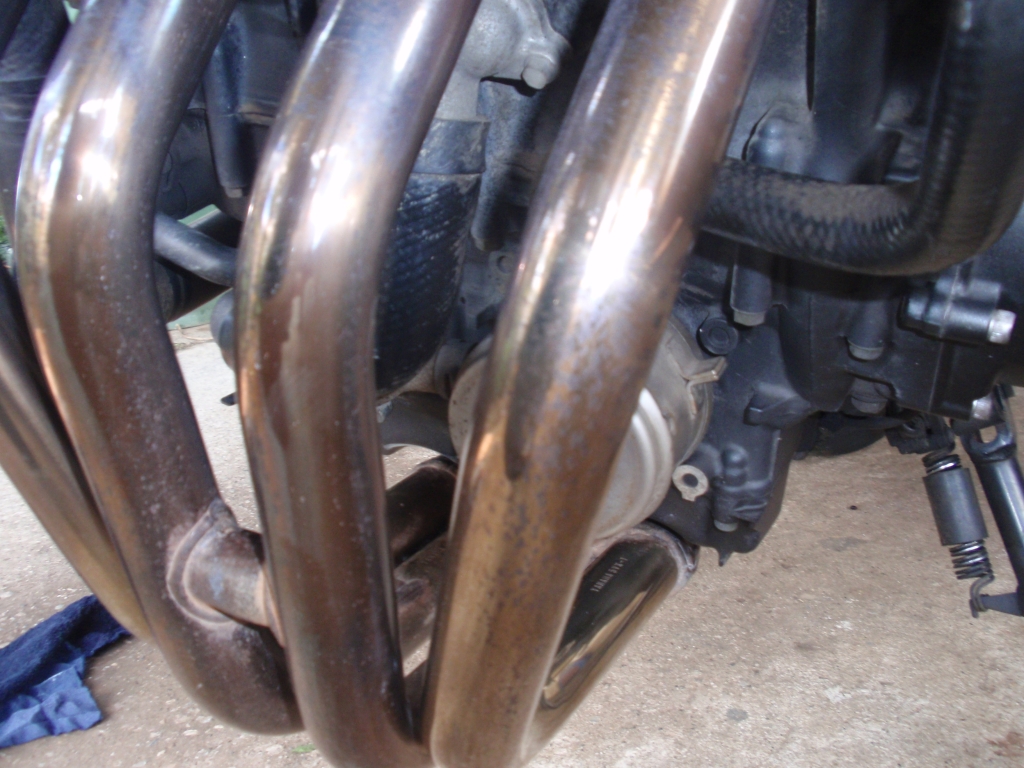
You'll start off with something stained brown like this:

4936913950_bfbb2fc22c_b.jpg


What you need to do, is get the steel wool and rip a bit off like this:

4936915138_a2e8855757_b.jpg


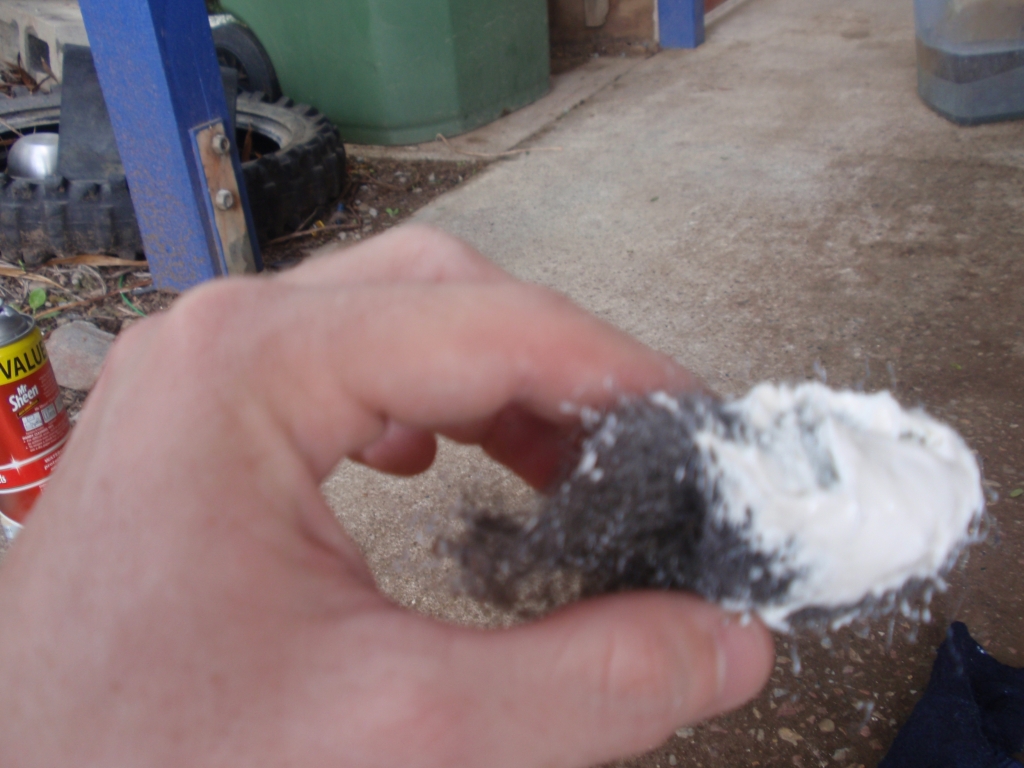
Then you'll need to put a bit of polish on it (you can never have too much)

Now this is the hard part.. Get the steel wool and scrub those pipes!
You'll never scratch them, so go as hard as you can, and for as long as you're comfortable with.

Concentrate on a small area at a time, otherwise you won't get as good of a result.

I find the easiest way to do it is to wrap your hand and the wool around the pipe and pull up and down along the pipe, although I don't think that gets as good a result as using two fingers and scrubbing.

After a couple of seconds you'll see them turning silver underneath the polish, but keep going, you want to get the other marks off as well.

4936323523_240c5e63d4_b.jpg


Once the polish starts turning black/dark, that's your queue to stop, wait about a minute and then wipe all of the excess polish off with your rag.
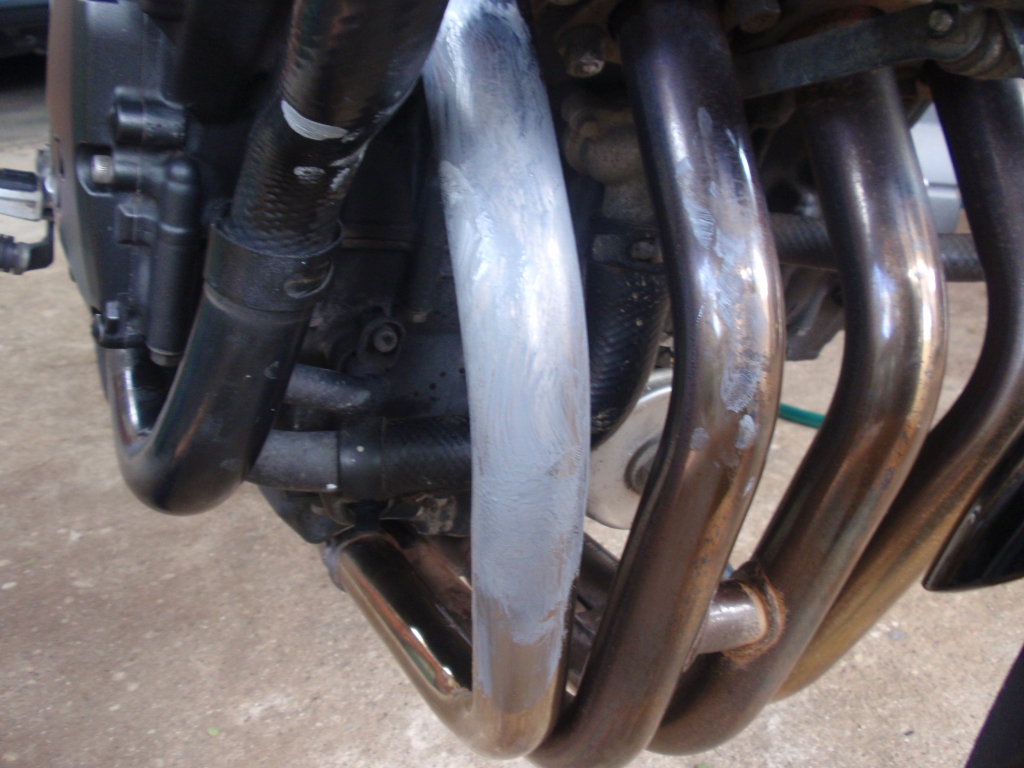
If it's not shiny enough, keep going, or if you're happy with it, move on to the next bit, and so on.

Keep going until they all look nice and shiny, and then hit them with some Mr. Sheen and a clean cloth to get the excess off and shiny them up really nice. (PS. I'm not sure about this anymore, it MIGHT burn on to the pipes next time you run it.. Until I post the results, I'd hold off on this.)

Then hopefully you'll end up with something like this, or even better if you aren't a lazy **** like me!

4936918164_4e78dc65f6_b.jpg


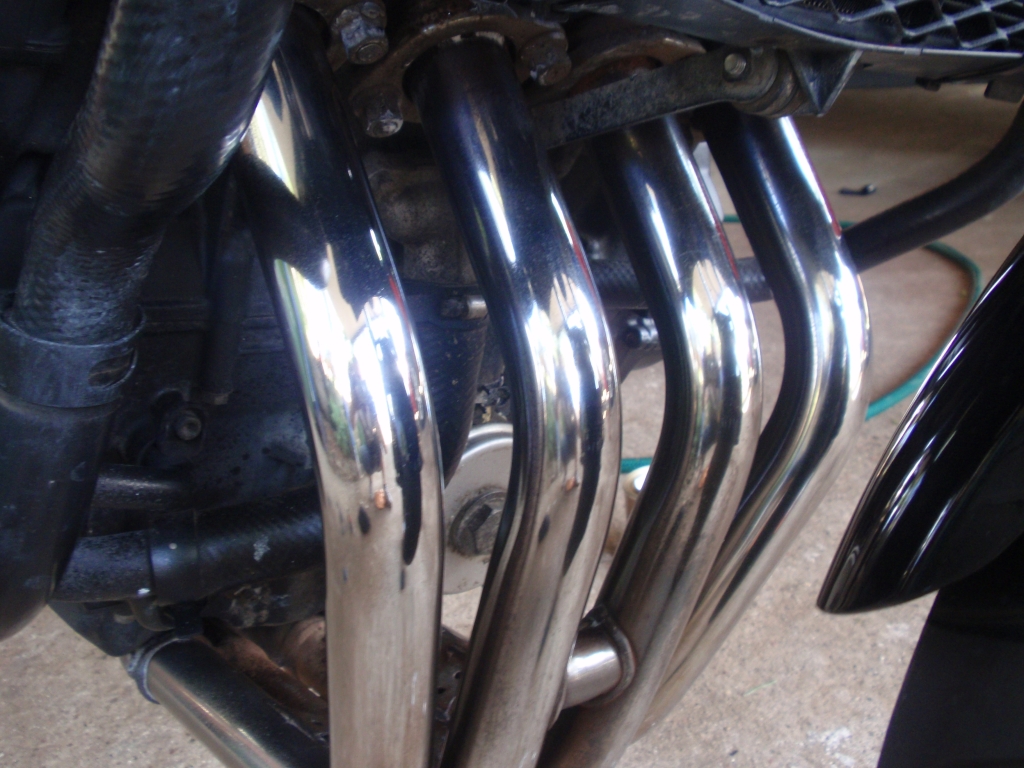
Once completed (and likely at intervals throughout the job) worship the drop bear, or have yourself a nice cold drink of your choice, and enjoy your new pipes! And don't forget to repeat again in a week when they look as bad as they did when you started :eek:

4936332225_6fd2954d95_b.jpg


Good luck!
Sweeeeeeeeeeeeeeet

Nelly
 

SteveH41

Junior Member
Joined
May 20, 2012
Messages
72
Reaction score
3
Points
0
Location
Midlands
Visit site
Got some autosol and wire wool.

Made a start then had to eat, will continue tomorrow night after work.

IMAG0544.jpg


1 pipe (nearest) partially done but looking good so far :)
 

Asta

Junior Member
Joined
May 12, 2013
Messages
17
Reaction score
0
Points
0
Location
Montenegro
Visit site
How long this glow stick after cleaning it? Friend told me its waist of time... he did this few years ago... started bike to worm up and after 10-15 min pipes turn yellow again.. He didnt even left the garage...
 

dpaul007

Junior Member
Joined
Feb 23, 2012
Messages
583
Reaction score
6
Points
18
Location
Lake Crystal, MN
Visit site
How long this glow stick after cleaning it? Friend told me its waist of time... he did this few years ago... started bike to worm up and after 10-15 min pipes turn yellow again.. He didnt even left the garage...

That's about how long they last. As soon as those pipes heat up, they start getting yellow. But at least it's a shiny yellow!


Sent from my iPhone using Tapatalk
 
Top