bd43's 07 Headlight Mod Part 1

bd43

Moderator
Staff member
Elite Member
Joined
Aug 24, 2007
Messages
889
Reaction score
79
Points
28
Location
Alberta, Canada (GMT-7)
Visit site
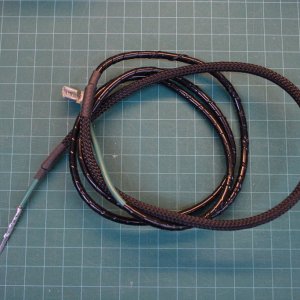
In another post, I mentioned the left handlebar switch where the high/low beam switch resides. I also talked about the connector from the left handlebar switch mating to the wiring harness on the frame side that wanders off to the lights, horn, etc.


The important note here is the low beam wire from the switch is factory wired to the connector with the mating frame connector not having a pin to go no where. This mod exploits the use of that empty pin and utilizes the factory pre-wired low beam wire from the switch. Unfortunately, part 1 of this mod is not that easy to do and I apologize for its complexity, but once you see where this mod goes, it is the most non-evasive low beam mod that does not destroy the factory wire harness. Let’s begin.

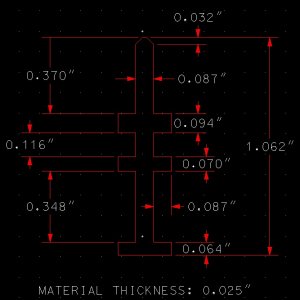
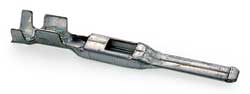
Unless you can find a source for the pin that inserts into the frame connector, then one needs to be fabricated.

Here are the dimensions for making a pin out or 0.025” brass plating that will fit into the male connector that mates to the left side switch assembly.


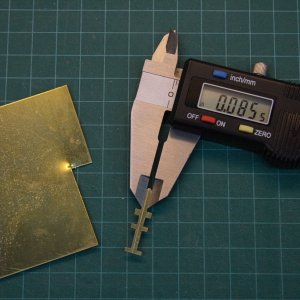
Using a metal nibbler, metal file, mini saw, Dremel grinding tool, or what have you, to fabricate this pin. This is the hardest part of the mod short of finding the pin from another source such as AMP.


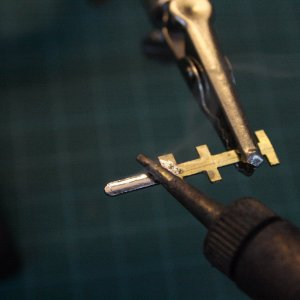
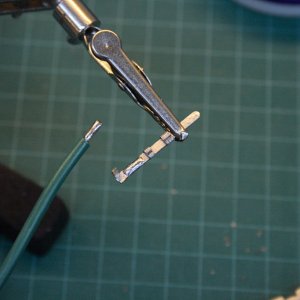
Tinning exposed surfaces is important as it prevents corrosion. Clean both sides of the brass pin with steel wool or a pencil eraser as best as possible. Coat the surface with solder flux and then tin the surface with solder. This process will not work if the surface is not CLEAN.


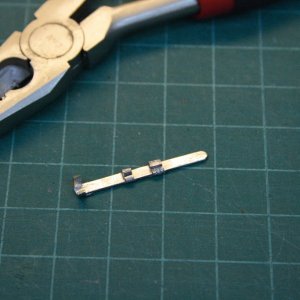
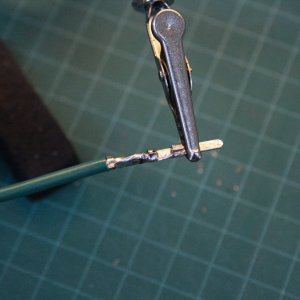
Once the pin has been tinned, bend the tabs over as shown in this photo making the bends as close to the middle as possible. These tabs are for locking the pin into the connector housing when it is inserted. The end tabs are not bent all the way because this is where the wire will rest.

 
Last edited:

bd43

Moderator
Staff member
Elite Member
Joined
Aug 24, 2007
Messages
889
Reaction score
79
Points
28
Location
Alberta, Canada (GMT-7)
Visit site
Acquire approximately 48” of green jacketed multi-stranded wire either in #18 or #16 gauge size. I butchered this #16 out of a length of extension cord. Pre-tin the wire and add a drop of solder to the pin where the wire will rest.


The soldered wire should not overhang the bent tabs, nor should there be any solder to fill the void between the bent tabs. Since the jacket diameter of #16 is large, the wire should only be stripped back far enough so that the jacket butts up to the end of the pin.


Solder a 0.320” tab size flag connecter to the other end of the green wire. This end will be attaching to the low beam filament bulb. A 0.250” flag connector can be used but will need to be modified with pliers, etc.


For added protection, the green wire assembly is wrapped with electrical tape leaving enough green at the ends to easily identify the wire.

 
Last edited:

bd43

Moderator
Staff member
Elite Member
Joined
Aug 24, 2007
Messages
889
Reaction score
79
Points
28
Location
Alberta, Canada (GMT-7)
Visit site
To complete the Green Wire Assembly, 14” of ¼” FLEXO or polyethylene terepthalate (PET) expandable sleeving is added to the pin side of the wire and 1” pieces of black heat shrink is shrunk on the ends of the FLEXO. This will minimize any abrasive action from the bike frame where the wire will exit out. This concludes the difficult part of this mod.


Here is the link to "Installing the Wire Harness" Part 2.

 
Last edited:

Moeginny

Moeginny
Joined
Feb 10, 2008
Messages
12
Reaction score
0
Points
0
Location
Brownsburg, IN
Visit site
The mod worked out excellent. Just a note, I found a package of "Ford Assorted Connectors" at AutoZone which had a couple of the pieces you fabricated. Made the job a little quicker for me for about $4.
 

chimneydoc

Junior Member
Site Supporter
Joined
Apr 30, 2008
Messages
354
Reaction score
9
Points
18
Location
Camano Is Washington
Visit site
The mod worked out excellent. Just a note, I found a package of "Ford Assorted Connectors" at AutoZone which had a couple of the pieces you fabricated. Made the job a little quicker for me for about $4.

Did you have any trouble getting to the coupling or any trouble
taking the air box off? I'm going to do this mod in a week or so. Could you please tell us how long it took ?

Thank You

I have an after thought question, was it worth all the work and would you do it all over again if you had to ?.


Doc
 
Last edited:

Se7enLC

Nerd
Joined
Jun 6, 2008
Messages
164
Reaction score
2
Points
0
Location
Arlington, MA
Visit site
The mod worked out excellent. Just a note, I found a package of "Ford Assorted Connectors" at AutoZone which had a couple of the pieces you fabricated. Made the job a little quicker for me for about $4.

I found that "Ford Terminal Assortment". It came with 10 total terminals (2 of each of 5 types). The one closest to bd43's diagram is this one:

Terminal Supply Company - Product Detail : TERMINALS & CONNECTORS -> TERMINALS -> TERMINALS - FORD -> E7EB-14421-EA
E7EB14421EA_LG.JPG


I don't have calipers with me, so I'm eyeballing with a tape measure.
Blade: Between 2.5 and 3mm wide and negligible thickness, about 12mm long to the first bend
Window Section: 4mm wide, 2mm thick, section length about 10mm
Overall: Length is 33mm.

I haven't tested to see if it will fit the connector yet, but I suspect it will make a good start - might need some modifying with a dremel, but hopefully a lot less work than cutting it out from scratch. Box cost $5.99
 
Last edited:

Daybreaker

Junior Member
Joined
Jun 24, 2008
Messages
59
Reaction score
1
Points
0
Location
North Florida
Visit site
I found the Ford terminals at Autozone. Part number is 85377. I will do this mod today. Still have to get a few parts for the mod.
Daybreaker
 

Daybreaker

Junior Member
Joined
Jun 24, 2008
Messages
59
Reaction score
1
Points
0
Location
North Florida
Visit site
Got all the parts finally. Being it was raining here today I completed the Dual head light mod. Everything went well. The hardest part was removing and replacing the air box.
Thanks for the post for this mod. It was great information.
Daybreaker
 

Se7enLC

Nerd
Joined
Jun 6, 2008
Messages
164
Reaction score
2
Points
0
Location
Arlington, MA
Visit site
I found that "Ford Terminal Assortment". It came with 10 total terminals (2 of each of 5 types). The one closest to bd43's diagram is this one:

Terminal Supply Company - Product Detail : TERMINALS & CONNECTORS -> TERMINALS -> TERMINALS - FORD -> E7EB-14421-EA
E7EB14421EA_LG.JPG


I don't have calipers with me, so I'm eyeballing with a tape measure.
Blade: Between 2.5 and 3mm wide and negligible thickness, about 12mm long to the first bend
Window Section: 4mm wide, 2mm thick, section length about 10mm
Overall: Length is 33mm.

I haven't tested to see if it will fit the connector yet, but I suspect it will make a good start - might need some modifying with a dremel, but hopefully a lot less work than cutting it out from scratch. Box cost $5.99

Turns out that this connector is not QUITE perfect. I needed to crush down the section with the window and dremel a small amount from the sides of the blade section. But overall, it was a very simple and fast job.
 

slammer111

Junior Member
Joined
Jul 9, 2008
Messages
22
Reaction score
0
Points
0
Location
Vancouver, BC, Canada
Visit site
Wow you guys are nuts, especially the OP who designed the connector using CAD! Mad props.

I just went to an auto wrecker and pulled a harness (with like 20 wires attached to that type of connector) and chopped a H4 bulb off the same car. $20, and had the whole mod done in under 2hrs.

You can actually fish out the connector (with great difficulty) w/o touching the airbox. Then disconnect the connector, find the correct hole, then stick your new wire in :)
 

Alpine

Junior Member
Joined
Jul 17, 2008
Messages
5
Reaction score
0
Points
0
Location
Virginia
Visit site
Hi Mellow,
Though I did not measure mine, I'm thinking it was arround 30"-36" If he's still making them, its just easier to get BD43 to sell you one. The length is perfect and they are nicely made. Unless of course, you dig those kinds of projects and have the time. PM BD43 and i'm sure he'd be happy to tell you.
 

Letner

Junior Member
Joined
Aug 2, 2008
Messages
3
Reaction score
0
Points
0
Location
Michigan
Visit site
I just completed this mod today. Just got my FZ a couple of months ago and thought the one headlight thing was stupid.

I would recommend this to others that are thinking about it
 

Fz6Sa

SS1000 Veteran
Elite Member
Premium Member
Joined
Nov 24, 2008
Messages
1,428
Reaction score
61
Points
0
Location
Danmark, Near Aalborg (GMT+1)
www.youtube.com
How long is the wire all together? If I read it right, the 14\" was only for the outer sleeve.

Great DIY... by the way.

"Acquire approximately 48” of green jacketed multi-stranded wire either in #18 or #16 gauge size" is what is stated on page 1 ....

So 48" or 122Cm if my calculator is acting right.
 

arcata2

Member
Joined
Oct 27, 2008
Messages
38
Reaction score
0
Points
0
Location
Davis, California, USA
Visit site
Wow you guys are nuts, especially the OP who designed the connector using CAD! Mad props.

I just went to an auto wrecker and pulled a harness (with like 20 wires attached to that type of connector) and chopped a H4 bulb off the same car. $20, and had the whole mod done in under 2hrs.

You can actually fish out the connector (with great difficulty) w/o touching the airbox. Then disconnect the connector, find the correct hole, then stick your new wire in :)
Did you do low/high on both sides? If so how did you address the light bucket with the smaller hole? Where did you actually run the wires? If you did not add the 2nd high beam, what made you opt against it?
 
Top