bd43's 07 Headlight Mod Part 2

bd43

Moderator
Staff member
Elite Member
Joined
Aug 24, 2007
Messages
889
Reaction score
79
Points
28
Location
Alberta, Canada (GMT-7)
Visit site
https://www.600riders.com/media/dp_071103_12-jpg.5413/I made a low beam wire harness in the Part 1 post related to this topic.


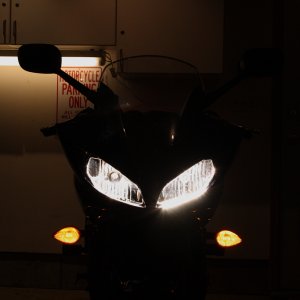
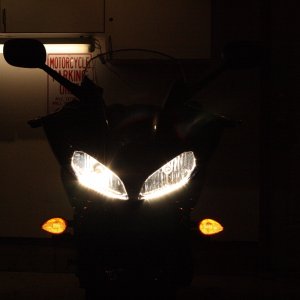
Now I’m going to install it in the bike. Up to this point I haven’t been in the garage near the bike to do the dual light mod.

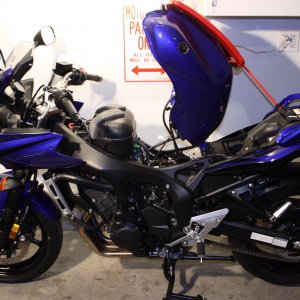
To get to the connector, it’s under the tank. Remove the seat and secure the tank. I used a bungee cord. Ensure that the wire leads to the tank aren’t being stressed otherwise disconnect them.


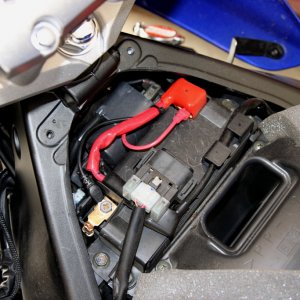
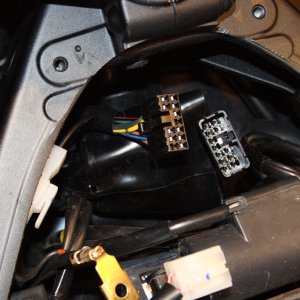
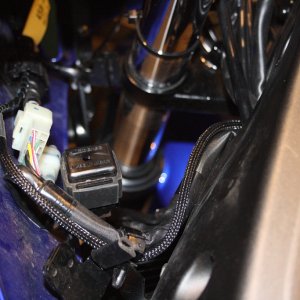
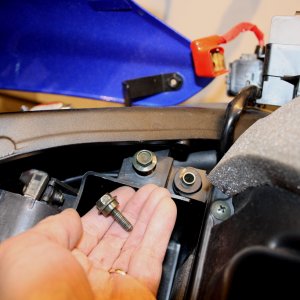
Remove the battery and the airbox. Remove the two 10mm bolts that hold the battery box in place and slide the box rearward. The connector is hidden in a rubber boot just inside the frame.


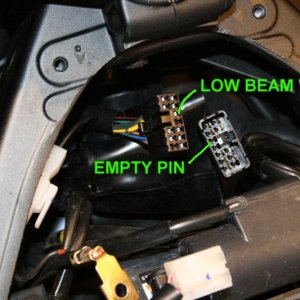
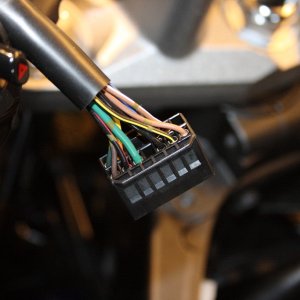
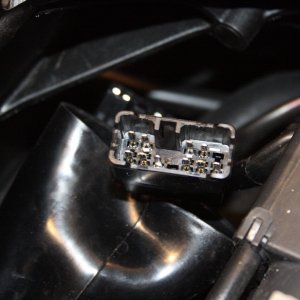
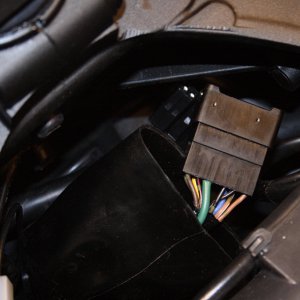
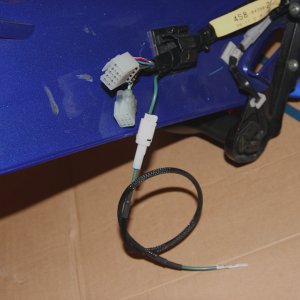
Unclip the connector halves apart. The bottom female connector in this picture goes to the left handlebar switch while the upper male connector runs off to various circuits on the frame as controlled by the switch.


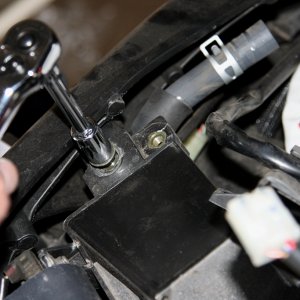
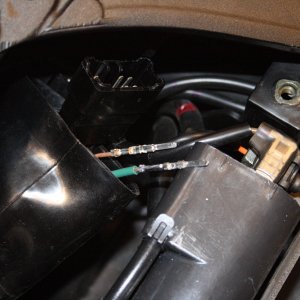
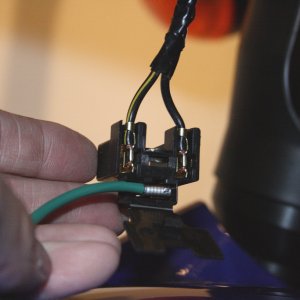
Feed the pin side of the wire harness, made in Part 1, through the frame, into the boot. This picture shows the fabricated pin to a factory stock one. It’s an exacting match.

 
Last edited:

bd43

Moderator
Staff member
Elite Member
Joined
Aug 24, 2007
Messages
889
Reaction score
79
Points
28
Location
Alberta, Canada (GMT-7)
Visit site
Note the position of the green low beam wire from the left handlebar switch connector. It is 3rd left on the bottom row of wires in this picture. Determine the location of this position on the male frame side connector. It should be an empty location. Note this because that is where the fabricated pin will be inserted.


Insert the fabricated pin into the empty slot in the frame male connector. Observe how the other pins have been inserted in this row and ensure the fabricated one is inserted the same way. This ensures that the pin locks into place. Check to ensure that it holds and not pull out easily.


Here is another pic of the pin inserted. It’s located 3rd from the left on the bottom row. Connect the two halves of the connector back together.


Route the wire harness to the right headlight assembly anyway you like through the inside of the fairing. I chose to pass through existing fasteners. Note the purpose of the FLEXO? Probably not needed but makes it look professional.

 
Last edited:

bd43

Moderator
Staff member
Elite Member
Joined
Aug 24, 2007
Messages
889
Reaction score
79
Points
28
Location
Alberta, Canada (GMT-7)
Visit site
As the same in the other headlight mods, pull the connector off the rear side of the right headlight assembly. Flip open the rear cover and insert the flag connector into the empty spot. Close the cover, fold the wire around to align with the other wires and wrap with electrical tape up as far as you can go. Plug back into headlight assembly.


Start putting everything back together. Put the connector halves back in the boot, tuck inside the frame, move the battery box back into position, and install air box on top. Note the special bolt used to hold down the battery box.


The test. Picture shows switch on low beam, the right side headlight (picture left) is illuminating low beam filament.


The switch is now flipped to high beam. The right side headlight (picture left) high beam filament is illuminated while the low beam filament is now off or non-illuminated.


That concludes the mod. Once the wire harness was made, not a lot of time was spent on the bike itself. Hopefully this is of use to someone.

Update: To date, this mod has been installed in all bikes around the world from years 2004 to 2009 inclusive. That's a question I get asked a lot, "does it fit in a 20XX bike?", and the answer is "yes". Happy riding and ride safe.

For those so inclined to do so, you can cut the harness at the location of the facotry connector within the faring and add a water-proof connector so that removing the faring is much easier without having to remove the harness from either end.

 
Last edited:

bd43

Moderator
Staff member
Elite Member
Joined
Aug 24, 2007
Messages
889
Reaction score
79
Points
28
Location
Alberta, Canada (GMT-7)
Visit site
Thanks guys, much appreciated. It takes a little time to document these mods as opposed to just hammering through it and not say anything, but I think the information is valuable. I just wanted to give back and contribute to this forum for all the stuff I gleamed off others and their words of wisdom. :rockon:
 
B

Bo67

Great info! I think I'll do this mod when we have a snowy day out here which might be next weekend according to the weatherman.
 

midnightfz6

Junior Member
Joined
Oct 1, 2007
Messages
34
Reaction score
0
Points
0
Location
London
Visit site
that's by far the nicest dual headlight mod out there. I've resisted doing the mod as I wasn't interested in destroying any part of the harness.
Fancy making any more of the green wire assemblies? I'd certainly pay. Can't find the flag connectors anywhere here in the UK, and your fabricated pin is very tidy!
 

gamestone

Junior Member
Joined
Oct 11, 2007
Messages
23
Reaction score
2
Points
0
Location
Erith, Kent, UK
www.gamestone.co.uk

Scorphonic

No Man is an Ireland.
Joined
Jul 25, 2007
Messages
732
Reaction score
9
Points
0
Location
Republic Of Ireland
Visit site
This is the best mod i have seen for this bike! :) I'm so glad you put this up...I was going to use the other method that was out there but now...that just seems like butchery compared to this professional approach! :)

Thanks a million! :)
 

bd43

Moderator
Staff member
Elite Member
Joined
Aug 24, 2007
Messages
889
Reaction score
79
Points
28
Location
Alberta, Canada (GMT-7)
Visit site
Okay.....,

I will try to make some, possibly 10 harnesses this go around. Since I did this harness for a North American 2007 Yamaha bike, I’m pretty sure that the left switch connector will be the same for all NA bikes in this year. I have no experience in the 2006, or 2005’s, or even the UK version of this bike.

I would ask that you check your connectors to see if it matches the pictures that I posted of mine before you decide to buy one from me as I cannot guarantee that yours is the same. Look for the green wire and ensure that the other side of the connector does not contain a pin in it.


Having said that, PM me if you want one and I’ll try and work something out.

Daryl.
 
Last edited:

codeblue

winter soldier
Elite Member
Joined
Oct 16, 2007
Messages
1,209
Reaction score
19
Points
38
Location
Edison, NJ
Visit site
real nice work there, i definitely would be interested in buying one of those harness from you. count me in and let me know what the cost will be (production and shipping). thanks
 

midnightfz6

Junior Member
Joined
Oct 1, 2007
Messages
34
Reaction score
0
Points
0
Location
London
Visit site
Absoulutely, count me in. Work out how much money you want for it, or if there's anything I can ship for you from here in the UK in return.
 

OneTrack

Super Member
Joined
Jul 8, 2007
Messages
1,172
Reaction score
5
Points
0
Location
Richmond, BC, Canada
Visit site
I installed biker_dude43's headlight mod harness today on my 06 FZ6. I had no issues whatsoever, as the 07 wiring appears to be identical to my 06. The instructions provided by bd43 are terrific, so I was able to do the job in about an hour.
Voila! Two lights on low beam. :D

Pics added (ain't she got purdy eyes...? :D )

Low Beam:-

FZ6lobeam.jpg


High Beam:-

FZ6hibeam.jpg
 
Last edited:
Top