Indicator switch disassembly?

bricksrheavy

Site Supporter
Joined
Jul 11, 2016
Messages
198
Reaction score
17
Points
18
Location
Croatia
Visit site
Hello,

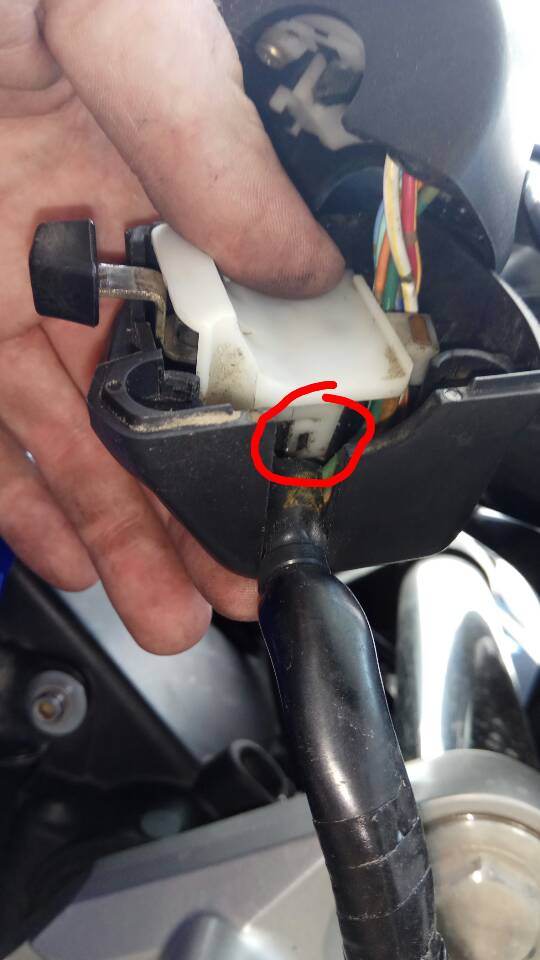
Has anybody any experience with disassembling the indicator switch?

- I need to clean the mechanism but can't get it out, the only thing I see is the little tab (marked in the pic) but when I pry it it seems like something else is holding it in place but can't for the life of me figure out what.

Any help is greatly appreciated [emoji106]
9edbc4be481d9027434ae2adbc69f236.jpg
 

TownsendsFJR1300

2007 FZ6
Site Supporter
Joined
Feb 7, 2009
Messages
12,531
Reaction score
1,176
Points
113
Location
Cape Coral, Florida, USA
Visit site
I haven't had it apart, but it appears to have a zip tie at the wire right BEFORE it goes into the housing.
I'd snip that (may be a tab it's zip tied to too).

Any AND all small screws visible, make sure their all removed.

That white little tab you have circled, generally, you have to push the center (cut out/tab) to release it.
I would try to get the load off it, push the large part down initially, push the tab in, and see if it releases..

I gather you believe there's a bad connection inside the switch, or it's sticking?
 

bricksrheavy

Site Supporter
Joined
Jul 11, 2016
Messages
198
Reaction score
17
Points
18
Location
Croatia
Visit site
Thanks for the reply [emoji106]

- yeah, it's sticking, tried both with contact spray (cleans&dries out leaving almost no residue) and silicone lube spray and it works fine for a while but then starts sticking again.

Gonna give it another try tomorrow, if I succeed I'll post photos to help the next guy down the line.
 

TownsendsFJR1300

2007 FZ6
Site Supporter
Joined
Feb 7, 2009
Messages
12,531
Reaction score
1,176
Points
113
Location
Cape Coral, Florida, USA
Visit site
If your able to get spray inside there, silicone isn't the best lubricant.

Try something like Liquid Wrench, CRC penetrating oil (a spray), etc.

I'd hang that switch off the handle bar, cover the bike and SOAK / SPRAY the heck out of it.
You want it downwards to flush out any crap, debris, etc..

Brake cleaner would also work to flush out crap, but I'd finish with just a shot of spray lubricant..
 

SirLanceralot

New Member
Joined
Jun 19, 2017
Messages
26
Reaction score
1
Points
0
Location
UT
Visit site
I had to clean mine a month or two ago as well, right turn signal wouldn't work due to gunk in there. I wish I could remember what was holding it on, but I ran into the same issue as well, held me up for a bit trying to figure it out. I cant say for 100% certainty, but I think there was a screw hidden holding it on.
 

bricksrheavy

Site Supporter
Joined
Jul 11, 2016
Messages
198
Reaction score
17
Points
18
Location
Croatia
Visit site
*To be read in the worst infomercial voice you can imagine;

Is your indicator indicating it has problems? Ladies, do you keep breaking fingernails on that stiff indicator lever? - This guide is for YOU!


1. There are 2 screws on the bottom of the left hand switch assembly, take them out and move the switch assembly away from the handlebar (they are different in length so make a note of it).
01.jpg

2. Remove the first screw holding the indicator switch mechanism, and unclip the ziptie holding the cables going in the switch assembly.
02.jpg

3. The second screw is "hiding", rotate the upper half of the switch assembly 'till you spot it then unscrew.
03.jpg

4. Now you will be able to move the indicator switch mechanism, you need to do so in order to get to the screw that's holding the horn switch. Once you unscrew that one the horn switch can come out, it's a bit fiddly so be patient and don't yank on the wires
04.jpg

5. The switches are now free of the lower switch casing, gently pry the two dabs holding the contacts so you can remove the switch mechanism
05.jpg

6. It's out!
06.jpg

7. The part marked #1 simply comes out by hand, the screw #2 is holding things together so remove it - now you can take apart everything but the lever itself.
07.jpg

8. Look "down" the lever, there's a small ball bearing that's being pushed against it by a spring (I HATE springs)
08.jpg

9. Look now on the opposite side of that spring, there's a small brass tab holding it in. Gently slide the brass tab out making sure the spring doesn't pop out 'cause God help your poor soul if it does, you'll never EVER find it :D
09.jpg

10. These are all the parts taken out & cleaned, if you're missing something it's time to start crying. :D
10.jpg
 
Last edited:

bricksrheavy

Site Supporter
Joined
Jul 11, 2016
Messages
198
Reaction score
17
Points
18
Location
Croatia
Visit site
11. This is the switch mechanism before cleaning, it doesn't look that dirty to be causing problems, does it?
11.jpg


Thanks to [MENTION=6338]TownsendsFJR1300[/MENTION] and [MENTION=28562]SirLanceralot[/MENTION] for their suggestions, they helped a lot :thumbup:
 

SirLanceralot

New Member
Joined
Jun 19, 2017
Messages
26
Reaction score
1
Points
0
Location
UT
Visit site
Nice write-up (and great pictures to aid)! This would've saved me a bit of time when I had to clean mine!

I also cleaned my killswitch on the right side of the bars when I cleaned my turn switch. The killswitch cleaning process is very similar, with a few smaller parts, and more of a pain in the ass, felt like I was going to break the clip putting it back together, but in the end it just needed more force to "pop" back in. :rolleyes:
 

TownsendsFJR1300

2007 FZ6
Site Supporter
Joined
Feb 7, 2009
Messages
12,531
Reaction score
1,176
Points
113
Location
Cape Coral, Florida, USA
Visit site
11. This is the switch mechanism before cleaning, it doesn't look that dirty to be causing problems, does it?
View attachment 68489


Thanks to @TownsendsFJR1300 and @SirLanceralot for their suggestions, they helped a lot :thumbup:

I suspect the plastic on plastic, not the electrical contacts are what's hanging up, being stiff..

If you get just a dab of grease (if still apart), onto the moving parts would help alot. A touch of grease on the contacts, and all moving parts
wouldn't hurt either...

Great write up by the way.

Attn moderator.. As this has been an issue for others, (and took a bit of time for Bricksrheavy to make a great tutorial),
I'd suggest making it a sticky for others later if needed...
 

TownsendsFJR1300

2007 FZ6
Site Supporter
Joined
Feb 7, 2009
Messages
12,531
Reaction score
1,176
Points
113
Location
Cape Coral, Florida, USA
Visit site
Last edited:

bricksrheavy

Site Supporter
Joined
Jul 11, 2016
Messages
198
Reaction score
17
Points
18
Location
Croatia
Visit site
+1 on the Contact Cleaner - it does a good job with the cleaning and evaporates completely leaving no residue for new dirt to stick to.
 
Top